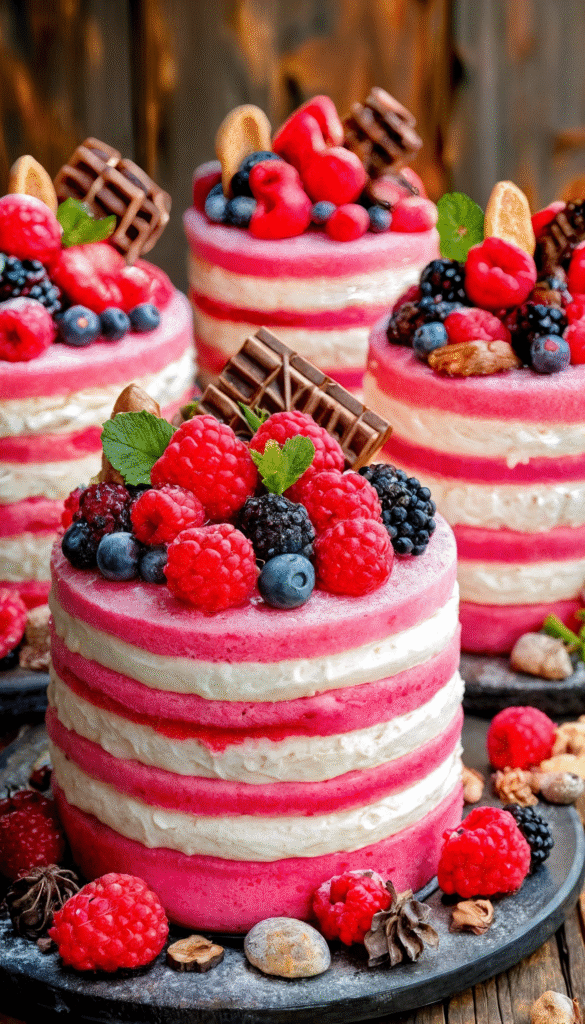
When the sun is high and berries are at their juiciest, there’s no better way to celebrate the season than with Summer Berry Layered Mini Cakes. These dainty, three-layered confections are the perfect union of vibrant pink sponge, silky whipped cream, and a crown of fresh, colorful berries. Whether you’re hosting a summer brunch, planning a baby shower, or just want to elevate your dessert game, this recipe is a showstopper — both in flavor and presentation.
Why You’ll Love These Mini Cakes
These cakes are for the home baker who wants to create something beautiful and festive without spending hours on intricate decorating. The recipe delivers an impressive aesthetic with simple techniques, making it perfect for beginner to intermediate bakers. They’re light yet indulgent, sweet but not overpowering, and packed with fresh fruit flavor in every bite.
Who is this recipe for?
- Entertainers looking for a crowd-pleasing dessert
- Berry lovers and fruit-forward dessert fans
- Parents and grandparents baking with kids
- Home bakers craving a fresh twist on classic layered cakes
This recipe is ideal for birthdays, picnics, afternoon tea, or just because you deserve a treat.

Ingredients You’ll Need
For the Pink Sponge Cake (Makes 3 mini cakes)
- 1½ cups all-purpose flour
- 1½ tsp baking powder
- ½ tsp baking soda
- ¼ tsp salt
- 3 large eggs (room temp)
- ¾ cup sugar
- ½ cup vegetable oil
- ½ cup buttermilk
- 1 tsp vanilla extract
- Pink food coloring (gel or liquid)
For the Cream Filling
- 2 cups heavy whipping cream (cold)
- ¼ cup powdered sugar
- 1 tsp vanilla extract
For Garnish
- Fresh raspberries, blackberries, blueberries, strawberries
- Fresh mint leaves
- Mini cookies or biscuits
- Chocolate squares or curls
- Optional: powdered sugar for dusting
Kitchen Equipment Needed
To pull off this beautiful dessert, make sure you have the following tools on hand:
- Electric mixer or stand mixer
- Mixing bowls
- Sheet pan or mini cake molds
- Parchment paper
- 3–4 inch round cookie or biscuit cutter
- Piping bag with a round or star tip
- Spatula
- Wire rack for cooling
- Fine mesh sieve (for optional powdered sugar dusting)
Step-by-Step Instructions
1. Bake the Pink Sponge Cake
Preheat your oven to 350°F (175°C). Grease and line a large sheet pan or use individual mini cake molds if preferred.
In a mixing bowl, whisk together the eggs and sugar until pale and fluffy. Add the vegetable oil, buttermilk, vanilla extract, and a few drops of pink food coloring. Mix until well combined.
In a separate bowl, whisk together the flour, baking powder, baking soda, and salt. Gradually add the dry ingredients to the wet mixture, mixing until smooth but not overworked.
Pour the batter evenly into your prepared pan and bake for 20–25 minutes or until a toothpick inserted in the center comes out clean. Allow the cake to cool completely on a wire rack before cutting.
Once cooled, use your round cutter to create uniform cake discs—each mini cake will need three layers.
2. Prepare the Cream Filling
In a cold mixing bowl, beat the heavy whipping cream with powdered sugar and vanilla extract until stiff peaks form. This cream is light, fluffy, and perfectly sweetened to complement the berries and sponge.
Tip: Chill your bowl and beaters in the freezer for 10 minutes before whipping for the best volume.
3. Assemble the Mini Cakes
Start with a sponge circle, add a generous swirl of whipped cream using your piping bag, then repeat twice more to create a lovely three-layer structure.
Keep your layers straight and aligned for the best visual effect. The piped cream provides structure and a polished look.
4. Garnish Like a Pro
Top each mini cake with an artful arrangement of fresh berries, a few sprigs of mint, a chocolate square or two, and a mini cookie or biscuit. For an extra touch of elegance, dust lightly with powdered sugar.
Your guests will think you hired a pastry chef — and they’ll be asking for the recipe!
Tips and Variations
Swap the Fruit:
Use sliced peaches, kiwi, or even mango for a tropical version.
Make It Vegan:
Use a dairy-free whipped topping and a plant-based buttermilk (mix ½ cup plant milk + ½ tbsp lemon juice). Swap eggs with 3 tbsp of aquafaba or ¾ cup applesauce.
Add Flavor Layers:
Brush the sponge layers with berry syrup or liqueur (like Chambord) for extra flavor.
No Round Cutter?
Use a glass or jar with a sharp rim — just be gentle when cutting through the sponge.
Color Variations:
Create a rainbow set with different food colorings: think lavender, sky blue, or pale yellow for other themes.
Storing Leftovers
If you somehow have leftovers (doubtful!), here’s how to store them:
- Refrigerator: Store in an airtight container for up to 3 days.
- Freezer: Freeze unassembled cake discs and whipped cream separately. When ready, defrost and assemble fresh.
- Tip: Do not freeze already assembled cakes with fresh berries—they will become mushy upon thawing.
Food & Drink Pairings
Beverages:
Pair with sparkling rosé, lavender lemonade, or a fruity iced tea.
Side Treats:
Serve alongside macarons, lemon bars, or mini pavlovas for a stunning dessert buffet.
For a Full Brunch:
These mini cakes go beautifully after a spread of quiche, fresh salad, and mimosas.
Frequently Asked Questions (FAQ)
Q: Can I make these ahead of time?
A: Yes! You can bake the sponge and whip the cream a day ahead. Store components separately and assemble before serving for the freshest taste.
Q: What if I don’t have buttermilk?
A: No problem—just mix ½ cup of milk with ½ tablespoon of vinegar or lemon juice. Let sit for 5–10 minutes before using.
Q: Can I make one large cake instead of minis?
A: Absolutely. Use the same batter for an 8-inch round cake. Slice horizontally to create layers, fill with cream, and garnish as instructed.
Q: How do I get that perfect whipped cream texture?
A: Cold ingredients and equipment are key. Don’t overwhip or it’ll turn grainy. Stop as soon as stiff peaks form.
Q: Are these gluten-free?
A: The original recipe uses all-purpose flour. For a gluten-free version, substitute with a 1:1 gluten-free baking flour blend.
Final Thoughts
These Summer Berry Layered Mini Cakes are as delicious as they are stunning. Whether you’re celebrating a special event or just want to brighten up a sunny afternoon, this recipe is a guaranteed crowd-pleaser. With airy pink sponge, cloud-like cream, and a crown of fresh summer berries, they bring joy in every bite.
If you loved this recipe, don’t keep it to yourself — share it with your fellow food lovers and subscribe to the blog for more gorgeous seasonal bakes, pro baking tips, and creative dessert ideas straight to your inbox.
Happy baking! 🍓🧁