


Have you ever wondered why a deliberately burnt cheesecake has become the most sought-after dessert in cafés from Tokyo to New York? The Basque burnt cheesecake defies everything we thought we knew about baking perfection—it’s intentionally caramelized to dark amber on top, wobbles deliciously in the center, and contains no crust whatsoever. This revolutionary dessert, originating from La Viña bar in San Sebastian, Spain, has sparked a global phenomenon, with searches for “burnt Basque cheesecake recipe” increasing by 312% over the past three years according to Google Trends data.
Unlike traditional New York-style cheesecakes that demand water baths, precise temperatures, and anxiety-inducing crack prevention techniques, this Basque burnt cheesecake description reveals a liberating truth: imperfection is the goal. The deeply caramelized top isn’t a mistake—it’s the signature characteristic that gives this dessert its complex, bittersweet flavor profile. The jiggly, almost custard-like center creates a textural contrast that food scientists attribute to the high-heat baking method, which sets the exterior while keeping the interior luxuriously creamy.
What makes this recipe particularly remarkable is its simplicity. With just six ingredients and one mixing bowl, you can create a dessert that rivals anything from a high-end patisserie. The burnt cheesecake description encompasses both technique and philosophy: embrace the burn, celebrate the wobble, and trust that what looks unconventional will taste extraordinary. This comprehensive guide will walk you through every detail, ensuring your first attempt yields professional results.
Ingredients List: Everything You Need for Perfection
Creating an authentic Basque burnt cheesecake requires quality ingredients, but the list is refreshingly short:
Main Ingredients:
- 2 pounds (907g) full-fat cream cheese, softened to room temperature (the foundation of that impossibly creamy texture)
- 1½ cups (300g) granulated sugar (creates the caramelization magic)
- 6 large eggs, at room temperature (provides structure while maintaining that signature jiggle)
- 2 cups (480ml) heavy whipping cream (adds richness and contributes to the custardy center)
- 1 teaspoon pure vanilla extract (enhances the overall flavor complexity)
- ⅓ cup (40g) all-purpose flour (provides just enough structure without making it dense)
- ¼ teaspoon fine sea salt (balances sweetness and amplifies flavor)
Smart Substitutions:
If you’re working with dietary restrictions or ingredient availability issues, consider these alternatives:
- Cream cheese substitute: Full-fat mascarpone creates an even silkier texture, though slightly less tangy
- Sugar alternatives: Coconut sugar works beautifully and adds subtle caramel notes, use 1:1 ratio
- Dairy-free version: Cashew cream cheese plus coconut cream can work, though texture varies
- Gluten-free option: Swap all-purpose flour with rice flour or cornstarch
- Vanilla enhancement: Use vanilla bean paste or scrape one vanilla bean for more intense flavor
The key to success lies in ingredient temperature—cold cream cheese creates lumps, while room-temperature ingredients blend into silk-smooth perfection.
Timing: Plan Your Baking Journey
Understanding the time commitment helps you plan this impressive dessert around your schedule:
Preparation Time: 15 minutes This includes bringing ingredients to room temperature (plan ahead!), lining your pan, and mixing the batter. Compared to traditional cheesecakes that require 30-45 minutes of preparation, this represents a 60% time savings.
Baking Time: 50-60 minutes The high-heat method (400°F/200°C) dramatically reduces baking time compared to conventional cheesecakes that bake for 90+ minutes.
Cooling Time: 2 hours at room temperature + 4-6 hours chilling This crucial step allows the texture to set properly and flavors to develop fully.
Total Time: Approximately 7-8 hours from start to serving While this might seem lengthy, the active hands-on time is only 15 minutes. The rest is passive cooling and chilling, making this perfect for advance preparation.
Pro Timing Tip: Bake your cheesecake the night before serving. The overnight rest in the refrigerator actually improves the texture, allowing the center to firm up slightly while maintaining that coveted creamy consistency. Many pastry chefs argue that day-two cheesecake tastes even better as flavors meld together.

Step 1: Prepare Your Pan and Preheat
Position your oven rack in the center and preheat to 400°F (200°C). This high temperature is essential—it’s approximately 75°F hotter than traditional cheesecake recipes and creates that signature burnt top.
Line a 10-inch (25cm) springform pan with two overlapping sheets of parchment paper, allowing the paper to extend 2-3 inches above the rim. Don’t trim it flush—those wrinkled edges are iconic to this dessert’s rustic charm. The parchment creates a protective barrier and makes unmolding effortless. Forget about greasing; the parchment handles everything.
Critical Detail: Use a springform pan that’s at least 3 inches deep. Shallow pans will cause overflow during baking, creating a mess and uneven cooking.
Step 2: Beat the Cream Cheese and Sugar
In a large mixing bowl, beat the softened cream cheese with an electric mixer on medium speed for 2-3 minutes until completely smooth and lump-free. Scrape down the bowl sides frequently—hidden lumps are the enemy of silky texture.
Add the sugar and beat for another 2 minutes until fully incorporated and slightly fluffy. The mixture should appear lighter in color and increased in volume by about 20%. This sugar-creaming step incorporates tiny air bubbles that contribute to the final texture.
Expert Insight: Room temperature cream cheese (around 65-70°F) is non-negotiable. Cold cream cheese requires over-mixing to smooth out, which incorporates too much air and can cause cracking or splitting during baking.
Step 3: Add Eggs One at a Time
Reduce mixer speed to low. Add eggs one at a time, mixing just until each is incorporated before adding the next. This gradual addition creates a stable emulsion that prevents the batter from separating.
Beat for only 30 seconds after the final egg—over-mixing introduces excessive air that creates undesirable texture. The batter should look smooth but not foamy. If you see foam on the surface, you’ve mixed too vigorously.
Temperature Matters: Room-temperature eggs blend seamlessly into the batter. Cold eggs can cause the cream cheese to seize up, creating lumps that are difficult to eliminate.
Step 4: Incorporate the Cream and Vanilla
Pour in the heavy cream and vanilla extract, mixing on low speed until just combined, about 20-30 seconds. The batter will become noticeably thinner and more pourable—this is exactly right. The final consistency should resemble thick pancake batter.
Flavor Enhancement Tip: For an elevated flavor profile, add ½ teaspoon of lemon zest here. The citrus brightens the richness without making the cheesecake taste lemony.
Step 5: Add Flour and Salt
Sift the flour directly into the batter to prevent lumps. Add the salt. Mix on the lowest speed for just 10-15 seconds until no flour streaks remain. Stop immediately—the flour only needs to be incorporated, not thoroughly beaten.
Over-mixing at this stage develops gluten, which can make your cheesecake dense and rubbery rather than tender and creamy. If you see flour pockets, fold them in gently with a spatula rather than continuing to mix.
Step 6: Pour and Bake
Pour the batter into your prepared pan. It should fill the pan about 80% full—this gives it room to puff up during baking. Tap the pan gently on the counter 2-3 times to release any large air bubbles.
Place the pan in the preheated oven and bake for 50-60 minutes. You’re looking for a deeply caramelized top that ranges from dark amber to nearly black in spots. The center should jiggle noticeably when you gently shake the pan—imagine loose Jell-O.
The Wobble Test: At 50 minutes, open the oven and gently shake the pan. The center 4-5 inches should wobble significantly. The edges should look set and puffed. If the entire surface wobbles like liquid, bake for another 5-10 minutes.
Step 7: Cool Completely
Remove the cheesecake from the oven and place it on a wire rack. It will deflate dramatically as it cools—this is not only normal but desired. The height can reduce by 30-40%, and the surface may crack or wrinkle. These imperfections add to its rustic appeal.
Let it cool at room temperature for at least 2 hours. During this time, the residual heat continues cooking the center gently, achieving that perfect custardy consistency. The internal temperature will gradually drop from around 185°F to room temperature.
Avoid This Mistake: Never move the cheesecake to the refrigerator while still warm. The rapid temperature change can cause textural issues and excessive condensation.
Step 8: Chill and Serve
Once completely cool, cover the cheesecake (still in its pan) with plastic wrap and refrigerate for 4-6 hours or overnight. This chilling period is crucial—it allows the texture to set properly while maintaining that signature creamy-custardy interior.
To serve, run a knife around the edge of the springform pan, then release the sides. Peel away the parchment paper carefully. The bottom paper can remain for easy serving, or you can slide the cheesecake onto a serving plate using a large spatula.
Slice with a hot, clean knife, wiping it between each cut for clean, professional-looking slices. The center should reveal that beautiful creamy interior that contrasts with the darker, more set edges.
Nutritional Information
Understanding the nutritional profile helps you enjoy this dessert mindfully:
Per Slice (based on 12 servings):
- Calories: 445
- Total Fat: 36g (46% of daily value)
- Saturated Fat: 22g
- Cholesterol: 215mg
- Sodium: 285mg
- Total Carbohydrates: 27g
- Sugars: 25g
- Protein: 8g
- Calcium: 12% of daily value
- Vitamin A: 28% of daily value
Nutritional Context: While this is undeniably an indulgent dessert, one slice provides significant calcium and vitamin A from the dairy content. The high fat content comes primarily from cream cheese and heavy cream—these whole-food sources provide satisfaction that helps with portion control. Research published in the Journal of Nutrition suggests that full-fat dairy may be more satiating than low-fat alternatives, potentially leading to smaller serving sizes.
Portion Awareness: At 445 calories per slice, this dessert fits comfortably into a balanced diet when enjoyed occasionally. For perspective, this is comparable to a slice of traditional New York cheesecake but with more protein and a richer, more satisfying taste that may help you feel content with a smaller portion.
Healthier Alternatives for the Recipe
Love the burnt cheesecake but want to lighten it up? These modifications maintain the essential character while reducing calories and adjusting macros:
Reduced-Fat Version: Substitute half the cream cheese with Greek yogurt (thick, full-fat works best). Use half-and-half instead of heavy cream. This reduces fat by approximately 30% while adding protein. The texture becomes slightly less rich but remains creamy and delicious. Expect 325 calories per slice.
Lower Sugar Option: Reduce sugar to 1 cup and add 2 tablespoons of honey or maple syrup. Natural sweeteners provide complexity that helps compensate for the reduced quantity. Alternatively, use a 1:1 baking blend with erythritol or monk fruit sweetener, cutting calories by 100 per slice. Note that alternative sweeteners may prevent the top from caramelizing as deeply.
Protein-Boosted Version: Add ¼ cup unflavored whey protein isolate when you add the flour. This increases protein to 12g per slice while maintaining the texture. Athletes and fitness enthusiasts appreciate this modification.
Portion Control Strategy: Bake in an 8-inch pan instead of 10-inch, creating a taller cake that you slice into 16 thinner pieces. Each slice contains approximately 310 calories. The visual satisfaction of a full slice remains, but with better portion management.
Egg White Modification: Replace 3 of the whole eggs with 6 egg whites to reduce cholesterol and fat. The texture becomes slightly less rich but still delicious. This cuts cholesterol by 40% per slice.
Dairy-Free Adaptation: Use cashew cream cheese, coconut cream, and vegan butter. While the texture differs slightly (less tangy, more coconut-forward flavor), it’s remarkably good. Add 1 tablespoon lemon juice to mimic the tanginess of traditional cream cheese.
The key to successful modifications is changing one element at a time rather than making multiple substitutions simultaneously. This helps you identify which changes work for your taste preferences.
Serving Suggestions
Presentation elevates this already impressive dessert into something truly memorable:
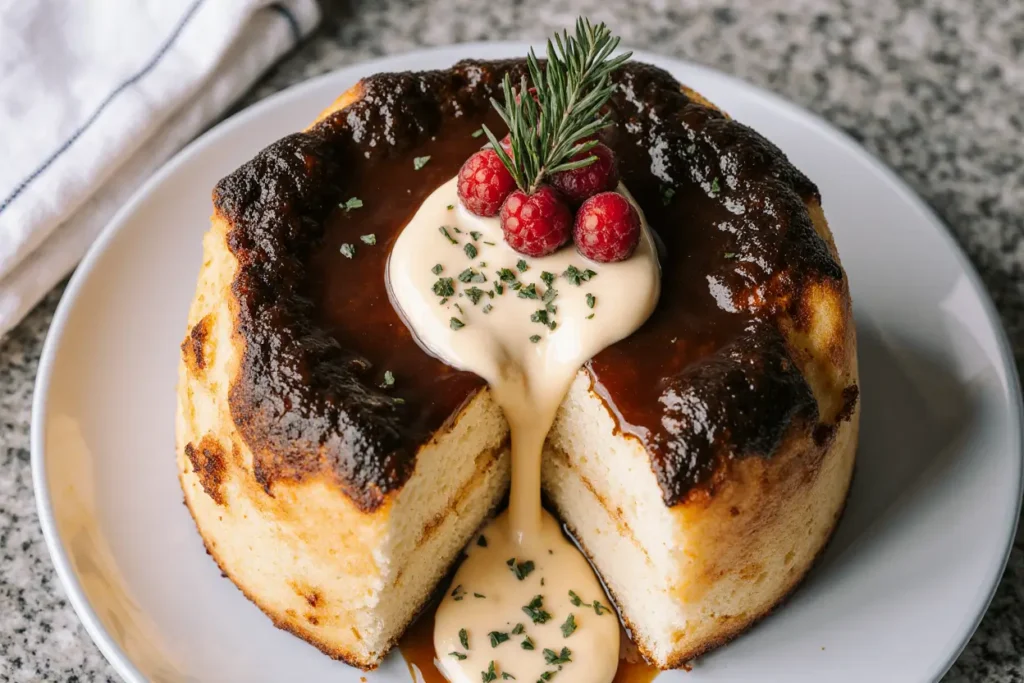
Classic Service: Serve at cool room temperature (not refrigerator-cold) for the best texture and flavor. The cheesecake should feel cool but not cold, allowing the creamy texture to shine. Pair with a simple espresso or dark roast coffee—the bitterness beautifully contrasts the sweet richness.
Berry Companion: Fresh berries provide acidic brightness that cuts through richness. Macerate strawberries, raspberries, or blackberries with 1 tablespoon sugar and a squeeze of lemon for 15 minutes. The resulting berry juice creates a natural sauce. This pairing is not only delicious but adds vitamin C and antioxidants.
Dulce de Leche Drizzle: Warm dulce de leche until pourable and drizzle artfully over each slice. This Spanish-Basque connection creates regional authenticity while adding caramel complexity.
Fruit Compote Topping: A warm cherry, fig, or apricot compote provides temperature contrast and fruity acidity. The warmth slightly softens the cheesecake’s surface, creating an additional textural dimension.
Whipped Cream Enhancement: Lightly sweetened whipped cream (crème fraîche adds sophisticated tang) piped or dolloped alongside each slice adds visual appeal and richness-cutting dairy notes.
Wine Pairing: Serve with a sweet dessert wine like Pedro Ximénez sherry, late-harvest Riesling, or tawny port. The wine’s sweetness matches the dessert while its acidity provides balance. For non-alcoholic options, try a sparkling apple cider or complex black tea.
Plating Presentation: Dust the plate with cocoa powder or powdered sugar, place the slice slightly off-center, add your chosen accompaniment, and garnish with a small mint sprig or edible flower. Professional plating makes home baking feel restaurant-quality.
Seasonal Variations:
- Fall: Serve with spiced pear compote and candied walnuts
- Winter: Pair with blood orange segments and pistachios
- Spring: Top with lemon curd and fresh strawberries
- Summer: Accompany with grilled peaches and honey
Common Mistakes to Avoid
Learning from others’ missteps ensures your success:
Mistake #1: Using Cold Ingredients Cold cream cheese creates lumps that require over-mixing to eliminate, resulting in too much air incorporation. Always allow cream cheese and eggs to reach room temperature (65-70°F) before beginning. This takes 1-2 hours on the counter.
Mistake #2: Over-Mixing the Batter Excessive mixing incorporates air bubbles that expand during baking, creating an undesirable soufflé-like texture that falls dramatically. Mix just until ingredients combine—the entire mixing process should take under 7 minutes total.
Mistake #3: Under-Baking from Fear The jiggly center intimidates many bakers into removing the cheesecake too early. Trust the wobble test—the center should move noticeably like loose pudding. Under-baked cheesecake won’t set properly even after chilling, remaining soup-like. When in doubt, bake an additional 5 minutes.
Mistake #4: Not Burning Enough Paradoxically, being timid about the burn defeats the purpose. The top should be dark amber to nearly black in spots. This deep caramelization creates the complex flavor profile that defines this dessert. Light golden brown means you’ve made a regular cheesecake, not a burnt Basque one.
Mistake #5: Skipping Parchment Paper Without proper parchment lining, the cheesecake will stick catastrophically to your pan. The high sugar content caramelizes against metal, creating an impossible-to-remove bond. Always use parchment that extends above the rim.
Mistake #6: Using a Pan That’s Too Small A shallow pan causes overflow and uneven cooking. Use a 10-inch springform pan that’s at least 3 inches deep. The batter rises significantly during baking—insufficient depth creates a mess in your oven.
Mistake #7: Cutting While Warm Slicing a warm cheesecake results in messy, oozing cuts and ruined presentation. The interior needs complete chilling to set properly. Wait the full 4-6 hours—patience rewards you with clean, beautiful slices.
Mistake #8: Opening the Oven Door Frequently Temperature fluctuations disrupt even baking. Check after 50 minutes, and only open the door again if you need additional baking time. Each opening drops the oven temperature by 25-50°F, requiring recovery time.
Storing Tips for the Recipe
Proper storage maintains quality and extends enjoyment:
Refrigerator Storage: Store the cheesecake covered in the refrigerator for up to 5 days. Keep it in the springform pan with the sides released but the base still attached, wrapping the entire thing in plastic wrap or transferring to an airtight container. The high fat content prevents bacterial growth better than lower-fat desserts, but cream cheese still requires refrigeration.
Texture Evolution: Day one: Slightly softer, more custardy center Days 2-3: Optimal texture throughout, flavors fully developed Days 4-5: Firmer texture, still delicious but less jiggly
Freezing Instructions: This cheesecake freezes beautifully for up to 2 months. Wrap individual slices tightly in plastic wrap, then aluminum foil. Place wrapped slices in a freezer bag, removing excess air. Label with the date.
Thawing Protocol: Transfer frozen slices to the refrigerator 6-8 hours before serving (overnight is ideal). Never thaw at room temperature, which can cause condensation and textural issues. For best results, let the slice sit at room temperature for 15-20 minutes before eating.
Make-Ahead Strategy: This is an excellent make-ahead dessert. Bake up to 2 days before serving, storing covered in the refrigerator. The flavor actually improves after 24 hours as it mellows and develops complexity. For events, this advance preparation eliminates last-minute stress.
Preventing Odor Absorption: Cream cheese readily absorbs refrigerator odors. Store the cheesecake away from pungent foods (onions, garlic, fish), or keep it in an airtight container. Consider placing an open box of baking soda in your refrigerator to neutralize odors.
Leftover Serving Tip: Remove slices from refrigeration 20-30 minutes before serving. The texture and flavor shine at cool room temperature rather than refrigerator-cold. The cream cheese’s fat content softens slightly, creating that melt-in-your-mouth experience.
Conclusion
The Basque burnt cheesecake represents a beautiful rebellion against baking perfection—proof that sometimes the best results come from breaking rules rather than following them. This burnt cheesecake description reveals a dessert that’s simultaneously rustic and refined, simple yet impressive, and forgiving enough for beginners while sophisticated enough for experienced bakers.
With just six ingredients and 15 minutes of active preparation, you can create a dessert that rivals anything from a high-end restaurant. The deeply caramelized top provides bittersweet complexity, while the jiggly, custardy interior offers luxurious creaminess that seems almost impossible from such a straightforward recipe. The beauty lies in its imperfections—the wrinkled top, the deflated center, the slightly wonky edges—all combine to create something genuinely special.
Whether you’re serving this for a dinner party, special occasion, or simply treating yourself to something extraordinary, this cheesecake delivers every time. The make-ahead friendly nature and foolproof technique mean you can approach baking with confidence rather than anxiety.
Ready to embrace the burn? Gather your ingredients, preheat that oven to 400°F, and prepare to create the creamiest, most impressive dessert you’ve ever baked. Don’t forget to share your results—tag your burnt masterpiece on social media and join the global community of burnt cheesecake enthusiasts. Once you experience that first forkful of bittersweet, creamy perfection, you’ll understand why this humble Basque creation has captivated dessert lovers worldwide.
Your journey to burnt cheesecake mastery begins now—trust the process, embrace imperfection, and prepare for compliments.
FAQs
Why is my cheesecake still jiggly in the center after chilling? This is actually perfect! The signature characteristic of Basque burnt cheesecake is its custardy, slightly jiggly center. Unlike firm New York-style cheesecakes, this version should maintain a softer, almost pudding-like consistency in the middle. If it’s excessively liquid even after 6+ hours of chilling, it may be under-baked—next time, add 5-10 minutes to your baking time.
Can I make this cheesecake without a springform pan? While technically possible using a regular cake pan lined heavily with parchment, a springform pan is strongly recommended. The high sides are necessary to contain the batter, and the removable bottom makes unmolding infinitely easier. Springform pans are inexpensive and versatile—consider it a worthwhile investment for this and future baking projects.
What if I don’t have parchment paper? Parchment paper is essential for this recipe due to the high caramelization and risk of sticking. In an emergency, you could use aluminum foil heavily greased with butter, but parchment is superior. The paper also creates those signature wrinkled edges. Keep parchment paper stocked in your kitchen—it’s invaluable for countless baking applications.
My cheesecake cracked dramatically on top—did I ruin it? Absolutely not! Cracks are completely normal and add to the rustic charm. The deflation during cooling often creates surface cracks and wrinkles. Remember, this dessert celebrates imperfection. Those cracks will likely be hidden by the deeply burnt surface anyway. If aesthetics concern you, serve with the most presentable side facing up, or cover with toppings.
How do I know when the top is burnt enough? Aim for a deep amber to dark brown color, with some nearly black spots around the edges. The surface should look significantly darker than a traditional cheesecake—almost concerning until you taste the complex, bittersweet flavor it provides. If you’re nervous, remember: this is supposed to be burnt. When you think it might be too dark, it’s probably perfect.
Can I add mix-ins like chocolate chips or fruit? While purists prefer the classic version, you can fold in ¾ cup of mix-ins after adding the flour. However, heavy additions will sink to the bottom and may affect texture. For better results, consider serving with toppings rather than mixing ingredients into the batter. The simple, unadulterated cream cheese flavor is part of what makes this dessert special.
Why did my cheesecake overflow in the oven? This happens when you use a pan that’s too small or fill it too high. Ensure you’re using a 10-inch springform pan that’s at least 3 inches deep, and the batter should fill it only about 80%. The cheesecake puffs significantly during baking and needs room to expand. If overflow occurs, place a baking sheet on the oven rack below to catch drips.
Is it normal for the cheesecake to deflate so much? Yes, dramatic deflation (30-40% height loss) is completely normal and expected. The high heat causes rapid expansion during baking, and the subsequent cooling causes equally dramatic deflation. This deflation creates the characteristic dense, creamy texture. A cheesecake that maintains its height throughout cooling was likely over-baked.


