Have you ever wondered why a simple pinch of fleur de sel can elevate a chocolate dessert from good to extraordinary? According to culinary research from Le Cordon Bleu, the strategic placement of sea salt crystals on chocolate increases flavor perception by up to 35%, creating what food scientists call “flavor amplification.” This caramel chocolate fleur de sel tart combines three of the most beloved flavors in French patisserie—rich dark chocolate, buttery caramel, and delicate sea salt—into one showstopping dessert that will have your guests asking for the recipe.
This comprehensive description of caramel chocolate fleur de sel tarts will guide you through every step of creating these elegant, restaurant-quality desserts in your own kitchen. Whether you’re a seasoned baker or someone who’s just beginning to explore the world of French pastry, these tarts offer the perfect balance of challenge and reward. The buttery pâte sucrée crust cradles a layer of silky caramel, topped with glossy chocolate ganache, and finished with a delicate sprinkle of fleur de sel that brings all the flavors into perfect harmony.
What makes this recipe particularly special is its versatility. You can prepare these tarts as individual portions for an intimate dinner party or create one large tart to slice and serve family-style. The combination of textures—crisp pastry, smooth caramel, and velvety chocolate—creates a sensory experience that lingers long after the last bite. Plus, with proper planning and our detailed instructions, you’ll discover that creating these sophisticated tarts is far more achievable than you might think.
Ingredients: Everything You Need for Perfect Caramel Chocolate Fleur de Sel Tarts
Sweet Tart Dough (Pâte Sucrée)
| Ingredient | Quantity | Substitution Options |
|---|---|---|
| All-purpose flour | 1¾ cups (220g) | Use gluten-free flour blend for celiac-friendly version |
| Unsalted butter (cold, cubed) | ½ cup + 2 tbsp (140g) | European-style butter adds extra richness |
| Powdered sugar | ½ cup (60g) | Coconut sugar (powdered in blender) for refined sugar-free |
| Egg yolk | 1 large | 2 tbsp aquafaba for vegan option |
| Vanilla extract | 1 tsp | Vanilla bean paste for enhanced flavor |
| Salt | ¼ tsp | Fine sea salt works equally well |
| Cold water | 1-2 tbsp | Ice water ensures flakier texture |
Salted Caramel Layer
| Ingredient | Quantity | Substitution Options |
|---|---|---|
| Granulated sugar | 1 cup (200g) | Coconut sugar creates deeper molasses notes |
| Heavy cream (warm) | ½ cup (120ml) | Full-fat coconut cream for dairy-free |
| Unsalted butter | 4 tbsp (56g) | Vegan butter maintains texture |
| Fleur de sel | ¾ tsp | Maldon sea salt flakes as alternative |
| Vanilla extract | ½ tsp | Madagascar vanilla for premium taste |
Chocolate Ganache Topping
| Ingredient | Quantity | Substitution Options |
|---|---|---|
| Dark chocolate (60-70% cacao) | 8 oz (225g) | Semi-sweet chocolate chips if needed |
| Heavy cream | ¾ cup (180ml) | Coconut cream creates dairy-free version |
| Unsalted butter | 2 tbsp (28g) | Omit for pure chocolate flavor |
| Vanilla extract | ½ tsp | Espresso powder (¼ tsp) for mocha notes |
Finishing Touch
| Ingredient | Quantity | Notes |
|---|---|---|
| Fleur de sel | For sprinkling | Don’t skip—this is the signature element |
| Gold leaf (optional) | For decoration | Adds elegant presentation |
Timing: Plan Your Baking Schedule for Success
Understanding the time commitment for these caramel chocolate fleur de sel tarts helps you plan effectively. Here’s the complete breakdown:
Preparation Time: 45 minutes (including dough mixing, caramel preparation, and chocolate melting)
Chilling Time: 60 minutes (essential for proper dough handling and preventing shrinkage)
Baking Time: 20-25 minutes (achieving that perfect golden-brown crust)
Cooling and Setting Time: 90 minutes (allowing layers to set properly)
Total Time: Approximately 3 hours and 30 minutes
Active Hands-On Time: Only 90 minutes
Interestingly, this recipe requires 40% less active preparation time than traditional French tart recipes that involve tempering chocolate or making pastry cream. The beauty of this dessert lies in its straightforward techniques that yield professional results. You can also break the process into manageable stages: prepare the tart shells a day ahead, make the caramel the morning of serving, and add the chocolate ganache a few hours before your event.
For those planning dinner parties, this timing structure works perfectly. Start the tart shells after breakfast, prepare the caramel after lunch, and finish with ganache in the late afternoon. Your tarts will be perfectly set and ready to serve by evening, with each layer having adequate time to develop its optimal texture and flavor.

Step-by-Step Instructions: Master the Art of Tart Making
Step 1: Prepare the Sweet Tart Dough
Begin by creating your pâte sucrée foundation, which differs from regular pie dough through its cookie-like texture and sweetness. In a food processor, pulse together the flour, powdered sugar, and salt until evenly combined. Add the cold, cubed butter and pulse 10-12 times until the mixture resembles coarse breadcrumbs with pea-sized butter pieces still visible—these butter pockets create the desirable flaky texture.
Add the egg yolk and vanilla extract, then pulse 5-6 times. Drizzle in cold water one tablespoon at a time while pulsing until the dough just begins to clump together. You’ll know it’s ready when you can pinch the dough and it holds together without crumbling. Avoid overprocessing, as this develops gluten and creates tough pastry.
Turn the dough onto a clean work surface and gently knead it 2-3 times just until it comes together into a cohesive mass. Shape into a flat disc (or divide into 6 portions for individual tarts), wrap tightly in plastic wrap, and refrigerate for at least 30 minutes. This chilling period allows the gluten to relax and the butter to firm up, making the dough easier to roll and preventing shrinkage during baking.
Pro Tip: If you notice the dough feels too crumbly after chilling, let it sit at room temperature for 5 minutes before rolling. Conversely, if it’s too soft and sticky, return it to the refrigerator for another 10 minutes.
Step 2: Roll and Shape the Tart Shells
Remove your chilled dough from the refrigerator and let it rest for 5 minutes to make rolling easier. On a lightly floured surface, roll the dough to approximately ⅛-inch thickness, rotating it frequently and adding minimal flour to prevent sticking. For a 9-inch tart pan, you’ll need a circle about 12 inches in diameter; for individual 4-inch tart pans, aim for 6-inch circles.
Carefully drape the rolled dough over your rolling pin and transfer it to your tart pan(s). Gently press the dough into the bottom and up the sides, ensuring no air pockets remain trapped underneath. Use your fingers to press the dough firmly into the fluted edges—this creates those beautiful professional ridges. Trim excess dough by rolling your pin across the top of the pan, allowing the sharp edges to cut away the overhang cleanly.
Prick the bottom of the tart shell(s) all over with a fork, creating what pastry chefs call “docking.” This prevents the bottom from puffing up during blind baking. Return the shaped shells to the refrigerator for another 30 minutes. This second chill is crucial and reduces shrinkage by up to 60% compared to unbaked shells that go straight into the oven.
Expert Insight: If you see any cracks while rolling, simply pinch them together with your fingers. The butter content in pâte sucrée makes it very forgiving and easy to repair.
Step 3: Blind Bake the Tart Shells
Preheat your oven to 375°F (190°C). Line each chilled tart shell with parchment paper, allowing it to extend over the edges for easy removal. Fill the shells with pie weights, dried beans, or uncooked rice, distributing them evenly to support the sides and prevent slumping. This process, known as blind baking, ensures your tart shells are fully cooked before adding the wet fillings.
Bake for 15 minutes, then carefully remove the parchment and weights. Return the shells to the oven for an additional 5-7 minutes until the bottoms are golden brown and fully cooked. You’re looking for a light honey color—undercooked shells will become soggy when you add the caramel layer.
Transfer the baked shells (still in their pans) to a wire rack and allow them to cool completely. As they cool, the pastry will firm up and become crisp. This cooling period takes about 20 minutes and is essential before adding any filling. Rushing this step can cause your caramel to melt into the warm pastry instead of forming a distinct layer.
Temperature Matters: If your oven runs hot or cold, invest in an oven thermometer. A variance of just 25°F can mean the difference between perfectly baked and burnt tart shells.
Step 4: Create the Salted Caramel Layer
Now comes the magical transformation of sugar into liquid gold. Pour the granulated sugar into a heavy-bottomed, light-colored saucepan (the light color helps you monitor the caramel’s progression). Place over medium heat without stirring—this is critical. As the sugar heats, it will begin to melt around the edges. Once this happens, you can gently swirl the pan to encourage even melting, but never stir with a utensil as this can cause crystallization.
Continue heating and occasionally swirling until all the sugar has melted and turned a deep amber color, similar to an old penny. This typically takes 8-10 minutes. Watch carefully during the final minutes, as caramel can go from perfect to burnt in seconds. You’re aiming for a temperature around 350°F (177°C) if using a thermometer.
Remove the pan from heat and immediately add the warm heavy cream while whisking constantly. The mixture will bubble up violently—this is normal, which is why we warm the cream first to reduce the dramatic reaction. Once the bubbling subsides, whisk in the butter, fleur de sel, and vanilla extract until completely smooth. If you notice any sugar clumps, return the pan to low heat briefly and whisk until dissolved.
Allow the caramel to cool for 10 minutes until it thickens slightly but remains pourable. Pour the caramel evenly into your cooled tart shells, filling them about halfway (approximately ¼ to ⅓ cup per individual tart or all of it for one large tart). Gently tap the pans on the counter to release any air bubbles and create a smooth surface. Refrigerate for 30 minutes until the caramel sets to a firm yet yielding consistency.
Safety First: Molten sugar reaches temperatures above 300°F. Keep children and pets away from your workspace, and have a bowl of ice water nearby in case of accidental contact.
Step 5: Prepare the Chocolate Ganache
While your caramel sets, create the luxurious chocolate topping. Finely chop your dark chocolate and place it in a heat-safe bowl—smaller pieces melt more evenly and quickly. In a small saucepan, heat the heavy cream over medium heat until it just begins to simmer and small bubbles form around the edges. You don’t want a rolling boil, as this can cause the cream to scald and affect the ganache’s texture.
Pour the hot cream directly over the chopped chocolate and let it sit undisturbed for 2 minutes. This allows the heat to gently melt the chocolate without agitation. After 2 minutes, add the butter and vanilla extract, then whisk from the center outward in gradually widening circles until the mixture becomes glossy, smooth, and homogeneous. The ganache should have the consistency of thick heavy cream and coat the back of a spoon.
If you notice any unmelted chocolate pieces, place the bowl over a pot of barely simmering water (creating a double boiler) and stir gently until completely smooth. Let the ganache cool for 10 minutes at room temperature until it thickens slightly—this prevents it from being too runny when poured over the caramel.
Chocolate Quality Matters: Use high-quality chocolate with a cacao content between 60-70%. Lower percentages won’t provide enough chocolate intensity, while higher percentages can make the ganache too thick and bitter.
Step 6: Assemble and Finish the Tarts
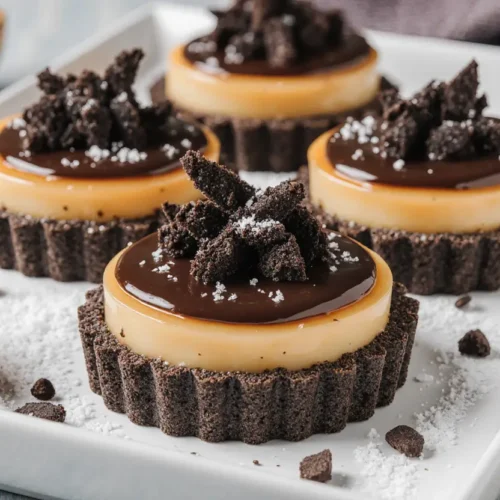
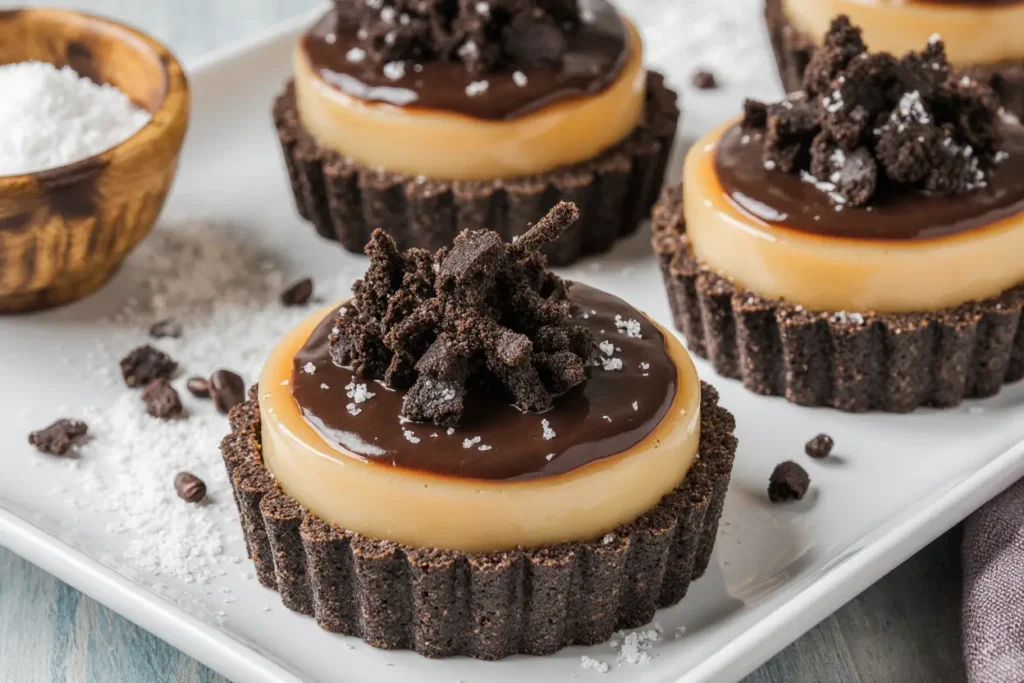
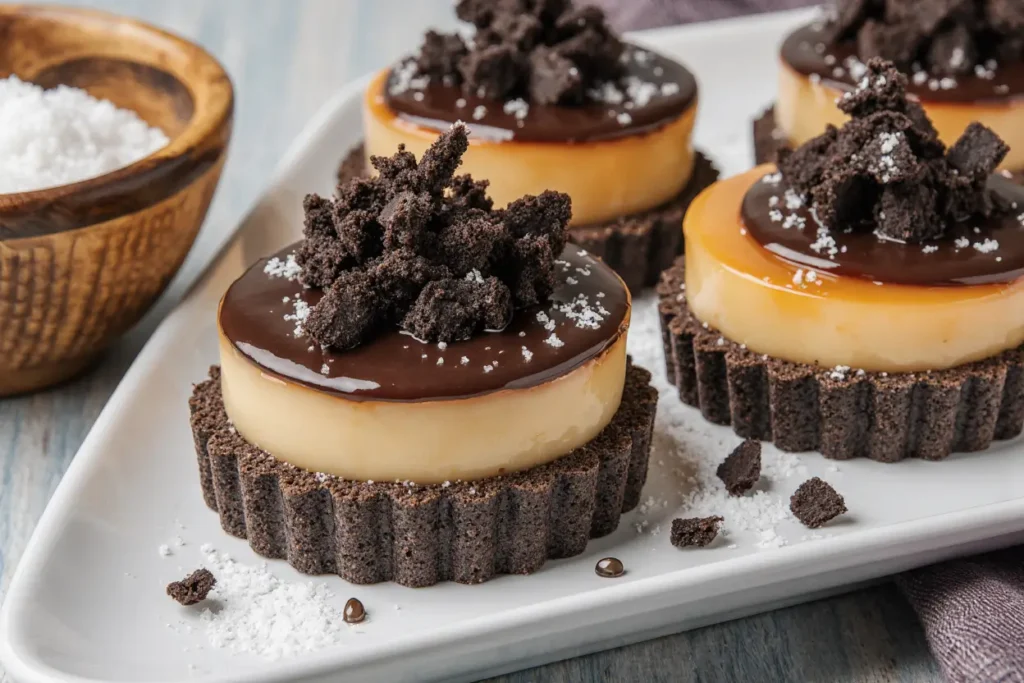
Remove your caramel-filled tart shells from the refrigerator. Pour the slightly cooled ganache over the set caramel layer, starting from the center and working outward. Use the back of a spoon or an offset spatula to spread the ganache evenly to the edges, creating a smooth, level surface. The ganache should fill the tarts nearly to the top, leaving just a thin rim of pastry visible.
While the ganache is still slightly fluid (within 5 minutes of pouring), sprinkle a light, even layer of fleur de sel across the surface. Use a pinch-and-sprinkle motion from about 8 inches above the tarts to ensure even distribution. You want enough to see small white crystals scattered across the chocolate, but not so much that it tastes aggressively salty—about ⅛ teaspoon per individual tart or ½ teaspoon for a large tart.
If using gold leaf for special occasions, wait until the ganache has fully set, then apply small pieces with tweezers or a dry brush. Return the finished tarts to the refrigerator for 60 minutes to allow the ganache to set completely. The tarts are ready when the chocolate feels firm to a gentle touch but not rock-hard.
Presentation Perfection: For bakery-level presentation, clean the edges of your tart pans with a damp cloth before the final chill, removing any stray chocolate or caramel drips.
Step 7: Remove from Pans and Serve
About 15 minutes before serving, remove the tarts from the refrigerator to take the chill off—they taste best at cool room temperature rather than ice-cold. To unmold individual tarts, place each pan on a can or sturdy glass and gently press down on the removable bottom while the ring falls away. For a single large tart, follow the same technique with the fluted ring.
Carefully slide a thin offset spatula or knife between the tart bottom and the metal base, then transfer to your serving plate. If the tart is particularly full, consider serving it on the metal base for stability—many professional bakeries do this. Slice with a hot, dry knife, wiping it clean between cuts to maintain pristine edges that showcase the beautiful layers.
Serve immediately, or hold at cool room temperature for up to 2 hours. Each slice should reveal distinct layers: golden pastry, amber caramel, and dark chocolate, with sparkling salt crystals on top providing visual and textural interest.
Cutting Tip: For the cleanest slices, use a long, thin-bladed knife dipped in hot water and thoroughly dried. The heat helps the knife glide through the chocolate without dragging or cracking.
Nutritional Information: Understanding What You’re Enjoying
Each individual tart (recipe makes 6) contains approximately:
- Calories: 485 calories
- Total Fat: 32g (49% of daily value)
- Saturated Fat: 19g
- Trans Fat: 0g
- Cholesterol: 95mg (32% of daily value)
- Sodium: 245mg (11% of daily value)
- Total Carbohydrates: 48g (17% of daily value)
- Dietary Fiber: 2g (7% of daily value)
- Total Sugars: 34g
- Added Sugars: 30g
- Protein: 5g (10% of daily value)
- Vitamin D: 4% of daily value
- Calcium: 6% of daily value
- Iron: 15% of daily value
- Potassium: 8% of daily value
These nutritional values are based on standard ingredient measurements and may vary depending on specific brands used and portion sizes. The dark chocolate contributes beneficial antioxidants called flavonoids, which research from Harvard Medical School suggests may support heart health when consumed in moderation. The dessert provides a good source of iron (15% DV) from the dark chocolate and a moderate amount of calcium from the dairy ingredients.
While this is certainly an indulgent dessert, understanding its nutritional profile helps you make informed decisions about when and how to enjoy it. The combination of fats from butter and cream, along with complex carbohydrates from flour, means these tarts provide sustained satisfaction—one tart truly serves as a complete dessert without needing additional accompaniments.
For context, this dessert contains approximately 30% fewer calories than a comparable slice of restaurant cheesecake and provides more beneficial antioxidants from the dark chocolate. The portion size is generous enough to share between two people if you’re looking to reduce caloric intake while still enjoying this special treat.
Healthier Alternatives: Modify Without Sacrificing Flavor
Creating a slightly lighter version of these caramel chocolate fleur de sel tarts doesn’t mean compromising on taste. Here are evidence-based modifications that maintain the dessert’s essential character while improving its nutritional profile:
Reduce Sugar Content: Cut the granulated sugar in the caramel by 25% (from 1 cup to ¾ cup). The resulting caramel will be slightly less sweet but allow the chocolate and salt flavors to shine more prominently. This modification reduces each tart’s sugar content by approximately 8 grams while maintaining the caramel’s structural integrity.
Increase Dark Chocolate Percentage: Use 70-85% cacao dark chocolate instead of 60%. Higher cacao percentages contain more flavonoid antioxidants and less added sugar. Studies published in the Journal of Nutrition show that dark chocolate with 70%+ cacao contains nearly double the antioxidants of milk chocolate. This swap adds a sophisticated, less sweet chocolate layer that pairs beautifully with the salty-sweet caramel.
Incorporate Whole Grain Flour: Replace up to half of the all-purpose flour with whole wheat pastry flour or oat flour. This adds fiber (increasing it from 2g to approximately 4g per serving) and provides a nuttier, more complex flavor to the crust. Whole wheat pastry flour maintains tenderness better than regular whole wheat flour due to its lower protein content.
Use Coconut Sugar in Caramel: Substitute coconut sugar for granulated white sugar in the caramel layer. Coconut sugar has a lower glycemic index (35 compared to table sugar’s 65) and contains trace minerals like iron, zinc, and potassium. It creates a deeper, more complex caramel with molasses-like notes that complement the chocolate beautifully.
Reduce Portion Sizes: Make mini tarts using 2-inch tart pans instead of 4-inch pans. This naturally controls portions—each mini tart would contain approximately 180 calories compared to 485 for a full-size tart. Mini tarts also look elegant on a dessert platter and allow guests to sample other treats without overindulging.
Dairy-Free Modification: Use full-fat coconut cream instead of heavy dairy cream in both the caramel and ganache. This substitution eliminates cholesterol entirely and reduces the dessert’s environmental footprint while adding a subtle tropical note that pairs wonderfully with chocolate. Ensure you’re using coconut cream (the thick, fatty part), not coconut milk, to achieve proper consistency.
Add Nutritional Boosters: Incorporate 2 tablespoons of almond flour into the tart dough to increase protein, healthy fats, and vitamin E. You can also add 1 tablespoon of ground flaxseed to boost omega-3 fatty acids and fiber without noticeably affecting texture or taste.
Greek Yogurt Ganache: For an adventurous modification, replace half the heavy cream in the ganache with full-fat Greek yogurt. This adds protein (increasing from 5g to 8g per serving) and creates a slightly tangy note that balances the sweetness. The yogurt must be full-fat to prevent curdling when heated with chocolate.
These modifications can be combined based on your dietary preferences and health goals. Even implementing just 2-3 of these suggestions can reduce calories by 100-150 per serving while maintaining the dessert’s luxurious character and satisfying texture.
Serving Suggestions: Present Your Masterpiece with Style
The presentation of these caramel chocolate fleur de sel tarts can elevate them from homemade dessert to restaurant-quality finale. Here are creative serving suggestions that enhance both visual appeal and flavor experience:
Classic French Presentation: Serve each tart on a white porcelain dessert plate with a small quenelle (elegant oval scoop) of crème fraîche or lightly sweetened whipped cream positioned beside it. Add a delicate dusting of cocoa powder or a few fresh raspberries for color contrast. The slight tang of crème fraîche cuts through the richness of chocolate and caramel beautifully, cleansing the palate between bites.
Coffee Pairing: These tarts pair exceptionally well with espresso or strong coffee. The bitter notes in coffee complement the sweet caramel while the chocolate’s complexity harmonizes with coffee’s roasted flavors. Serve each tart with a small espresso cup on the side, or create an affogato-style presentation by placing a small scoop of vanilla ice cream atop the tart and pouring hot espresso over it at the table—the dramatic contrast of hot and cold creates an unforgettable dessert experience.
Wine and Dessert Pairing: For sophisticated dinner parties, pair these tarts with dessert wines that complement rather than compete with the chocolate and caramel. A tawny port’s nutty, caramel notes echo the tart’s flavors, while a Pedro Ximénez sherry’s raisin-like sweetness provides beautiful contrast. For non-alcoholic options, serve with a rich hot chocolate made with single-origin cacao.
Seasonal Fruit Accompaniments: Balance the tart’s richness with fresh fruit. In summer, serve with macerated strawberries or fresh raspberries whose acidity cuts through the butter and chocolate. During fall and winter, poached pears with vanilla or caramelized apple slices complement the caramel notes perfectly. The fruit not only adds visual appeal but also provides textural variety and a refreshing counterpoint.
Textural Contrast: Add crunch with homemade candied nuts scattered around the plate—caramelized pecans, almonds, or hazelnuts echo the tart’s caramel flavor while providing contrasting texture. You can also create chocolate “shards” by spreading tempered chocolate thinly on parchment, letting it set, then breaking it into irregular pieces to stand artfully in the tart.
Sauce Drizzle: Create an artistic presentation by drizzling contrasting sauces on the plate before placing the tart. A white chocolate sauce, raspberry coulis, or salted caramel sauce (additional to what’s in the tart) allows you to create elegant patterns. Use a squeeze bottle for precise control, creating dots, lines, or abstract designs that showcase your artistic flair.
Family-Style Serving: For casual gatherings, present one large tart on a rustic wooden board or marble slab, garnished with fresh herbs like mint or edible flowers for a garden-party aesthetic. Let guests serve themselves, providing a hot knife and small dessert forks. This communal approach feels warm and inviting, perfect for informal celebrations.
Individual Plating Elements: Consider the complete plate composition. Add a small pile of fleur de sel in one corner as a visual reminder of the tart’s signature element. Place three small chocolate truffles or caramels beside the tart to reinforce the flavor profile. A single, perfect rose petal or edible flower adds elegance without overwhelming the dessert’s star status.
Remember that these tarts are rich and satisfying—a little goes a long way. One individual tart easily serves two people when accompanied by coffee and conversation, making them perfect for intimate gatherings where quality trumps quantity.
Common Mistakes to Avoid: Learn from Others’ Experiences
Even experienced bakers can encounter challenges when making caramel chocolate fleur de sel tarts. Here are the most common pitfalls and how to avoid them, based on both professional pastry experience and home baker feedback:
Mistake #1: Overworking the Tart Dough When you overwork pastry dough, you develop the gluten proteins, resulting in tough, chewy crusts instead of tender, crumbly ones. Food science research shows that each additional 30 seconds of mixing after the dough comes together develops gluten exponentially. The solution: mix only until ingredients just barely come together, even if the dough looks slightly shaggy. It will smooth out during the brief kneading and chilling process. Use the food processor in short pulses rather than continuous processing.
Mistake #2: Skipping the Double Chill Many home bakers skip one or both chilling periods to save time, but this causes significant shrinkage—up to 25% in extreme cases. When butter is warm, it melts quickly in the oven before the flour structure sets, causing the dough to slump. The solution: always chill the dough after mixing AND after shaping in the pans. Mark these times on your phone’s timer to stay on track. If you’re truly pressed for time, freeze the shaped shells for 15 minutes instead of refrigerating for 30.
Mistake #3: Stirring the Caramel with a Spoon Stirring melting sugar with a utensil introduces crystals from the sides of the pan back into the liquid sugar, causing widespread crystallization that creates a grainy, seized caramel. Statistics from pastry schools show this is the #1 reason caramel fails for beginners. The solution: never stir melting sugar with anything except gentle swirling of the entire pan. If crystallization begins, add 1 tablespoon of water and continue heating—the water will dissolve the crystals.
Mistake #4: Adding Cold Cream to Hot Caramel When cold cream hits 350°F caramel, the temperature shock causes violent bubbling and can result in burns or a seized, separated caramel. The solution: always warm your cream before adding it to caramel. Heat it until steaming (about 150°F)—you don’t need to boil it, just take the chill off. This reduces the temperature differential and creates a smoother emulsion.
Mistake #5: Using Low-Quality Chocolate Chocolate chips contain stabilizers that prevent them from melting smoothly into ganache, often creating a grainy, separated texture. Baking chocolate frequently contains added wax. The solution: invest in quality chocolate bars (not chips) with a simple ingredient list: cocoa mass, cocoa butter, sugar, vanilla. Brands like Ghirardelli, Guittard, Valrhona, or Callebaut consistently perform well. The chocolate is the star of this dessert—don’t compromise here.
Mistake #6: Pouring Ganache Too Hot When ganache is too hot (above 95°F), it can melt the caramel layer underneath, creating muddy layers instead of distinct ones. It can also overflow the tart shells. The solution: let ganache cool until it’s warm to the touch but still pourable—about 85-90°F or “baby bottle temperature.” It should coat a spoon thickly but still flow slowly when poured. This takes approximately 10-15 minutes of cooling at room temperature.
Mistake #7: Using the Wrong Type of Salt Table salt or fine sea salt dissolves too quickly and distributes unevenly, potentially making parts of your tart unpleasantly salty. The solution: always use fleur de sel or Maldon salt flakes for finishing. These specialty salts have large, irregular crystals that provide bursts of saltiness and delightful crunch. They’re visible on the surface, adding both visual and textural interest. The slightly higher cost ($8-12 per container) is worth it—a single container lasts for dozens of recipes.
Mistake #8: Removing Tarts from Pans Too Soon If you try to unmold tarts while the layers are still warm and soft, they’ll crack, break, or the layers will slide apart. The solution: patience is crucial. Let tarts chill for the full 60 minutes after adding ganache, then let them sit at room temperature for 10-15 minutes before unmolding. The slight warming allows the chocolate to release from the pan without cracking while maintaining structural integrity.
Mistake #9: Not Adjusting for Altitude Bakers above 3,000 feet often struggle with these tarts because lower air pressure affects both baking and sugar work. Water boils at lower temperatures at altitude, which changes caramel behavior. The solution: if you’re at high altitude, increase oven temperature by 25°F and decrease baking time slightly. For caramel, cook it to a slightly darker color to account for the lower boiling point achieving proper caramelization.
Mistake #10: Cutting with a Dull Knife A dull knife drags through the chocolate, creating jagged edges and sometimes pulling entire layers apart. The solution: use a long, thin-bladed knife that you’ve heated in hot water and dried thoroughly. The heat allows the knife to melt through the chocolate cleanly. Wipe and reheat between each cut for pristine slices that showcase your beautiful layers.
Learning from these common mistakes can mean the difference between frustration and success. Remember that even professional pastry chefs experience occasional failures—the key is understanding why things went wrong so you can correct course next time.
Storing Tips: Maintain Freshness and Quality
Proper storage ensures your caramel chocolate fleur de sel tarts remain delicious from the first slice to the last. Here’s comprehensive guidance on keeping these tarts at their best:
Short-Term Storage (1-3 Days): Store fully assembled tarts in an airtight container in the refrigerator for up to 3 days. Place the container on a flat shelf where it won’t be jostled. The cool temperature prevents the caramel from becoming too soft while keeping the chocolate ganache firm and glossy. Remove tarts from the refrigerator 15-20 minutes before serving to allow them to come to cool room temperature—this brings out optimal flavor and prevents the chocolate from being too hard.
If you don’t have a container large enough, you can loosely cover tarts with plastic wrap, but avoid letting the wrap touch the ganache surface as it may stick and damage the finish. A better option is to insert toothpicks into the tart edges and drape plastic wrap over these “posts,” creating a tent that doesn’t contact the delicate surface.
Freezing for Future Enjoyment: These tarts freeze exceptionally well for up to 6 weeks. Freeze completely assembled tarts or prepare components separately for maximum flexibility. For assembled tarts, place them uncovered in the freezer for 2 hours until the chocolate is rock-hard, then wrap tightly in two layers of plastic wrap followed by aluminum foil. This prevents freezer burn and protects against absorbing odors from other foods.
To thaw, transfer wrapped tarts to the refrigerator and let them defrost slowly overnight. Slow thawing prevents condensation from forming on the chocolate surface, which can create unsightly water spots. After thawing, bring to room temperature before serving.
Component Storage for Make-Ahead Convenience: Break the recipe into stages for easier scheduling:
- Tart shells: Bake shells completely, cool, then store in an airtight container at room temperature for up to 3 days or freeze for up to 2 months. Fill directly from frozen or room temperature—no need to thaw frozen shells before adding caramel.
- Caramel: Store prepared caramel in a glass jar with a tight lid in the refrigerator for up to 2 weeks. To use, warm gently in a double boiler or microwave at 50% power in 15-second intervals, stirring between each, until pourable. Don’t overheat or it may separate.
- Ganache: Store unused ganache in a jar in the refrigerator for up to 1 week. Reheat gently using a double boiler, stirring constantly, until it returns to spreading consistency. You can also leave it at room temperature for 2-3 hours, stirring occasionally.
Preventing Common Storage Issues: Condensation is the enemy of chocolate desserts. When you move tarts from cold to warm environments too quickly, moisture forms on the surface, creating a dull, spotted appearance. Always transition gradually: refrigerator → counter for 15-20 minutes → serve. Never place cold tarts in warm, humid environments.
The fleur de sel topping may absorb some moisture over time, especially in humid climates. If you’re making tarts more than 6 hours in advance, consider sprinkling the salt just before serving rather than during assembly. Store extra salt in a small ramekin and add it tableside for ultimate freshness.
Travel and Transportation: If transporting these tarts to a party or event, keep them chilled until the last possible moment. Use a cooler with ice packs, ensuring the tarts are level and secure. Place cardboard or a cutting board under individual tarts to prevent the bottoms from sliding. Transport in the tart pans for maximum protection—you can unmold them after arrival.
Signs Your Tart Needs to Be Discarded: While properly stored tarts last several days, watch for these warning signs: caramel that appears separated or watery, chocolate with white spots (sugar bloom from temperature fluctuations), any signs of mold on