


here’s something magical about a dessert that combines tradition, flavor, and texture all in one bite. Cassava cake with a creamy custard topping is one such treat, beloved for its rich, chewy base and luscious, silky topping. Whether you’ve grown up enjoying this dessert at family gatherings or you’re discovering it for the first time, this guide will show you how to create a cassava cake that will impress and delight.
This dessert isn’t just a recipe—it’s a story of tropical flavors, comfort food, and culinary tradition. And now, you can bring it to life in your kitchen. Let’s dive into the details and master this iconic treat.
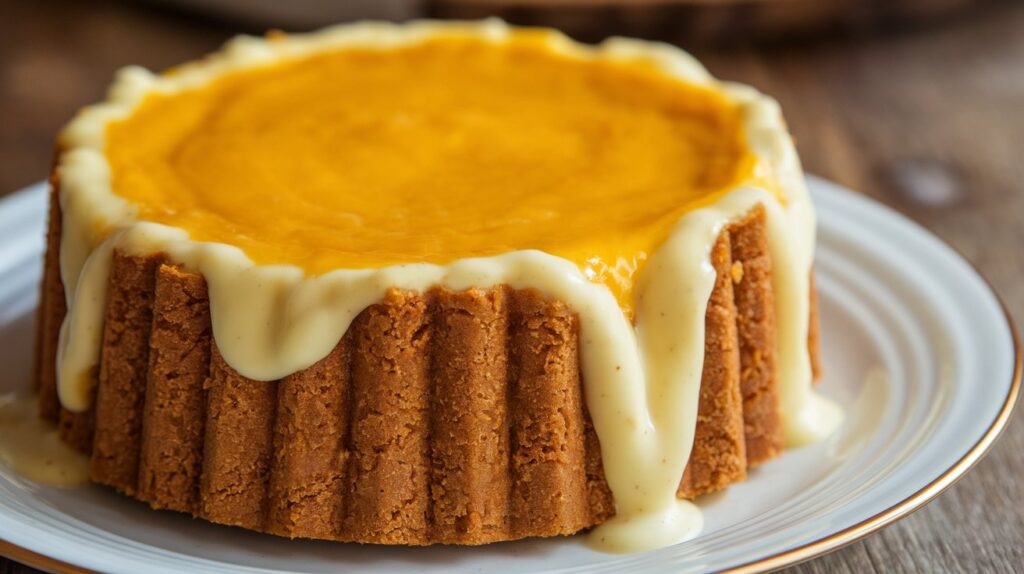
What Is Cassava Cake? A Filipino Favorite
Cassava cake is a traditional dessert from the Philippines, made primarily from grated cassava—a starchy root vegetable widely used in Southeast Asian and Latin American cuisine. Combined with coconut milk and topped with a creamy custard layer, this dessert is a staple at celebrations and family gatherings.
Why It’s Special
What makes cassava cake so irresistible is its unique combination of textures and flavors:
- Rich and Chewy Base: The grated cassava creates a dense and satisfying texture.
- Luscious Custard Topping: A creamy, golden layer adds a silky finish.
- Naturally Gluten-Free: Cassava’s starchy nature means there’s no need for flour.
- Versatile Flavors: It pairs perfectly with variations like cheese or ube (purple yam).
Whether you’re serving it for a special occasion or indulging in it as a personal treat, cassava cake never fails to delight.
Ingredients for Cassava Cake with Creamy Custard Topping
Main Ingredients for the Cake Base
- 2 cups grated cassava (fresh or frozen)
- 1 cup coconut milk
- 1 can (14 ounces) sweetened condensed milk
- ½ cup granulated sugar
- 3 large eggs
Ingredients for the Custard Topping
- 1 cup coconut cream
- ½ can sweetened condensed milk
- 3 egg yolks
These simple ingredients come together to create a dessert that’s rich, creamy, and unforgettable.
Step-by-Step Guide to Making Cassava Cake
Preparing the Cassava Base
- Preheat Your Oven: Set your oven to 350°F (175°C).
- Mix the Ingredients: In a large mixing bowl, combine the grated cassava, coconut milk, sweetened condensed milk, granulated sugar, and eggs. Stir until well-blended.
- Prepare the Baking Pan: Grease a baking pan with butter or cooking spray to prevent sticking.
- Pour the Batter: Pour the cassava mixture into the prepared pan, spreading it evenly.
Baking the Cake Base
- Place the pan in the preheated oven and bake for 45-50 minutes, or until the surface is firm and slightly golden. Use a toothpick to check—it should come out clean when inserted into the center.
Preparing the Creamy Custard Topping
- Whisk the Ingredients: In a separate bowl, whisk together the coconut cream, sweetened condensed milk, and egg yolks until smooth.
- Strain for a Silky Texture: For a flawless custard, strain the mixture to remove any lumps.
Adding the Custard Topping
- Remove the baked cassava base from the oven and gently pour the custard mixture over it. Use a spatula to spread it evenly.
Final Baking and Cooling
- Return the pan to the oven and bake for an additional 20-30 minutes, or until the custard is set and the top is golden brown.
- Let the cake cool completely before slicing. This helps the layers set and makes for cleaner cuts.
Tips and Tricks for the Perfect Cassava Cake
Texture Tips
- Use fresh grated cassava for the most authentic texture. If fresh isn’t available, frozen grated cassava works as an excellent substitute.
- Adjust the sugar level to your preference; some like it sweeter, while others prefer a more balanced taste.
Custard Tips
- For a velvety custard, don’t skip the straining step. This removes any bits of egg yolk that didn’t mix properly.
- Keep an eye on the custard while baking—you want it golden brown but not overcooked.
Serving Tips
- Serve slightly chilled for a refreshing contrast to the rich flavors.
- Garnish with shredded coconut or grated cheese for an added twist.
Variations on the Classic Recipe
Cassava cake is incredibly versatile, and you can customize it to suit your taste:
Cheesy Cassava Cake
- Add a layer of shredded cheddar cheese to the custard topping for a salty-sweet combination.
Ube Cassava Cake
- Mix in ube halaya (purple yam jam) to the cassava batter for a vibrant, colorful twist.
Nutty Cassava Cake
- Sprinkle crushed peanuts or cashews on top of the custard before baking for added crunch.
Nutrition Facts for Cassava Cake
| Ingredient | Quantity | Calories |
|---|---|---|
| Grated Cassava | 2 cups | 328 |
| Coconut Milk | 1 cup | 445 |
| Sweetened Condensed Milk | 1 can | 1300 |
| Eggs | 3 large | 210 |
| Coconut Cream | 1 cup | 445 |
| Total per Serving (Approx.) | Varies | 550 |
Note: Nutritional values may vary depending on ingredient brands and portion sizes.
Frequently Asked Questions About Cassava Cake
What is cassava, and where can I buy it?
Cassava is a starchy root vegetable commonly used in tropical cuisines. You can find it fresh, frozen, or grated in Asian and Latin American grocery stores.
Can I make cassava cake ahead of time?
Yes! Cassava cake keeps well in the refrigerator for up to 3 days. Reheat in the oven or microwave before serving.
How do I know the custard is fully cooked?
The custard should be firm to the touch and have a golden brown color on top. If it jiggles excessively, it needs more time in the oven.
Can I use cassava flour instead of grated cassava?
Grated cassava is preferred for its authentic texture, but cassava flour can be used with adjusted liquid ratios. Keep in mind that the texture may differ slightly.
Conclusion
Cassava cake with a creamy custard topping is more than just a dessert; it’s a celebration of flavor, texture, and tradition. With its rich, chewy base and silky custard finish, it’s a dish that’s sure to become a favorite in your home. Whether you’re serving it at a party or enjoying it as a personal indulgence, this recipe is bound to impress.
So, what are you waiting for? Gather your ingredients, follow these simple steps, and create a dessert that’s as delicious as it is memorable. Don’t forget to share your experience and any creative variations in the comments below. Happy baking!