


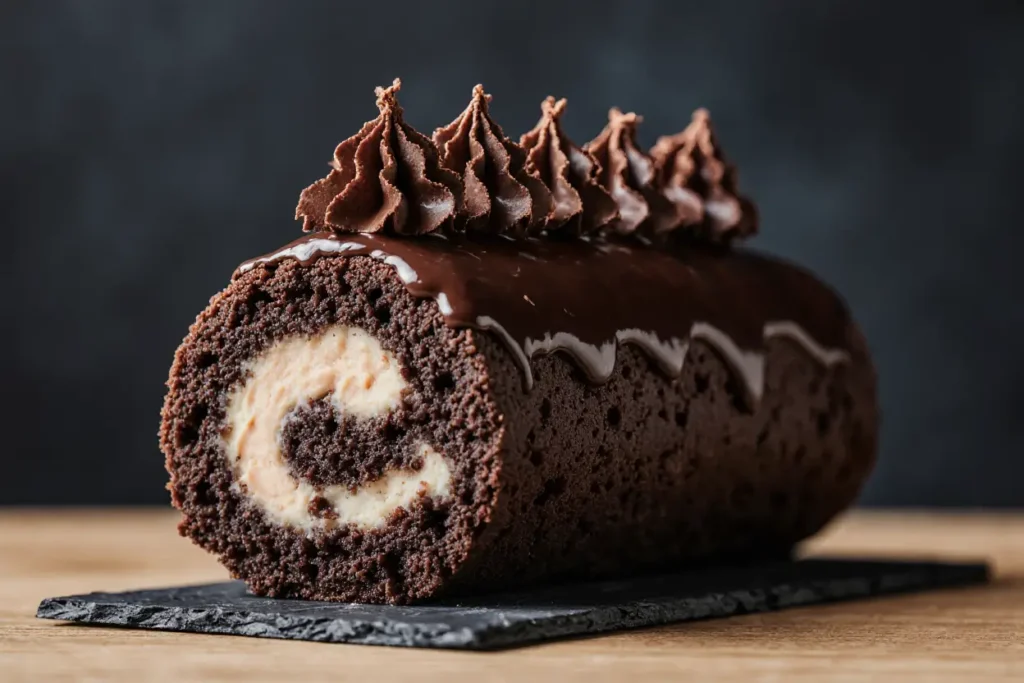
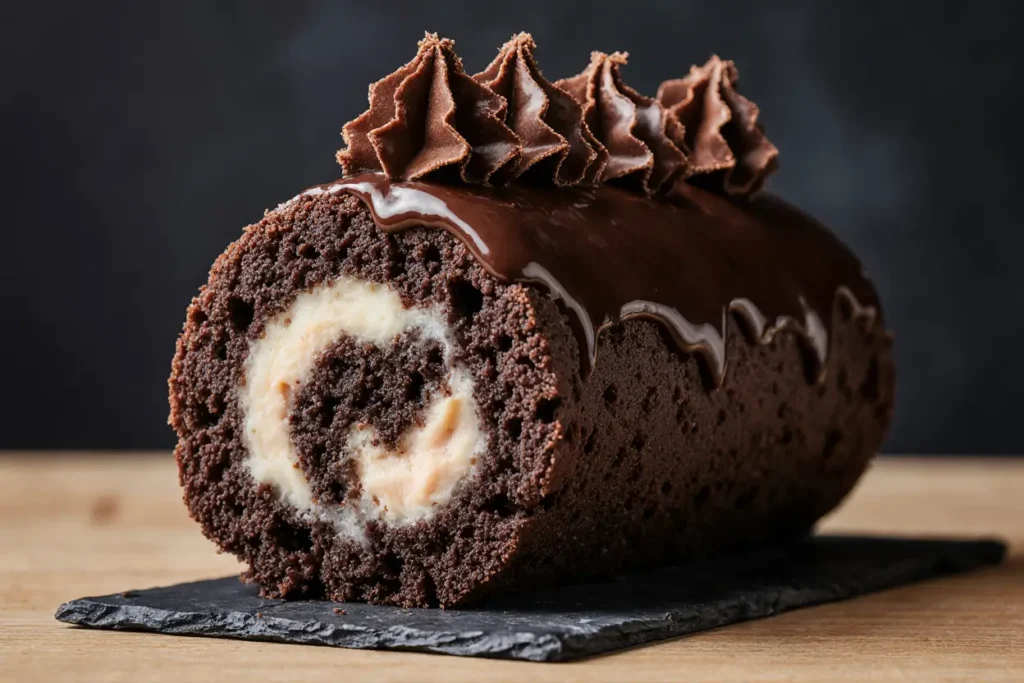
If you’re looking for a show-stopping dessert that’s as delightful to eat as it is stunning to serve, look no further than the Chocolate Sponge Roll Cake. Light, moist, and filled with velvety chocolate cream, this rolled beauty is covered in a luscious ganache that’s sure to turn heads at any gathering. Whether you call it a Swiss roll, jelly roll, or roulade, this cake is the ultimate celebration of chocolate — layered, whipped, and indulgently rich.
In this post, we’ll walk through every step of crafting this elegant dessert. From making the airy sponge to whipping up the creamy filling and drizzling that silky ganache, you’ll learn the secrets to creating a bakery-quality roll cake right in your home kitchen.
Who This Recipe is For
This recipe is perfect for:
- Chocolate lovers who crave depth and richness in dessert.
- Home bakers looking for a professional-style challenge that’s still approachable.
- Entertainers who want to impress guests with a visually striking centerpiece.
- Holiday hosts preparing a sophisticated dessert for the festive table.
While this roll cake looks impressive, it’s surprisingly achievable with the right technique and a little patience. Whether it’s your first roulade or you’re a seasoned baker, you’ll find helpful tips below to ensure perfect results.
What Makes This Chocolate Roll Cake Special?
Unlike boxed cake mixes or overly sugary store-bought versions, this sponge roll cake recipe is:
- Scalded like choux pastry, for a unique structure that’s pliable yet sturdy enough to roll.
- Rich in cocoa for a deep, satisfying chocolate flavor.
- Filled with whipped chocolate cream, not buttercream, making it light and luscious.
- Finished with a glossy chocolate ganache, giving it a professional, polished look.
It’s the kind of dessert you’d find at a high-end patisserie — but now, you can make it at home.
Ingredients You’ll Need
Let’s break the recipe into three parts: sponge cake, whipped chocolate cream filling, and ganache topping.
For the Chocolate Sponge Cake
- 124 g Milk
- 88 g Butter
- 40 g Sugar
- 80 g Plain flour
- 45 g Cocoa powder
- 150 g Egg yolks (approx. 8 yolks)
- 90 g Whole eggs (about 2 eggs)
- 220 g Egg whites (about 6–7 eggs)
- 110 g Sugar
For the Chocolate Whipped Cream Filling
- 250 g Heavy whipping cream (chilled)
- 40 g Powdered sugar
- 25 g Cocoa powder
- 1 tsp Vanilla extract
For the Chocolate Ganache
- 100 g Dark chocolate (chopped)
- 50 g Heavy cream
Equipment You’ll Need
To get the best results, prepare the following kitchen tools:
- Stand mixer with paddle and whisk attachments (or electric hand mixer)
- Rubber spatula
- Measuring scale
- Mixing bowls
- Saucepan
- Offset spatula
- Baking tray (600x400x30mm or similar with a 1cm rim)
- Parchment paper or silicone mat
- Knife or serrated cake knife
- Whisk
- Cooling rack
Step-by-Step Instructions
Step 1: Scald the Batter
- In a saucepan, combine milk, butter, and sugar. Heat until the mixture comes to a boil.
- Scald the flour: Once the liquid boils, pour in the plain flour and cocoa powder all at once, stirring vigorously. Cook this mixture for a couple of minutes — similar to making pâte à choux — until it thickens and comes together into a paste.
- Transfer the warm paste into a stand mixer with the paddle attachment and let it cool slightly.
Step 2: Add the Yolks and Eggs
- Once cooled to lukewarm, begin adding the egg yolks and whole eggs, one at a time, while the mixer is on medium speed. The batter should loosen and become smooth and glossy.
Step 3: Whip the Egg Whites
- In a separate clean bowl, use the whisk attachment to beat the egg whites until foamy.
- Gradually add the 110g sugar and continue whipping until you achieve medium-stiff peaks.
Step 4: Combine the Two Batters
- Carefully fold the whipped egg whites into the chocolate egg batter in three additions. Use a spatula and fold gently to preserve the air.
- The final batter should be airy, chocolatey, and slightly glossy.
Step 5: Bake the Sponge
- Preheat the oven to 165°C (330°F).
- Line a baking tray with parchment or silicone mat. Spread the batter evenly to a 1cm thickness using an offset spatula.
- Bake for 15 minutes, or until the sponge is springy to the touch.
Let the cake cool completely before moving on to filling.
Step 6: Make the Whipped Chocolate Cream
- In a chilled bowl, beat heavy cream on high speed until soft peaks form.
- Gradually add powdered sugar, vanilla extract, and cocoa powder.
- Continue whipping until stiff peaks form.
- Refrigerate until ready to assemble.
Step 7: Prepare the Chocolate Ganache
- In a small saucepan, heat 50g heavy cream over medium heat until it just simmers.
- Pour the hot cream over 100g chopped dark chocolate in a bowl.
- Let sit for a few minutes, then stir gently until the ganache is smooth and glossy.
- Allow to cool slightly so it thickens to a pourable, spreadable consistency.
Step 8: Assemble the Roll Cake
- Once the sponge has cooled, gently peel it off the parchment.
- Spread a generous layer of whipped chocolate cream over the surface.
- Carefully roll the sponge from one short end to the other, using the parchment paper to guide you and keep it tight.
- Place seam-side down and refrigerate for 30 minutes to help it set.
Step 9: Finish with Ganache
- After chilling, drizzle or spread the ganache over the top of the roll.
- Use an offset spatula for a smooth finish, or let it drip naturally for a more rustic look.
- Chill again for 15–20 minutes or serve immediately.
Tips for Success
- Don’t over-whip the egg whites: You want medium-stiff peaks for easy folding.
- Cool the scalded flour mix before adding eggs: Hot batter will cook the eggs prematurely.
- Use chilled cream and utensils for whipping the filling.
- Roll the cake while it’s slightly warm (optional): This can help prevent cracking, though this recipe’s sponge is quite flexible.
- Trim the edges for a cleaner look before serving.
Variations to Try
- Espresso Cream Filling: Add 1–2 tsp of instant espresso powder to the whipped cream for a mocha twist.
- Raspberry Surprise: Spread a thin layer of raspberry jam under the cream for a fruity contrast.
- Nutella Ganache: Mix 2 tbsp of Nutella into the ganache for a hazelnut-chocolate flavor.
- Holiday Edition: Dust with powdered sugar or add crushed peppermint candy on top for Christmas.
How to Store Chocolate Roll Cake
- Refrigerator: Store in an airtight container for up to 4–5 days.
- Freezer: Freeze (without ganache) wrapped tightly in plastic and foil. Thaw overnight in the fridge, then top with ganache before serving.
- Make-Ahead: The sponge and cream can be made a day ahead. Assemble the day of for best texture.
What to Serve With Chocolate Roll Cake
- Beverages:
- Coffee or espresso
- Black tea or chai
- A glass of red wine or port
- Sides:
- Fresh berries
- Scoop of vanilla ice cream
- A dollop of whipped cream
Nutritional Information (Per Slice Approximation)
- Calories: ~310
- Fat: 22g
- Carbs: 28g
- Sugar: 18g
- Protein: 6g
Nutritional content will vary depending on serving size and garnishes.

Frequently Asked Questions
Can I make this gluten-free?
Yes, substitute the plain flour with a gluten-free 1:1 flour mix designed for baking.
My sponge cracked. What happened?
Overbaking or rolling when the cake is too cold can lead to cracks. Roll while it’s just cooled or use a clean towel to help guide the roll.
Can I skip the ganache?
Absolutely. You can dust the roll with powdered sugar or cocoa instead for a lighter finish.
How long does this cake stay fresh?
Best enjoyed within 3 days, but it can be kept refrigerated for up to 5 days.
Final Thoughts
This Chocolate Sponge Roll Cake is more than just a dessert — it’s an experience. From its tender sponge to the dreamy cream filling and rich ganache topping, it’s a labor of love that rewards you (and your guests) with every single bite.
Whether you’re looking to impress during the holidays, add a wow-factor to your dinner parties, or simply enjoy the art of baking, this cake delivers in every way.
Did you enjoy this recipe?
If so, please share it with your fellow dessert lovers and subscribe to our blog for more elegant, tested, and totally irresistible recipes every week! Let’s bake something beautiful together.


