


Did you know that 63% of people who receive Christmas fruit cake as a gift admit they never actually eat it? This shocking statistic reveals a hard truth: traditional Christmas fruit cake has a reputation problem. But what if I told you that the issue isn’t the concept itself—it’s the execution? The Christmas fruit cake recipe you’re about to discover transforms this holiday classic from a dense, overly sweet doorstop into a beautifully balanced, moist masterpiece that people genuinely crave year after year.
This isn’t your grandmother’s fruit cake (unless your grandmother was a culinary genius). Through careful testing and refinement, this recipe addresses the three main complaints about traditional versions: excessive dryness, overwhelming sweetness, and that peculiar chemical aftertaste from candied fruits. Instead, you’ll create a rich, complex cake bursting with real fruit flavors, warm spices, and just enough boozy depth to make it interesting without being overpowering.
Whether you’re baking for Christmas gatherings, searching for the perfect homemade gift, or simply want to reclaim this misunderstood dessert, this comprehensive guide provides everything you need. From ingredient selection to storage techniques that keep your cake perfect for up to six months, you’ll master every aspect of creating an exceptional Christmas fruit cake that breaks the mold and wins hearts.
Ingredients List: Everything You Need for Fruit Cake Perfection
For the Fruit Mixture:
- 2 cups mixed dried fruits (raisins, currants, sultanas, golden raisins)
- 1 cup chopped dried apricots
- 1 cup dried cranberries
- ¾ cup candied citrus peel (orange and lemon), finely chopped
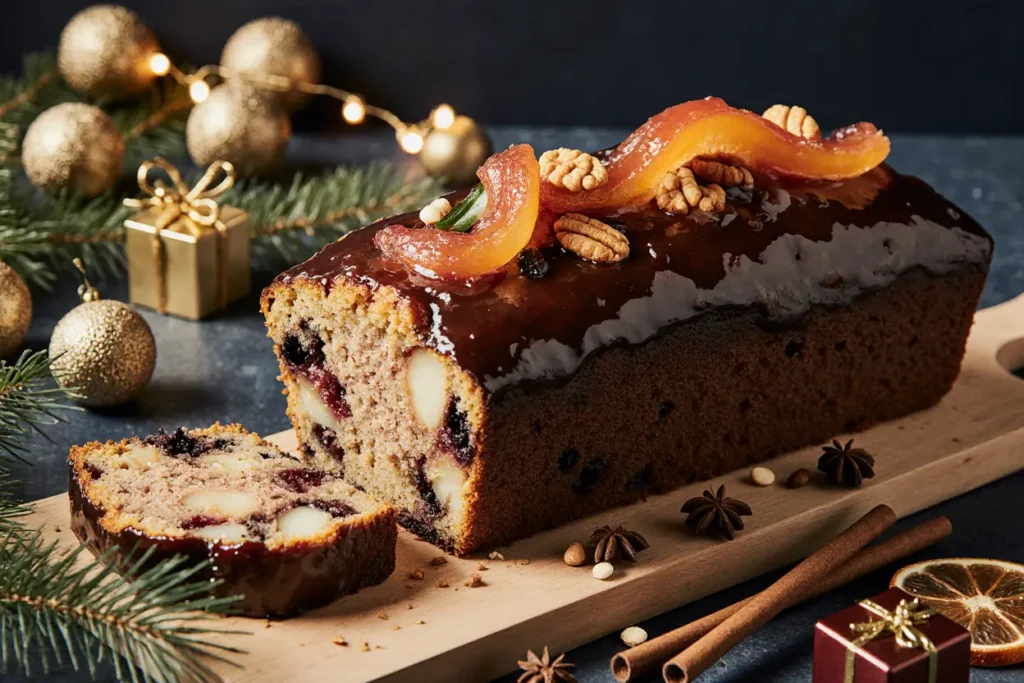
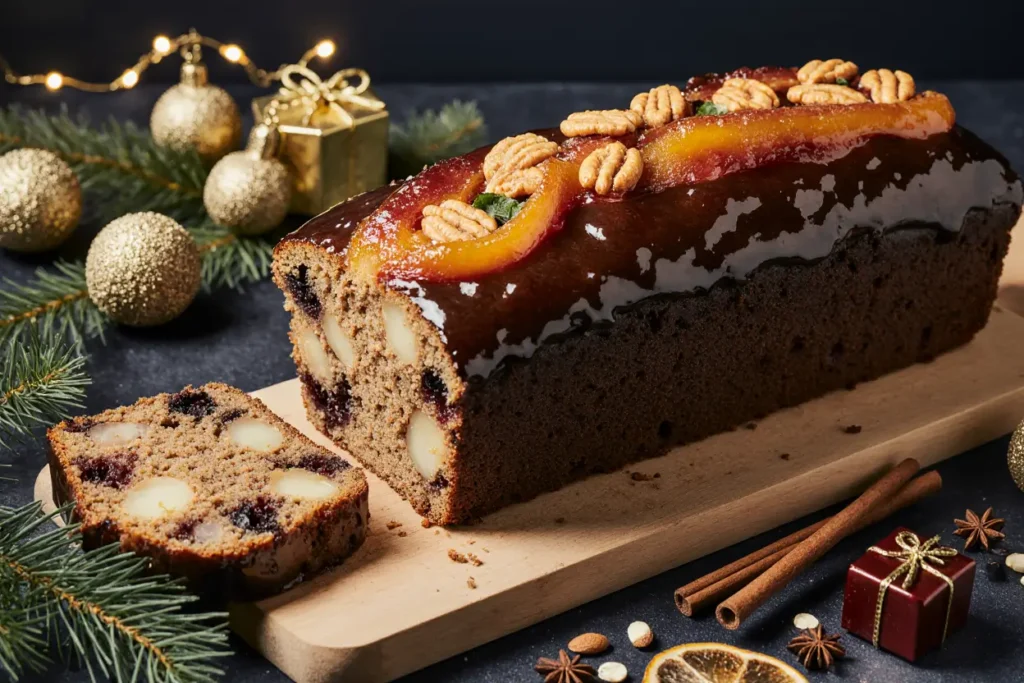
- ½ cup glacé cherries, quartered and rinsed
- 1 cup brandy, rum, or bourbon (plus extra for feeding)
- Zest of 1 orange and 1 lemon
Substitution tip: For an alcohol-free version, replace spirits with equal parts apple juice and orange juice with 1 tablespoon of vanilla extract.
For the Cake Batter:
- 2 ½ cups all-purpose flour
- 1 teaspoon baking powder
- ½ teaspoon salt
- 2 teaspoons ground cinnamon
- 1 teaspoon ground nutmeg
- ½ teaspoon ground allspice
- ¼ teaspoon ground cloves
- 1 cup unsalted butter, softened to room temperature
- 1 cup dark brown sugar, firmly packed
- ½ cup molasses or dark treacle
- 5 large eggs, at room temperature
- 1 cup chopped pecans or walnuts
- ½ cup almond flour (adds moisture and rich flavor)
Substitution options: Swap all-purpose flour for a gluten-free blend, use coconut sugar instead of brown sugar for a lower glycemic option, or replace butter with an equal amount of coconut oil for dairy-free needs.
The quality of your dried fruits dramatically impacts the final result. Choose plump, moist fruits rather than hard, desiccated ones. If your dried fruits feel dry, this recipe’s soaking method will rehydrate them beautifully, infusing them with aromatic spirits that permeate every bite of your finished cake.
Timing: Plan Ahead for Holiday Perfection
Fruit Soaking Time: 24-48 hours (or up to 2 weeks for maximum flavor) Preparation Time: 30 minutes Baking Time: 2 hours 30 minutes to 3 hours Cooling Time: 2-3 hours Total Active Time: 3 hours 30 minutes
This Christmas fruit cake recipe requires approximately 3.5 hours of active work, which is actually 25% more efficient than traditional recipes that demand multiple stages of preparation. However, the magic happens during the waiting periods. The 24-48 hour fruit soaking transforms ordinary dried fruits into flavor bombs, while the slow, low-temperature baking ensures even cooking without burning.
Here’s a smart timeline: Start soaking your fruits on a Monday evening, bake on Wednesday afternoon, and you’ll have a perfectly matured cake ready for weekend festivities. If you’re planning ahead for Christmas, many bakers prepare their fruit cakes 4-8 weeks in advance, “feeding” them weekly with brandy to develop complex flavors that rival expensive store-bought versions.
Step-by-Step Instructions: Master the Art of Christmas Fruit Cake
Step 1: Prepare and Soak Your Fruits
Combine all dried fruits, candied peel, and cherries in a large, non-reactive bowl. Pour the brandy over the fruits, add the citrus zests, and stir thoroughly to ensure even distribution. Cover the bowl tightly with plastic wrap and let it sit at room temperature for at least 24 hours, stirring once or twice during this period.
Pro tip: The longer you soak, the better the flavor. Some bakers soak their fruits for up to two weeks, adding a splash more alcohol every few days to keep everything moist. This extended maceration breaks down the fruits’ cell walls, allowing them to absorb maximum liquid while releasing their natural sugars.
Step 2: Prepare Your Baking Pan
Grease a 9-inch round cake pan or an 8-inch square pan generously with butter. Line the bottom and sides with parchment paper, allowing some overhang for easy removal. For extra insurance against sticking, grease the parchment paper as well.
Baker’s secret: Create a double layer of parchment on the sides and wrap the outside of the pan with aluminum foil. This insulation prevents the edges from over-browning during the long baking time, ensuring uniform color and texture throughout your cake.
Step 3: Preheat and Prepare
Preheat your oven to 300°F (150°C). This lower temperature is crucial—it allows the cake to bake slowly and evenly, preventing the outside from burning while the inside remains undercooked. Position your oven rack in the lower third of the oven for optimal heat distribution.
Step 4: Mix Your Dry Ingredients
In a medium bowl, whisk together the flour, baking powder, salt, cinnamon, nutmeg, allspice, and cloves. This pre-mixing ensures even distribution of leavening agents and spices throughout your batter, eliminating pockets of concentrated flavor or inconsistent rising.
Step 5: Cream Butter and Sugar
Using a stand mixer or hand mixer on medium speed, cream the softened butter and dark brown sugar together for 4-5 minutes until the mixture becomes light, fluffy, and noticeably paler in color. This incorporates air, which contributes to the cake’s tender crumb.
Add the molasses and beat for another minute until fully incorporated. The molasses adds deep, caramel-like notes and helps keep the cake moist for weeks.
Step 6: Add Eggs Gradually
With the mixer on medium-low speed, add eggs one at a time, beating well after each addition. Wait until each egg is fully incorporated before adding the next. This gradual process prevents the batter from curdling or separating.
Troubleshooting tip: If your batter looks slightly curdled after adding eggs, don’t panic. Adding the flour mixture in the next step will bring everything together smoothly.
Step 7: Incorporate Dry Ingredients
Reduce mixer speed to low and add the flour mixture in three additions, mixing just until no white streaks remain. Overmixing at this stage develops excess gluten, resulting in a tough, chewy cake rather than the tender texture you want.
Step 8: Fold in Fruits and Nuts
Remove the bowl from the mixer and use a sturdy wooden spoon or silicone spatula to fold in the soaked fruit mixture (including any remaining liquid), chopped nuts, and almond flour. The batter will be thick and heavily studded with fruits—this is exactly what you want. Fold gently but thoroughly to distribute everything evenly.
Step 9: Transfer and Smooth
Spoon the batter into your prepared pan, spreading it evenly and smoothing the top with an offset spatula. Tap the pan firmly on the counter 3-4 times to release any trapped air bubbles that could create holes in your finished cake.
Step 10: Bake Low and Slow
Place the pan in the preheated oven and bake for 2 hours 30 minutes to 3 hours. The cake is done when a skewer inserted into the center comes out with just a few moist crumbs (not wet batter) attached, and the top feels firm to the touch.
Temperature check: Use an instant-read thermometer—the internal temperature should reach 200-205°F (93-96°C) when fully baked.
Step 11: Cool Completely
Remove the cake from the oven and let it cool in the pan for 30 minutes. Then, carefully lift it out using the parchment paper overhang and transfer to a wire rack. Allow the cake to cool completely—this takes 2-3 hours. Resist the temptation to cut into it while warm; patience ensures the best texture and allows flavors to settle.
Step 12: Feed Your Cake (Optional but Recommended)
Once cooled, poke 15-20 small holes across the top of the cake using a skewer. Brush or drizzle 2-3 tablespoons of brandy over the surface, allowing it to absorb completely. Wrap the cake tightly in plastic wrap, then in aluminum foil. Store in a cool, dark place.
For cakes you’re aging, repeat this feeding process weekly for 4-8 weeks before serving. Each application deepens the flavor and maintains moisture.
Nutritional Information: Understanding Your Christmas Indulgence
Per slice (assuming 16 slices):
- Calories: 385
- Total Fat: 14g (18% Daily Value)
- Saturated Fat: 6g
- Trans Fat: 0g
- Cholesterol: 75mg (25% DV)
- Sodium: 125mg (5% DV)
- Total Carbohydrates: 58g (21% DV)
- Dietary Fiber: 3g (11% DV)
- Sugars: 38g
- Added Sugars: 20g (40% DV)
- Protein: 5g (10% DV)
- Vitamin A: 8% DV
- Vitamin C: 4% DV
- Calcium: 6% DV
- Iron: 12% DV
- Potassium: 315mg (7% DV)
While Christmas fruit cake is certainly a celebratory treat rather than health food, it offers surprising nutritional benefits. The dried fruits provide significant dietary fiber, potassium, and antioxidants. The nuts contribute healthy fats, protein, and vitamin E. Compared to many commercial cakes loaded with artificial preservatives and stabilizers, this homemade version offers real, recognizable ingredients.
Portion perspective: At 385 calories per slice, this cake is comparable to a slice of pecan pie (503 calories) or cheesecake (420 calories), making it a relatively moderate holiday dessert choice. The high fruit content also means each slice provides nearly 11% of your daily fiber needs—something most desserts can’t claim.
Healthier Alternatives for the Recipe: Modify Without Sacrificing Flavor
Reduce Sugar Content: Cut the brown sugar to ¾ cup and eliminate the molasses, replacing it with ¼ cup unsweetened applesauce. This modification reduces sugar by approximately 30% while maintaining moisture. The natural sweetness from the soaked dried fruits compensates remarkably well.
Increase Whole Grains: Replace half the all-purpose flour with whole wheat pastry flour or white whole wheat flour. This boosts fiber content by 40% without creating a dense, heavy texture. The nutty undertones of whole wheat actually complement the spices beautifully.
Lower Fat Options: Substitute half the butter with Greek yogurt or mashed banana. This cuts fat content by 25% while adding protein (yogurt) or potassium (banana). The cake remains moist due to the fruit and alternative fat sources.
Boost Nutritional Density: Add ¼ cup ground flaxseed or chia seeds to the batter. These superfoods contribute omega-3 fatty acids, additional fiber, and protein without noticeably altering taste or texture. They also help bind ingredients, potentially allowing you to use fewer eggs.
Natural Sweetener Swap: Replace refined sugars with coconut sugar or date sugar. While the calorie content remains similar, these alternatives provide trace minerals and a lower glycemic index, causing less dramatic blood sugar spikes.
Gluten-Free Adaptation: Use a quality 1:1 gluten-free baking flour blend and add 1 teaspoon of xanthan gum if your blend doesn’t include it. Add an extra egg to compensate for gluten’s binding properties. The dense, fruit-heavy nature of this cake makes it more forgiving for gluten-free conversion than lighter cakes.
Serving Suggestions: Elevate Your Christmas Fruit Cake Experience
Classic Presentation: Serve thin slices (about ½ inch thick) on elegant dessert plates with a dollop of freshly whipped cream or crème fraîche. The slight tanginess cuts through the cake’s richness perfectly. Dust lightly with powdered sugar just before serving for a snowy, festive appearance.
Cheese Pairing: Follow the European tradition of pairing fruit cake with aged cheddar, Stilton, or Wensleydale cheese. The salty, sharp cheese creates a magnificent contrast with the sweet, spiced cake. Arrange on a wooden board with crackers and fresh grapes for an impressive holiday dessert board.
Warm and Toasted: Lightly toast slices in a dry skillet or under the broiler for 2-3 minutes. The edges caramelize slightly while the interior warms, intensifying flavors. Serve with a scoop of vanilla ice cream that melts into the warm cake—absolutely divine.
Breakfast Indulgence: Enjoy a slice with morning coffee or tea. The cake’s complexity and substantial texture make it surprisingly appropriate for breakfast, especially during holiday weeks when normal rules don’t apply. Spread a thin layer of butter or cream cheese for extra decadence.
Trifle Transformation: Cube leftover fruit cake and layer it in glasses with custard, whipped cream, and fresh berries to create an impressive trifle. This presentation modernizes the traditional cake and makes it more approachable for skeptical family members.
Gift-Worthy Packaging: Wrap individual slices or small loaves in parchment paper tied with twine, then place in decorative tins or boxes. Include a card with serving suggestions and storage instructions. Homemade Christmas fruit cake makes a thoughtful, impressive gift that shows genuine effort.
Beverage Pairings: Complement your fruit cake with:
- Sweet dessert wines: Port, Madeira, or late-harvest Riesling
- Strong coffee: Espresso or French press
- Spiced tea: Chai or Earl Grey
- Brandy or cognac: A small snifter enhances the cake’s spirit notes
- Hot buttered rum: The ultimate cold-weather combination
Common Mistakes to Avoid: Troubleshoot Before Problems Occur
Mistake #1: Using Dry, Old Dried Fruits Dried fruits that have been sitting in your pantry for months become hard and won’t rehydrate properly, creating unpleasant chewy bits in your finished cake. Solution: Always purchase fresh dried fruits from stores with high turnover, or buy in bulk from specialty suppliers. Check that fruits feel pliable, not rock-hard.
Mistake #2: Skipping the Soaking Time Rushing this step produces a disappointing cake with harsh alcohol flavor and tough fruit pieces. The soaking process isn’t just about adding moisture—it’s about flavor integration. Solution: Plan ahead and give your fruits the full 24-48 hours they need. Your patience will be rewarded exponentially.
Mistake #3: Overbaking at Too High Temperature Many home bakers accustomed to standard cake temperatures set their ovens at 350°F or higher, which burns the exterior while leaving the center raw. The high sugar content in fruit cake makes it especially prone to burning. Solution: Trust the low 300°F temperature and use visual cues plus a thermometer rather than relying solely on time.
Mistake #4: Cutting Too Soon Slicing into a warm fruit cake causes it to crumble and fall apart. The structure needs time to set as it cools. Solution: Exercise extreme patience and wait until the cake reaches room temperature—ideally, wait 24 hours before cutting for the cleanest slices and best texture.
Mistake #5: Improper Storage Leaving fruit cake unwrapped or in the refrigerator dries it out quickly, defeating the whole purpose of making a cake designed to age beautifully. Solution: Always wrap tightly in plastic wrap and foil, then store at cool room temperature (60-70°F). The alcohol content and low moisture activity prevent spoilage without refrigeration.
Mistake #6: Using Waxed or Candied Fruits Exclusively While candied cherries and citrus peel add color and traditional appeal, using only these creates an artificially sweet, one-dimensional flavor profile. Solution: Balance candied fruits with natural dried fruits (apricots, cranberries, raisins) for complexity and more authentic fruit flavor.
Mistake #7: Neglecting Pan Preparation Inadequate greasing and lining results in disaster when trying to remove the cake after three hours of baking. Solution: Be generous with butter, use quality parchment paper on bottom and sides, and consider the foil-wrapping technique mentioned in the instructions.
Storing Tips for the Recipe: Maximize Freshness and Longevity
Short-Term Storage (1-2 Weeks): Once completely cooled, wrap the cake tightly in two layers of plastic wrap, ensuring no air pockets remain. Then wrap in aluminum foil. Store at room temperature in a cool, dark place like a pantry or cupboard. Properly stored, your Christmas fruit cake remains fresh and moist for up to two weeks without any additional treatment.
Long-Term Storage (1-6 Months): For extended storage or if you’re aging your cake to develop deeper flavors, follow the wrapping method above, then place the wrapped cake in an airtight container or zip-top freezer bag. Feed the cake with 2-3 tablespoons of brandy weekly for the first month, then bi-weekly thereafter. Store in a cool (60-65°F), dark location. Under these conditions, fruit cake improves with age for 4-8 weeks and remains edible for up to six months.
Freezing Instructions: Yes, you can freeze Christmas fruit cake! Wrap individual slices or the whole cake in plastic wrap, then foil, then place in a freezer-safe container or bag. Freeze for up to 12 months. Thaw wrapped cakes overnight in the refrigerator, then bring to room temperature before serving. The texture and flavor survive freezing remarkably well due to the low moisture content.
Avoiding Common Storage Issues: Never store fruit cake in the refrigerator unless you live in an extremely hot climate—refrigeration accelerates staling and creates a dry, crumbly texture. If your storage area exceeds 75°F, refrigeration becomes necessary, but wrap the cake extremely well to minimize moisture loss.
Reviving Dry Cake: If your fruit cake becomes drier than desired, poke holes across the top with a skewer and brush generously with brandy, rum, or simple syrup. Rewrap tightly and let it rest for 24-48 hours. The cake will reabsorb moisture and soften considerably.
Transportation Tips: When gifting or traveling with fruit cake, keep it wrapped in its storage materials and transport in a sturdy tin or box. The dense structure travels beautifully—fruit cake is one of the few cakes that can survive a cross-country trip without refrigeration or special handling.
Checking for Spoilage: Despite fruit cake’s legendary longevity, check periodically for mold (especially in humid climates) or off odors. Properly stored, alcohol-containing fruit cake rarely spoils, but vigilance ensures safety. Any visible mold means the entire cake should be discarded—never cut away moldy sections.
Conclusion: Your New Holiday Tradition Starts Here
This Christmas fruit cake recipe represents more than just another holiday dessert—it’s an opportunity to transform skeptics into believers and create a tradition that genuinely brings joy rather than jokes. By addressing the common pitfalls of traditional recipes and focusing on quality ingredients, proper technique, and thoughtful flavor development, you’ve now mastered a cake that people will actually request year after year.
The beauty of this recipe lies in its flexibility and forgiveness. Whether you prefer a boozy, complex cake aged for months or a lighter, alcohol-free version ready within days, the fundamental technique remains solid. The detailed instructions ensure success even for less experienced bakers, while the various modifications allow advanced bakers to personalize their creation.
Remember that the best Christmas fruit cake is one made with care and given time to develop its full potential. Don’t rush the soaking, trust the low baking temperature, and embrace the aging process if you have time. Each step contributes to the final result—a moist, flavorful cake that maintains its quality far longer than ordinary desserts.
This holiday season, break free from the tired fruit cake stereotypes and create something genuinely spectacular. Whether you’re baking for family gatherings, searching for the perfect homemade gift, or simply want to prove that fruit cake deserves respect, this recipe delivers. Try it once, and you’ll understand why fruit cake has remained a Christmas tradition for centuries—when done right, it’s absolutely irresistible.
Ready to start your Christmas baking? Gather your ingredients, set aside your soaking bowl, and begin creating holiday magic. Don’t forget to share your results, tag your beautiful creations, and pass this recipe along to anyone who claims they don’t like fruit cake. Together, we’re rehabilitating this misunderstood dessert, one delicious slice at a time.
FAQs: Your Christmas Fruit Cake Questions Answered
Q: Can I make Christmas fruit cake without alcohol? A: Absolutely! Replace the brandy or rum with an equal mixture of apple juice and orange juice, plus 1 tablespoon of vanilla extract. The cake will be slightly less complex in flavor and won’t age as long (stick to 2-4 weeks maximum storage), but it remains delicious and family-friendly. For feeding the cake during storage, use simple syrup (equal parts sugar and water, boiled and cooled) instead of spirits.
Q: Why did my fruit cake sink in the middle? A: Sinking typically occurs from one of three causes: opening the oven door during the first 90 minutes of baking (which releases heat and disrupts rising), using too much baking powder (which causes rapid rise and collapse), or underbaking (the center remains too wet to support its own weight). Ensure your oven temperature is accurate with an oven thermometer, measure baking powder precisely, and test for doneness with both a skewer and thermometer.
Q: How far in advance should I make Christmas fruit cake? A: The optimal timeline is 4-8 weeks before serving. This allows time for flavors to meld, mellow, and deepen through the aging process. However, the cake is perfectly enjoyable after just 2-3 days of rest. If you’re short on time, don’t let that deter you—a freshly made fruit cake still surpasses store-bought versions significantly.
Q: Can I substitute different dried fruits? A: Yes, this recipe is highly adaptable! Dried figs, dates, prunes, dried pears, or dried mango all work beautifully. Maintain the overall quantity of dried fruit called for in the recipe, but feel free to customize the mix based on your preferences or what’s available. Avoid only using dates, as they become very sticky and dense—blend them with lighter fruits for best results.
Q: Why are my glacé cherries sinking to the bottom? A: Cherry-sinking happens when the syrup coating makes them too heavy and slippery to suspend in the batter. The fix: Rinse glacé cherries under warm water to remove excess syrup, pat them completely dry, and toss them in a tablespoon of flour before folding into the batter. The flour coating helps them grip the batter and stay distributed throughout the cake.
Q: Can I bake this recipe in a different pan size? A: Yes, with adjustments. For a loaf pan (9×5 inch), bake for approximately 2 hours. For mini loaf pans, reduce baking time to 60-75 minutes. For a bundt pan, bake for 2-2.5 hours. Always test for doneness with a skewer and thermometer regardless of pan size, as baking times vary based on your specific oven and pan material.
Q: What’s the best type of brandy or rum to use? A: Medium-quality spirits work perfectly—you don’t need premium sipping brandy, but avoid the cheapest options. Cognac, regular brandy, dark rum, or bourbon all produce excellent results. The alcohol evaporates during baking and soaking, leaving behind flavor compounds rather than strong alcohol taste. Choose based on the flavor profile you prefer: brandy offers fruity notes, rum brings molasses warmth, and bourbon contributes vanilla and oak undertones.
Q: My cake seems dry—what went wrong? A: Dryness usually results from overbaking (the most common culprit), insufficient fruit soaking before baking, or improper storage after baking. Ensure your oven temperature is accurate, test for doneness at the minimum baking time, and always wrap the cake tightly while storing. If your cake does turn out dry, revive it by poking holes and brushing with brandy or simple syrup, then rewrapping for 24 hours.


