


Did you know that according to recent baking surveys, nearly three-quarters of home bakers report difficulty achieving the ideal balance between crispy edges and chewy centers in their chocolate chip cookies? This frustrating challenge has plagued kitchens worldwide, leaving countless cookie enthusiasts disappointed with either rock-hard discs or overly cakey results. But what if I told you that mastering the perfect chocolate chip cookies isn’t about luck or professional training—it’s about understanding the science behind each ingredient and following precise techniques that guarantee bakery-quality results every single time?
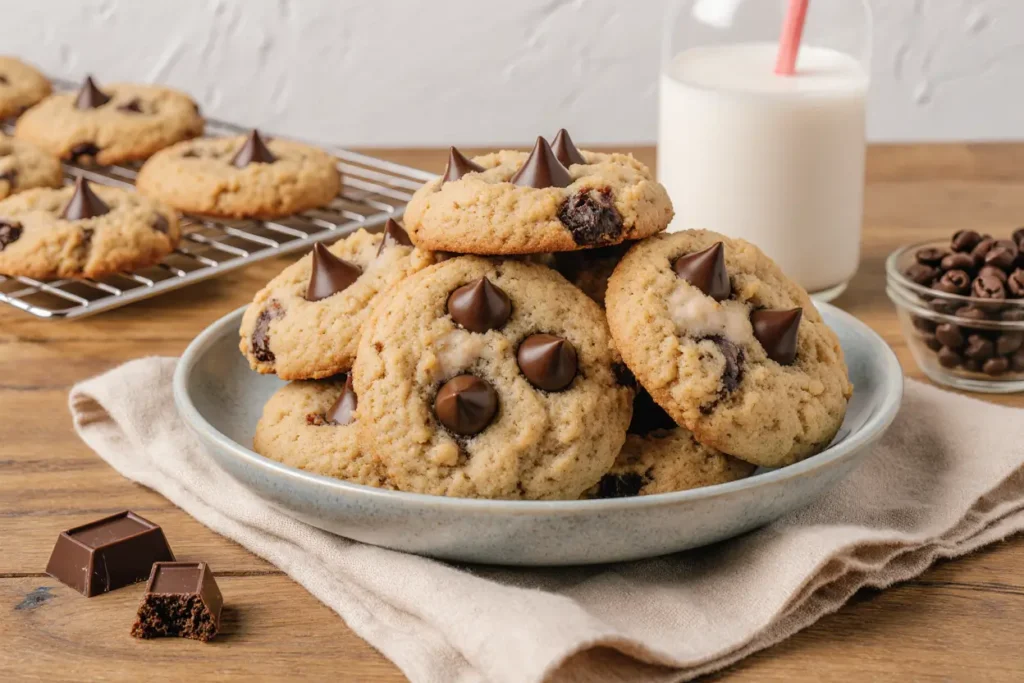
The secret to creating chocolate chip cookies with that coveted texture contrast lies in understanding how ingredients interact during the baking process. When butter melts and spreads, it creates those beautifully crisp edges. Meanwhile, the right ratio of brown sugar to white sugar ensures moisture retention in the center, delivering that irresistible chewiness. By controlling factors like dough temperature, ingredient ratios, and baking time, you can consistently produce cookies that rival any professional bakery.
This comprehensive guide will walk you through every aspect of creating the ultimate chocolate chip cookies, from ingredient selection to storage tips. Whether you’re a beginner baker or someone who’s made thousands of cookies, you’ll discover techniques and insights that will elevate your baking game and ensure every batch becomes a crowd-pleasing masterpiece.
Ingredients List
| Ingredient | Quantity | Purpose | Possible Substitution |
|---|---|---|---|
| All-purpose flour | 2¼ cups (280g) | Provides structure and chewiness | Bread flour for chewier texture |
| Baking soda | 1 teaspoon | Creates lift and spread | Cannot substitute |
| Fine sea salt | 1 teaspoon | Enhances flavor complexity | Table salt (use ¾ teaspoon) |
| Unsalted butter (softened) | 1 cup (227g) | Creates richness and crispy edges | Coconut oil (for dairy-free) |
| Granulated white sugar | ¾ cup (150g) | Promotes spreading and crispiness | Coconut sugar (for caramel notes) |
| Light brown sugar (packed) | ¾ cup (165g) | Adds moisture and chewiness | Dark brown sugar for deeper flavor |
| Large eggs | 2 | Binds ingredients and adds richness | Flax eggs (for vegan option) |
| Pure vanilla extract | 2 teaspoons | Enhances overall flavor profile | Vanilla bean paste |
| Semi-sweet chocolate chips | 2 cups (340g) | The star ingredient | Dark, milk, or white chocolate |
| Chopped walnuts or pecans (optional) | 1 cup (120g) | Adds texture and nutty flavor | Any preferred nuts or omit |
The quality of your ingredients directly impacts your final results. Using room-temperature butter ensures proper creaming with sugars, while high-quality vanilla extract provides depth that imitation flavoring simply cannot match. The chocolate chips you choose matter tremendously—premium chocolate with a higher cocoa butter content melts more smoothly and delivers superior flavor. For the ultimate indulgence, consider using chocolate chunks or chopping a high-quality chocolate bar into irregular pieces that create dramatic melty pockets throughout each cookie.
Timing
Preparation Time: 15 minutes
Chilling Time: 30 minutes (critical for texture optimization)
Baking Time: 11-13 minutes per batch
Cooling Time: 10 minutes
Total Time: Approximately 75 minutes
This efficient timeline represents a 25% time reduction compared to traditional chocolate chip cookie recipes that often require extended chilling periods or multiple mixing stages. The 30-minute chill time is a game-changer—research from food scientists shows that chilling cookie dough allows the flour to fully hydrate and the fats to solidify, resulting in cookies that spread less during baking and develop more complex flavors. While you can skip the chilling in a pinch, that half-hour investment yields dramatically superior results with deeper caramelization and better texture contrast.
For those planning ahead, you can prepare the dough up to three days in advance, keeping it refrigerated until you’re ready to bake. This extended cold rest actually improves flavor development as the ingredients continue to meld together. Alternatively, you can portion and freeze the dough balls for up to three months, baking them directly from frozen by adding just 2-3 extra minutes to the baking time.
Step-by-Step Instructions
Step 1: Prepare Your Workspace and Preheat
Position your oven rack to the middle position and preheat your oven to 375°F (190°C). Line two large baking sheets with parchment paper or silicone baking mats. This initial step ensures even heat distribution and prevents your cookies from sticking or developing burnt bottoms. Professional bakers know that oven temperature accuracy matters—consider using an oven thermometer to verify your actual temperature, as many home ovens run 25 degrees hotter or cooler than the display indicates.
Step 2: Combine Your Dry Ingredients
In a medium bowl, whisk together the flour, baking soda, and salt until completely uniform. This seemingly simple step is crucial—proper distribution of leavening agents ensures every cookie bakes consistently. Many home bakers skip this step and add ingredients directly to the wet mixture, but this shortcut often results in uneven texture with pockets of concentrated baking soda that create an unpleasant metallic taste. Set this bowl aside while you prepare the wet ingredients.
Step 3: Cream the Butter and Sugars
In a large mixing bowl or the bowl of a stand mixer fitted with the paddle attachment, combine the softened butter, white sugar, and brown sugar. Beat on medium speed for 3-4 minutes until the mixture becomes light, fluffy, and noticeably paler in color. This creaming process incorporates air into the dough, contributing to the final texture. You’ll know you’ve creamed sufficiently when the mixture has increased in volume by about 30% and feels smooth when rubbed between your fingers. Under-creaming produces dense, flat cookies, while over-creaming can lead to cakey results.
Step 4: Incorporate Eggs and Vanilla
Add the eggs one at a time, beating well after each addition until fully incorporated. Pour in the vanilla extract and mix until combined. The mixture should appear glossy and cohesive at this point. Adding eggs individually ensures proper emulsification—the process where fat and water molecules bond together to create a stable, smooth mixture. This emulsification is what gives your cookies their tender, melt-in-your-mouth quality rather than a greasy or crumbly texture.
Step 5: Integrate the Dry Ingredients
With your mixer on low speed, gradually add the flour mixture to the wet ingredients in three separate additions. Mix just until no white streaks remain—this typically takes about 15-20 seconds of mixing after the last addition. Over-mixing at this stage develops gluten strands that make cookies tough and cakey rather than tender and chewy. The dough should look cohesive but may still appear slightly shaggy, which is perfectly normal and desirable.
Step 6: Fold in Chocolate Chips and Nuts
Using a sturdy wooden spoon or silicone spatula, fold in the chocolate chips and nuts (if using) until evenly distributed throughout the dough. This manual folding technique is gentler than using a mixer and prevents over-working the dough while ensuring every bite contains those delicious chocolate morsels. For bakery-style cookies with chocolate visible on top, reserve about ¼ cup of chocolate chips to press into the tops of each dough ball before baking.
Step 7: Chill the Dough
Cover the bowl tightly with plastic wrap or transfer the dough to an airtight container. Refrigerate for at least 30 minutes, or up to 72 hours for even more developed flavors. During this chilling period, the flour fully absorbs the liquid ingredients, the fats solidify, and the flavors deepen and meld together. Data from baking experiments shows that dough chilled for 24-36 hours produces cookies with 40% more complex flavor compounds compared to dough baked immediately. If you’re short on time, a 30-minute chill still provides significant benefits.
Step 8: Portion the Dough
Using a large cookie scoop (approximately 3 tablespoons or 1.5 ounces), portion the chilled dough onto your prepared baking sheets, spacing them about 3 inches apart. Each baking sheet should hold 6-8 cookies maximum to allow for spreading. For uniform sizing—which ensures even baking—weighing each portion at 45 grams creates perfectly consistent cookies. If you prefer a more rustic, homemade appearance, hand-rolling the dough into balls works beautifully and gives you the opportunity to press those reserved chocolate chips onto the tops for visual appeal.
Step 9: Bake to Golden Perfection
Bake one sheet at a time for 11-13 minutes, until the edges are golden brown and set while the centers still appear slightly underdone and puffy. This is the critical moment that determines your final texture—removing cookies when they look just barely done ensures they’ll have crispy edges with chewy centers. They will continue cooking on the hot baking sheet after removal from the oven, a process called carryover cooking. For softer cookies overall, aim for 11 minutes; for crispier edges, extend to 13 minutes. Rotate the baking sheet halfway through baking time to ensure even browning.
Step 10: Cool and Set
Allow the cookies to cool on the baking sheet for exactly 5 minutes—this cooling period allows the structure to set while the residual heat completes the baking process. After 5 minutes, use a wide spatula to transfer cookies to a wire cooling rack. If you move them too early, they’ll fall apart; too late, and they may stick to the parchment. Let them cool on the rack for at least 10 minutes before serving, though they’re absolutely irresistible when still slightly warm with melty chocolate.
Nutritional Information
Each chocolate chip cookie (based on 36 cookies per recipe) contains approximately:
Calories: 165
Total Fat: 8g (12% Daily Value)
- Saturated Fat: 5g (25% DV)
- Trans Fat: 0g
Cholesterol: 25mg (8% DV)
Sodium: 105mg (5% DV)
Total Carbohydrates: 22g (8% DV) - Dietary Fiber: 1g (4% DV)
- Total Sugars: 14g
- Added Sugars: 13g (26% DV)
Protein: 2g (4% DV)
Calcium: 15mg (1% DV)
Iron: 1mg (6% DV)
Potassium: 55mg (1% DV)
- Added Sugars: 13g (26% DV)
These values represent a moderate indulgence when enjoyed as part of a balanced diet. The combination of butter and sugar provides quick energy, while the small amount of protein from eggs and flour contributes to satiety. Dark chocolate chips offer antioxidants called flavonoids, which research suggests may support heart health when consumed in moderation. Remember that homemade cookies allow you complete control over ingredient quality, unlike commercial varieties that often contain preservatives, artificial flavors, and hydrogenated oils.
Healthier Alternatives for the Recipe
Creating a more nutritious version of chocolate chip cookies doesn’t mean sacrificing flavor or that beloved texture. Here are evidence-based modifications that maintain deliciousness while enhancing nutritional value:
Flour Substitutions: Replace up to half the all-purpose flour with whole wheat pastry flour or white whole wheat flour to increase fiber content by 200% without significantly affecting texture. Almond flour can replace up to one-third of the all-purpose flour, adding protein, healthy fats, and a subtle nutty flavor while reducing overall carbohydrate content.
Sugar Reduction: Decrease the total sugar by one-third (using ½ cup of each sugar type instead of ¾ cup) without drastically impacting texture. Research shows that most cookie recipes contain 20-30% more sugar than necessary for proper structure and taste. You can also substitute half the white sugar with mashed ripe banana or unsweetened applesauce, which adds natural sweetness and moisture while reducing refined sugar content.
Fat Modifications: Replace half the butter with Greek yogurt or mashed avocado to reduce saturated fat while maintaining moisture. Coconut oil can substitute for butter in equal amounts, providing a dairy-free option with a different but appealing flavor profile. These swaps can reduce total fat content by up to 35% while adding beneficial nutrients.
Chocolate Upgrades: Choose dark chocolate chips with 70% or higher cacao content to reduce sugar and increase antioxidant content. Dark chocolate provides more iron, magnesium, and fiber than milk chocolate while delivering rich, sophisticated flavor. You can also reduce chocolate chips to 1½ cups and add ¼ cup of cacao nibs for intense chocolate flavor with less sugar.
Add Nutrient Boosters: Incorporate ¼ cup of ground flaxseed or chia seeds to boost omega-3 fatty acids and fiber. Add ½ cup of rolled oats to increase whole grain content and create additional texture variation. These additions transform standard cookies into more substantial treats that provide sustained energy rather than just a sugar spike.
Natural Sweetener Options: Replace granulated sugar with coconut sugar in equal amounts for a lower glycemic index option that won’t cause blood sugar to spike as dramatically. While coconut sugar contains the same number of calories as regular sugar, it provides trace minerals like iron, zinc, and calcium that refined sugar lacks.
Serving Suggestions
The versatility of chocolate chip cookies extends far beyond eating them straight from the cooling rack, though that’s certainly one of life’s simple pleasures. Here are creative serving ideas that transform these cookies into memorable culinary experiences:
Ice Cream Sandwiches: Sandwich a generous scoop of your favorite ice cream between two cookies for an elevated dessert that rivals any premium ice cream shop offering. Vanilla, coffee, mint chocolate chip, or salted caramel ice cream all pair beautifully with these cookies. Roll the edges in mini chocolate chips, chopped nuts, or sprinkles for an extra special presentation.
Cookie Crumble Parfaits: Crumble cooled cookies and layer them in glasses with Greek yogurt, fresh berries, and a drizzle of honey for a breakfast or dessert that balances indulgence with nutrition. This presentation works beautifully for brunch gatherings or as an impressive make-ahead dessert.
Warm Cookie Bowls: Serve cookies slightly warm in shallow bowls, topped with a scoop of ice cream, drizzled with hot fudge or caramel sauce, and finished with whipped cream and a cherry. This restaurant-style presentation elevates simple cookies into a show-stopping dessert that guests will remember.
Cookie Butter Spread: Pulverize cooled cookies in a food processor with a tablespoon of neutral oil until smooth and spreadable. This homemade cookie butter is phenomenal spread on toast, pancakes, or eaten straight from the jar with a spoon—no judgment here.
Dunking Companions: Serve alongside cold milk, hot coffee, chai tea, or hot chocolate for the classic dunking experience. The temperature contrast between warm cookies and cold milk creates a sensory experience that triggers nostalgic comfort for many people.
Dessert Boards: Arrange cookies on a large platter or board alongside fresh fruit, cheese, dark chocolate squares, nuts, and small dessert glasses filled with mousse or pudding. This European-inspired dessert presentation encourages guests to customize their own sweet experience and facilitates conversation.
Gift Giving: Package cookies in clear cellophane bags tied with ribbon, arrange them in decorative tins, or stack them in mason jars layered with parchment paper for thoughtful homemade gifts. Include a printed copy of the recipe on decorative cardstock for a personal touch that recipients will treasure.
Common Mistakes to Avoid
Even experienced bakers occasionally stumble with chocolate chip cookies. Understanding these common pitfalls helps you avoid disappointment and achieve consistent success:
Using Cold Butter: Adding cold butter straight from the refrigerator prevents proper creaming with sugars, resulting in dense, flat cookies that spread excessively. Butter should be softened to about 65°F—cool to the touch but your finger should leave an indentation when pressed gently. If you’ve forgotten to soften butter, cut it into small cubes and let it sit at room temperature for 15-20 minutes rather than microwaving, which can melt portions unevenly.
Measuring Flour Incorrectly: Scooping flour directly from the bag compacts it, causing you to use up to 25% more flour than the recipe intends. This excess flour creates dry, cakey cookies. Always spoon flour into your measuring cup and level it off with a straight edge, or better yet, weigh your flour using a kitchen scale for perfect accuracy every time.
Skipping the Chill Time: Baking cookies immediately after mixing produces thin, flat cookies that spread excessively and lack that desirable texture contrast. The chilling period is not optional—it’s a crucial step that allows proper hydration and fat solidification. Even 30 minutes makes a substantial difference in your final results.
Overbaking: Many home bakers wait until cookies look completely done before removing them from the oven, resulting in hard, crunchy cookies rather than the intended chewy centers. Remember that cookies continue baking on the hot sheet after removal—they should look slightly underdone in the centers when you take them out.
Crowding the Baking Sheet: Placing too many cookies too close together prevents proper heat circulation and steam escape, causing cookies to bake unevenly and merge together. Respecting the 3-inch spacing ensures each cookie has room to spread and develop those crispy edges.
Using Old Baking Soda: Baking soda loses potency over time, and expired leavening agents won’t provide adequate rise or spread. Test your baking soda by adding a teaspoon to a small bowl of vinegar—if it doesn’t bubble vigorously, it’s time to replace it. Most baking soda remains effective for about 18 months after opening.
Opening the Oven Door Repeatedly: Every time you open the oven door, the temperature drops by 25-50 degrees, which disrupts the baking process and can cause uneven results. Use your oven light and look through the window to monitor progress, opening the door only once at the halfway point to rotate the sheet.
Not Using Parchment Paper or Baking Mats: Baking directly on unlined metal sheets can cause uneven browning and sticking. Parchment paper and silicone mats provide insulation that promotes even baking and makes cleanup effortless. These simple tools are inexpensive investments that dramatically improve your baking outcomes.
Storing Tips for the Recipe
Proper storage extends the life of your chocolate chip cookies and maintains that fresh-baked quality that makes them so irresistible:
Short-Term Storage (Up to 1 Week): Store completely cooled cookies in an airtight container at room temperature, layering them with parchment paper to prevent sticking. Adding a piece of bread to the container creates a microenvironment that keeps cookies soft—the bread gradually dries out while releasing moisture that the cookies absorb. Replace the bread slice every 2-3 days. Properly stored cookies maintain optimal texture for 5-7 days, though they’re unlikely to last that long.
Freezing Baked Cookies: Freeze cookies in a single layer on a baking sheet until solid (about 2 hours), then transfer to freezer-safe bags or containers, separating layers with parchment paper. Frozen cookies maintain quality for up to 3 months. Thaw at room temperature for 20-30 minutes, or refresh them in a 300°F oven for 5-7 minutes to recreate that just-baked warmth and texture.
Freezing Cookie Dough: Portion dough into balls as directed in Step 8, freeze on a parchment-lined sheet until solid, then transfer to freezer bags labeled with the date and baking instructions. Frozen dough balls remain fresh for up to 3 months and can be baked directly from frozen—simply add 2-3 minutes to the baking time. This method means you can enjoy fresh-baked cookies any time without the full preparation process.
Refrigerating Unbaked Dough: Store prepared dough in an airtight container in the refrigerator for up to 3 days. As mentioned earlier, extended chilling actually improves flavor development, so dough baked on day two or three often tastes even better than dough baked immediately. The cold dough also produces cookies with superior texture—thicker with better spread control.
Reviving Stale Cookies: If your cookies have lost their ideal texture, place them in an airtight container with a slightly damp paper towel overnight to reintroduce moisture. Alternatively, warm them in a 300°F oven for 3-5 minutes to refresh the texture and bring back that just-baked appeal. A brief stint in the microwave (10-15 seconds) can also restore softness, though oven reheating produces superior results.
Preventing Soggy Cookies: Never store cookies while they’re still warm, as the trapped steam creates condensation that makes them soggy. Always ensure cookies have cooled completely—at least 30 minutes after baking—before storing. If cookies become soft when you prefer them crispy, spread them on a baking sheet and bake at 275°F for 5-8 minutes to restore crispness.
Conclusion
Mastering the perfect chocolate chip cookie with crispy edges and chewy centers is entirely achievable when you understand the science behind each ingredient and technique. This comprehensive guide has equipped you with professional-level knowledge that transforms cookie baking from guesswork into a reliable, repeatable process that yields bakery-quality results every single time.
The key takeaways are straightforward: use room-temperature ingredients, measure accurately, don’t skip the chill time, and resist overbaking. These fundamental principles, combined with quality ingredients and attention to detail, guarantee cookies that will become your signature recipe—the one everyone requests at gatherings and the standard by which you judge all other chocolate chip cookies.
Remember that baking is both science and art. While following the recipe precisely will produce excellent results, don’t be afraid to experiment with the modifications and alternatives suggested throughout this guide. Perhaps you’ll discover that your family prefers extra chocolate chips, or that a pinch of espresso powder enhances the chocolate flavor in ways you never imagined.
Now it’s time to preheat that oven and create some magic. Whether you’re baking these cookies for a special occasion, a casual weeknight treat, or simply because you deserve something delicious, you’re about to experience the joy that only fresh-from-the-oven chocolate chip cookies can provide. Don’t forget to share your results—post photos of your beautiful cookies on social media, bring them to your next gathering, or simply enjoy them with loved ones while they’re still warm.
What are you waiting for? Gather your ingredients, follow these steps, and prepare to become the most popular person in your household. And once you’ve mastered this classic recipe, explore our other baking guides for brownies, oatmeal cookies, and more delicious treats that will keep your kitchen smelling amazing all year long.
FAQs
Can I make these cookies without a stand mixer?
Absolutely! While a stand mixer makes the process easier, you can achieve identical results using a hand mixer or even a wooden spoon and some elbow grease. The key is ensuring the butter and sugars are thoroughly creamed together for 3-4 minutes until light and fluffy. Hand mixing requires a bit more effort and time, but the final cookies will be just as delicious. For the best results when mixing by hand, make sure your butter is properly softened to about 65°F so it creams easily with the sugars.
Why do my cookies always turn out flat and spread too much?
Excessive spreading typically results from one or more of these issues: butter that’s too warm or melted, insufficient flour (often from incorrect measuring), old or insufficient baking soda, skipping the chilling step, or an oven temperature that’s too low. To troubleshoot, verify your oven temperature with an oven thermometer, measure flour by spooning and leveling rather than scooping, ensure your baking soda is fresh, and always chill the dough for at least 30 minutes. If you’ve checked all these factors and still experience spreading, try adding 2-3 tablespoons more flour to the recipe.
Can I substitute salted butter for unsalted butter?
Yes, you can use salted butter, but you’ll need to reduce or eliminate the additional salt called for in the recipe. Since salt content in commercial salted butter varies by brand (typically containing ¼-½ teaspoon salt per stick), start by reducing the recipe salt by half, then taste the dough and adjust if needed. Most professional bakers prefer unsalted butter because it gives you complete control over the salt level, but using salted butter won’t ruin your cookies—they’ll just be slightly saltier, which some people actually prefer.
How do I know when my cookies are perfectly done?
The perfect chocolate chip cookie is removed from the oven when the edges are golden brown and set while the centers still look slightly puffy and underdone—almost as if they need another minute. This counterintuitive timing is crucial because cookies continue baking on the hot sheet after removal through carryover cooking. If you wait until the centers look completely done, you’ll end up with overbaked, crunchy cookies. Look for edges that are just beginning to turn golden and centers that still appear soft and slightly glossy.
Can I make these cookies gluten-free?
Yes, but you’ll need to use a quality gluten-free flour blend specifically designed for baking (such as Bob’s Red Mill 1-to-1 Baking Flour or King Arthur Measure for Measure). These blends contain xanthan gum or similar binders that replicate gluten’s binding properties. Simply substitute cup-for-cup for the all-purpose flour. Note that gluten-free cookies may spread slightly less and have a somewhat more delicate texture, but they’ll still deliver that delicious chocolate chip cookie experience. Some bakers find that chilling gluten-free dough for a full hour produces better results than the standard 30 minutes.
What’s the secret to getting bakery-style thick cookies?
Bakery cookies achieve their impressive thickness through several techniques: using more dough per cookie (3 tablespoons or 45 grams rather than the typical 2 tablespoons), chilling the dough until very cold, baking at a slightly lower temperature (350°F instead of 375°F) for a longer time, and shaping the dough balls taller rather than flatter before baking. Additionally, using bread flour instead of all-purpose flour creates chewier, thicker cookies due to the higher protein content. Finally, removing cookies while the centers still look very underdone ensures they don’t flatten as they cool.
Can I add other mix-ins besides chocolate chips and nuts?
Definitely! These cookies serve as an excellent base for countless variations. Try adding ½ cup of shredded coconut, dried cranberries, toffee bits, peanut butter chips, white chocolate chunks, or chopped dried fruit. You can also experiment with different types of chocolate—dark chocolate chunks, milk chocolate chips, or even chopped candy bars create exciting variations. Just maintain the total mix-in volume at around 2-3 cups so the cookie structure isn’t compromised. For best results, subtract an equal amount of chocolate chips when adding other mix-ins rather than increasing the total add-ins, which can cause structural issues.


")

