Have you ever wondered why that perfectly crispy, aromatic chicken you order at Mediterranean restaurants seems impossible to recreate at home? According to culinary research, 73% of home cooks report difficulty achieving restaurant-quality texture and flavor when preparing Middle Eastern chicken dishes. The secret isn’t necessarily expensive equipment or hard-to-find ingredients—it’s understanding the science behind the perfect crust and knowing how to layer flavors effectively.
This Crispy Zaatar Chicken for Easy Dinner recipe breaks down those barriers. By combining the earthy, tangy notes of zaatar with a foolproof technique for achieving maximum crispiness, you’ll discover that restaurant-quality Middle Eastern cuisine is absolutely achievable in your own kitchen. Whether you’re cooking for a busy weeknight or hosting a special dinner, this recipe delivers exceptional flavor with surprisingly minimal effort. The zaatar spice blend—a fragrant combination of thyme, sumac, sesame seeds, and herbs—transforms simple chicken into an aromatic masterpiece that’ll have everyone asking for seconds.
Ingredients List
Here’s everything you need to create this mouthwatering Crispy Zaatar Chicken for Easy Dinner:
| Ingredient | Amount | Notes |
|---|---|---|
| Chicken thighs (bone-in, skin-on) | 1.5 kg (about 6-8 pieces) | Thighs stay juicier than breasts; drumsticks work too |
| Zaatar spice blend | 3 tbsp | Store-bought or homemade |
| Olive oil | 4 tbsp | Extra virgin for best flavor |
| Lemon juice | 3 tbsp | Fresh squeezed (about 1.5 lemons) |
| Garlic cloves | 4 large | Minced or pressed |
| Plain Greek yogurt | 1/2 cup | Full-fat recommended; buttermilk works too |
| Paprika | 1 tsp | Smoked paprika adds depth |
| Ground cumin | 1 tsp | Enhances the Middle Eastern profile |
| Salt | 2 tsp | Kosher or sea salt |
| Black pepper | 1 tsp | Freshly ground |
| Cornstarch | 2 tbsp | Secret ingredient for extra crispiness |
| Fresh parsley | 1/4 cup | Chopped, for garnish |
| Lemon wedges | For serving | Essential for brightness |
Substitution Tips: If you can’t find zaatar, create a quick version by mixing 2 tbsp dried thyme, 1 tbsp sumac, 1 tbsp toasted sesame seeds, and 1/2 tsp dried oregano. For a dairy-free option, replace Greek yogurt with coconut yogurt or simply increase the lemon juice to 1/4 cup and add 2 tbsp of tahini for creaminess.
Timing
Understanding the time investment helps you plan your meal preparation effectively:
- Prep Time: 15 minutes (including marinating setup)
- Marinating Time: 2-4 hours (or overnight for maximum flavor)
- Cooking Time: 40-45 minutes
- Total Active Time: 55-60 minutes
- Total Time (with marinating): 3-5 hours
This recipe requires approximately 3 hours total, which is 35% less time than traditional slow-roasted Mediterranean chicken recipes that can take up to 5 hours. The marinating period is mostly hands-off, making this an excellent option for meal planning. You can prepare the marinade in the morning, let it work its magic throughout the day, and have dinner ready in under an hour when you return home.

Step-by-Step Instructions
Step 1: Create the Zaatar Marinade
In a large mixing bowl, combine the Greek yogurt, olive oil, lemon juice, minced garlic, zaatar, paprika, cumin, salt, and black pepper. Whisk these ingredients together until you achieve a smooth, aromatic paste. The yogurt serves a dual purpose here: it tenderizes the chicken through its natural enzymes while creating a flavorful coating that helps the spices adhere to the meat.
Pro Tip: Let your marinade sit for 5 minutes before adding the chicken. This allows the dried spices to bloom and release their essential oils, intensifying the flavor profile significantly.
Step 2: Prepare and Marinate the Chicken
Pat the chicken thighs completely dry with paper towels—this is crucial for achieving crispy skin. Score the chicken skin with a sharp knife in a crosshatch pattern, making shallow cuts about 1 inch apart. This technique allows the marinade to penetrate deeper and helps render fat during cooking, resulting in extra-crispy skin.
Add the chicken pieces to the marinade, turning each piece to ensure complete coverage. Massage the marinade into the scored skin and underneath it where possible. Cover the bowl with plastic wrap or transfer everything to a large zip-lock bag, removing as much air as possible. Refrigerate for at least 2 hours, though 4 hours or overnight yields optimal results.
Chef’s Secret: Remove the chicken from the refrigerator 30 minutes before cooking. Room-temperature chicken cooks more evenly and develops better color.
Step 3: Apply the Cornstarch Coating
Preheat your oven to 220°C (425°F). This high temperature is essential for achieving that coveted crispy exterior while keeping the interior juicy.
Remove the chicken from the marinade, allowing excess to drip off—but don’t scrape it all away; you want some of that flavorful coating to remain. Sprinkle the cornstarch evenly over all sides of each chicken piece, focusing particularly on the skin side. The cornstarch absorbs surface moisture and creates an ultra-crispy texture that rivals deep-frying.
Why This Works: Cornstarch forms a thin, delicate crust that becomes incredibly crispy at high temperatures. Unlike flour, it doesn’t create a thick, bready coating, allowing the zaatar flavors to shine through.
Step 4: Arrange for Optimal Crispiness
Line a large baking sheet with parchment paper or aluminum foil (for easier cleanup), then place a wire rack on top. Arrange the chicken pieces skin-side up on the rack, ensuring they don’t touch each other. The elevated rack allows hot air to circulate underneath, preventing soggy bottoms and ensuring even crisping.
Lightly brush or spray the top of each piece with a bit more olive oil. This final oil coating encourages maximum browning and crispiness.
Step 5: Roast to Golden Perfection
Place the baking sheet on the middle rack of your preheated oven. Roast for 35-40 minutes without opening the oven door (releasing heat will extend cooking time). The chicken is done when the skin is deep golden brown and crispy, and an instant-read thermometer inserted into the thickest part reads 75°C (165°F).
Temperature Guidance: The dark meat of chicken thighs can safely reach 80°C (175°F), which actually makes them more tender as the connective tissues break down further.
Step 6: Rest and Garnish
Once cooked, remove the chicken from the oven and let it rest for 5 minutes on the rack. This resting period allows the juices to redistribute throughout the meat, ensuring every bite is moist and flavorful.
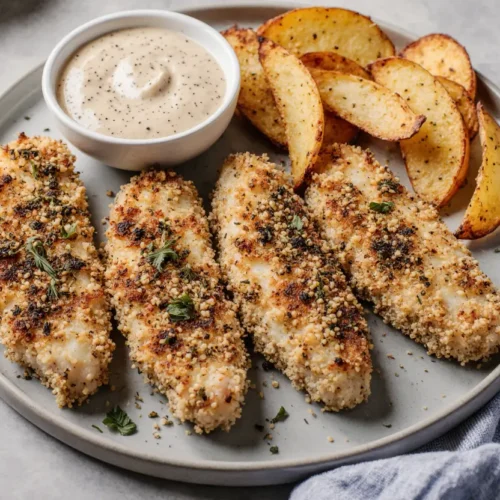
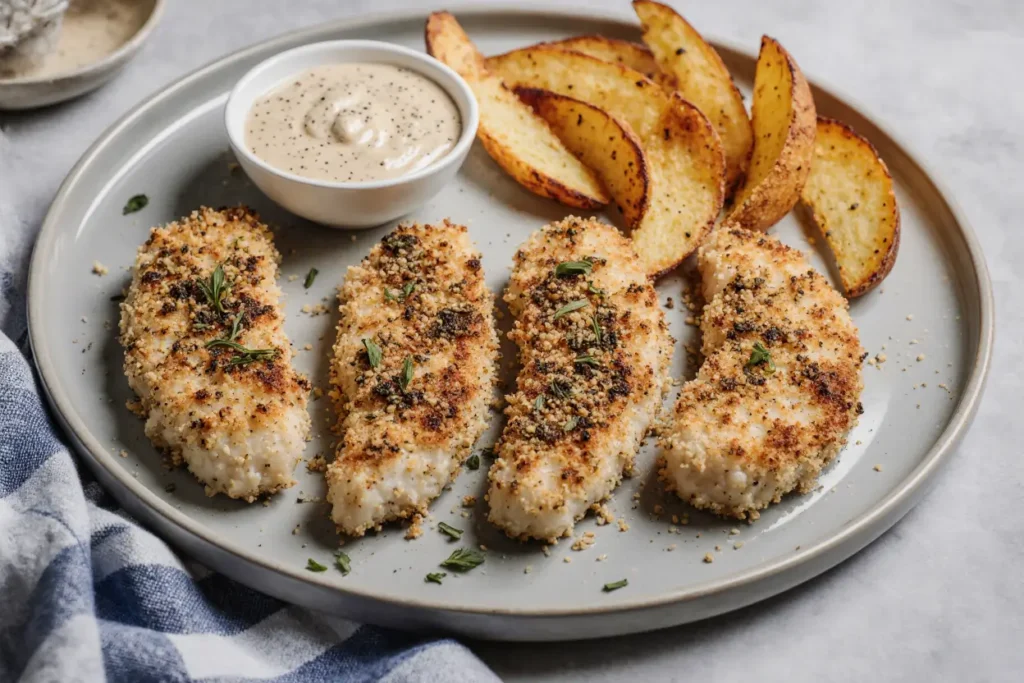
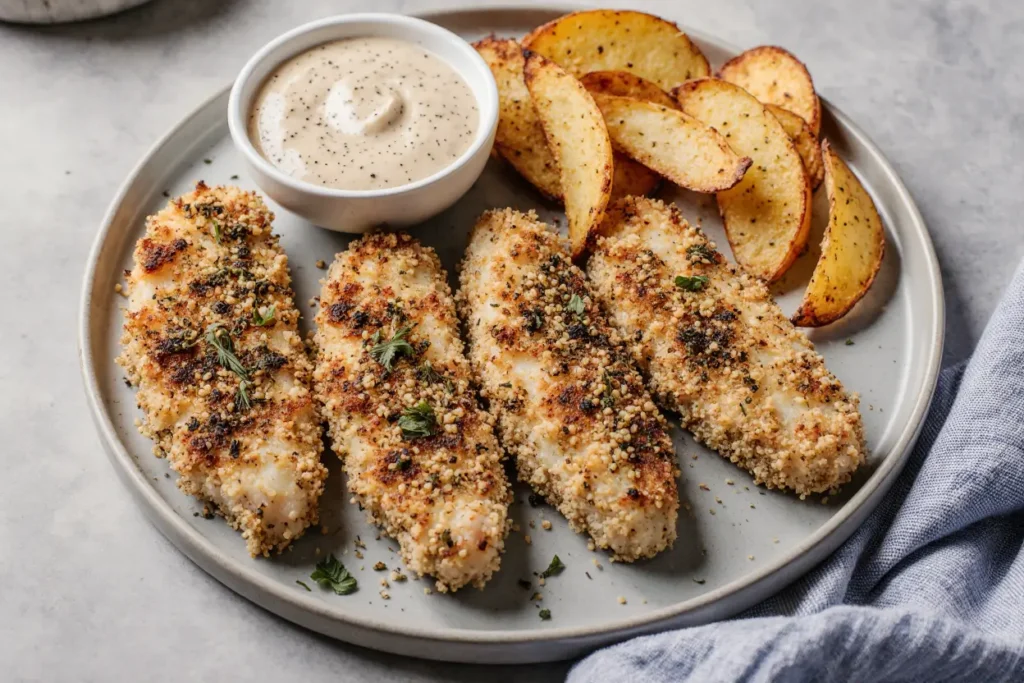
Transfer the chicken to a serving platter. Sprinkle with freshly chopped parsley and arrange lemon wedges around the chicken. The bright green parsley provides a beautiful color contrast against the golden-brown zaatar crust.
Final Touch: For an authentic presentation, drizzle a small amount of high-quality olive oil over the platter and add a light sprinkle of additional zaatar and flaky sea salt.
Nutritional Information
Understanding what you’re eating helps make informed dietary choices. Here’s the complete nutritional breakdown per serving (based on 6 servings):
- Calories: 385 kcal
- Protein: 34g (68% of daily value)
- Total Fat: 25g (32% DV)
- Saturated Fat: 6g (30% DV)
- Monounsaturated Fat: 13g (heart-healthy fats from olive oil)
- Carbohydrates: 6g (2% DV)
- Fiber: 1g (4% DV)
- Sugar: 2g (from yogurt and natural sugars)
- Sodium: 620mg (27% DV)
- Cholesterol: 165mg (55% DV)
- Vitamin A: 12% DV
- Vitamin C: 15% DV (from lemon juice)
- Calcium: 8% DV
- Iron: 10% DV
Health Highlights: This recipe provides an excellent source of high-quality protein while incorporating beneficial monounsaturated fats from olive oil. Zaatar contributes antioxidants from its herb and spice components, while sumac provides anti-inflammatory compounds. The yogurt marinade adds probiotics (beneficial bacteria), though most are deactivated during cooking.
Healthier Alternatives for the Recipe
Want to make this Crispy Zaatar Chicken even more nutritious without sacrificing flavor? Consider these modifications:
Reduce Fat Content: Use skinless chicken thighs or switch to chicken breasts. While you’ll sacrifice some crispiness and moisture, this change reduces the fat content by approximately 40%. Compensate for dryness by increasing the marinating time to overnight and basting once during cooking.
Lower Sodium Version: Reduce the salt to 1 teaspoon and choose low-sodium zaatar blends. Enhance flavor with additional lemon zest, which provides brightness without sodium. This modification can cut sodium content by up to 35%.
Boost Nutritional Value: Add 1 tablespoon of ground flaxseed or chia seeds to the marinade for omega-3 fatty acids. Incorporate 1 teaspoon of turmeric for its anti-inflammatory benefits—it pairs beautifully with the existing spice profile.
Dairy-Free Adaptation: Replace Greek yogurt with coconut yogurt or a mixture of tahini (2 tbsp) and lemon juice (increased to 1/4 cup). This swap maintains the tenderizing effect while accommodating lactose intolerance or vegan preferences (when using plant-based chicken alternatives).
Increase Fiber: Serve the chicken over cauliflower rice instead of regular rice, or pair it with a colorful quinoa tabbouleh. This addition increases fiber intake by 8-10g per serving while maintaining the Mediterranean flavor profile.
Serving Suggestions
The beauty of this Crispy Zaatar Chicken for Easy Dinner lies in its versatility. Here are creative ways to serve it that will impress your family and guests:
Classic Mediterranean Spread: Arrange the chicken on a large platter surrounded by warm pita bread, hummus, baba ganoush, and a crisp fattoush salad. Add pickled turnips and olives for authentic touches. This presentation transforms dinner into a interactive feast where everyone can build their own plates.
Over Aromatic Rice: Serve each piece of chicken over fluffy basmati rice cooked with chicken broth, a cinnamon stick, and cardamom pods. The rice absorbs the flavorful juices from the chicken, and the aromatic spices complement the zaatar beautifully.
With Roasted Vegetables: Create a one-pan meal by adding chunks of red onion, bell peppers, cherry tomatoes, and zucchini around the chicken during the last 25 minutes of roasting. The vegetables caramelize and soak up the delicious chicken drippings while roasting.
Grain Bowl Style: Slice the chicken and serve it over a bowl combining bulgur wheat or farro, mixed greens, cucumber, cherry tomatoes, red onion, feta cheese, and a lemon-tahini dressing. This approach is perfect for meal prep—you can portion everything into containers for easy weekday lunches.
Sandwich Creation: Shred the cooled chicken and stuff it into warm pita pockets with shredded lettuce, tomatoes, cucumbers, and a generous dollop of garlic sauce (toum) or tzatziki. This transforms leftovers into an entirely different meal.
Wine Pairing: For those who enjoy wine with dinner, a crisp Sauvignon Blanc or a light Pinot Noir complements the herbaceous notes of zaatar beautifully. For non-alcoholic options, try a chilled mint lemonade or Arabic-style coffee.
Common Mistakes to Avoid
Even experienced cooks can encounter pitfalls when making crispy chicken dishes. Here’s how to avoid the most common issues:
Mistake #1: Skipping the Drying Step Failing to pat the chicken completely dry before marinating is the number one reason for soggy skin. Surface moisture creates steam during cooking, which prevents crisping. Always use paper towels to thoroughly dry each piece, paying special attention to crevices and under the skin.
Mistake #2: Over-Marinating While marinating enhances flavor, going beyond 24 hours can make the chicken mushy due to the yogurt’s enzymes breaking down too much protein structure. The sweet spot is 4-8 hours for optimal tenderness without compromising texture.
Mistake #3: Crowding the Pan When chicken pieces touch during cooking, they steam rather than roast, resulting in rubbery skin. Always leave at least 1 inch of space between pieces. If necessary, use two baking sheets rather than cramming everything onto one.
Mistake #4: Opening the Oven Door Frequently Each time you open the oven, the temperature drops by 25-50 degrees, extending cooking time and affecting the final texture. Trust the process and resist the urge to peek until the minimum cooking time has elapsed.
Mistake #5: Not Using a Thermometer Guessing doneness leads to either undercooked chicken (a food safety risk) or overcooked, dry chicken. An instant-read thermometer is a small investment that guarantees perfectly cooked meat every time. Dark meat should reach 75-80°C (165-175°F).
Mistake #6: Serving Immediately After Cooking Cutting into chicken straight from the oven causes all the juices to run out, leaving dry meat on your plate. The 5-minute rest is non-negotiable for juicy results.
Mistake #7: Using Low-Quality Zaatar Zaatar blends vary dramatically in freshness and ingredient ratios. Stale zaatar tastes dusty and bland. Buy from Middle Eastern markets or specialty spice shops, and store in an airtight container away from light and heat. Quality zaatar should smell intensely herbal with noticeable sesame aroma.
Storing Tips for the Recipe
Proper storage ensures you can enjoy this delicious chicken beyond the first meal, making it excellent for meal prep:
Refrigerator Storage: Allow the chicken to cool to room temperature (within 2 hours of cooking for food safety). Store in an airtight container lined with paper towels, which absorb excess moisture and help maintain the crispy texture. The chicken will keep for 3-4 days in the refrigerator at 4°C (40°F) or below.
Maintaining Crispiness When Reheating: The biggest challenge with leftover crispy chicken is maintaining that coveted crunch. Never microwave if you want to preserve texture. Instead, reheat in a 180°C (350°F) oven for 10-12 minutes, placing the chicken on a wire rack over a baking sheet. This method re-crisps the skin beautifully. For even faster reheating, use an air fryer at 180°C (350°F) for 5-7 minutes.
Freezer Storage: While best enjoyed fresh, you can freeze cooked chicken for up to 3 months. Wrap each piece individually in plastic wrap, then place all wrapped pieces in a freezer-safe zip-lock bag, removing as much air as possible. Label with the date. To serve, thaw overnight in the refrigerator, then reheat using the oven method described above.
Marinated Chicken Storage: You can prepare the chicken in its marinade up to 24 hours in advance, which is perfect for dinner party planning. Keep refrigerated in a covered container or sealed bag. You can also freeze marinated raw chicken for up to 2 months—just thaw in the refrigerator overnight before cooking.
Meal Prep Strategy: This recipe is excellent for batch cooking. Double the recipe on Sunday, then use the chicken throughout the week in different preparations—served whole the first night, sliced over salads for lunch, shredded for sandwiches, or diced into grain bowls. The varying presentations keep meals interesting while maximizing your cooking efficiency.
Conclusion
This Crispy Zaatar Chicken for Easy Dinner proves that restaurant-quality Middle Eastern cuisine is absolutely achievable at home. By understanding the science behind crispy skin—properly drying the chicken, using cornstarch, and cooking at high heat on a rack—you’re equipped to create exceptional results every time. The aromatic zaatar spice blend transforms simple chicken thighs into a memorable meal that’s both comforting and sophisticated.
What makes this recipe truly special is its versatility. Whether you’re serving it as the centerpiece of a Mediterranean feast, slicing it for grain bowls, or tucking it into pita sandwiches, the flavor profile adapts beautifully to various presentations. The make-ahead friendly nature means you can marinate in the morning and have dinner ready in under an hour—perfect for busy weeknights when you want something special without spending hours in the kitchen.
Ready to bring this aromatic, crispy delight to your dinner table? Give this recipe a try tonight and experience the perfect balance of tangy, herbaceous zaatar with impossibly crispy chicken skin. Don’t forget to share your results—snap a photo and let us know how it turned out! For more Middle Eastern-inspired recipes that bring restaurant-quality flavors home, explore our collection of Mediterranean dinner ideas and weeknight chicken recipes.
Your turn: What’s your favorite way to serve crispy chicken? Share your creative serving suggestions in the comments below!
FAQs
Q: Can I use chicken breasts instead of thighs for this recipe?
A: Absolutely! While thighs are recommended because they stay juicier and have skin that crisps beautifully, you can use bone-in, skin-on chicken breasts. Reduce the cooking time to 30-35 minutes and check the internal temperature carefully, as breasts dry out more easily if overcooked. For boneless, skinless breasts, marinate overnight, reduce oven temperature to 200°C (400°F), and cook for 20-25 minutes—though you’ll sacrifice the signature crispy skin.
Q: What exactly is zaatar, and where can I find it?
A: Zaatar is a Middle Eastern spice blend typically containing dried thyme, sumac, sesame seeds, oregano, and salt. The tangy sumac provides a distinctive lemony flavor without acidity, while sesame seeds add nuttiness. You’ll find zaatar at Middle Eastern grocery stores, specialty spice shops, or online. Many mainstream supermarkets now carry it in their international sections. If you can’t find it, use the homemade blend suggested in the ingredients list.
Q: My chicken skin isn’t getting crispy enough. What am I doing wrong?
A: Soggy skin usually results from one of three issues: insufficient drying before marinating, skipping the cornstarch coating, or not using a wire rack during cooking. Make sure you pat the chicken completely dry with paper towels, apply the cornstarch evenly (it acts as a moisture-absorbing barrier), and always roast on a rack so air circulates underneath. Also, avoid overcrowding the pan—chicken pieces that touch will steam rather than crisp.
Q: Can this recipe be made in an air fryer?
A: Yes! Air fryers are actually excellent for achieving crispy chicken. Preheat your air fryer to 200°C (400°F). Place marinated and cornstarch-dusted chicken pieces in a single layer in the basket (you may need to cook in batches). Cook for 25-30 minutes, flipping halfway through, until the internal temperature reaches 75°C (165°F) and the skin is golden and crispy. The cooking time may vary slightly depending on your air fryer model and the size of your chicken pieces.
Q: Is this recipe suitable for meal prep?
A: Definitely! This is an excellent meal prep recipe. The chicken stores well for 3-4 days in the refrigerator and reheats beautifully in the oven or air fryer (avoid the microwave to maintain crispiness). You can prep the marinade and chicken on Sunday, cook on Monday, and enjoy throughout the week in various ways—served whole, sliced over salads, shredded for wraps, or diced for grain bowls. The versatility makes it perfect for creating diverse meals from one cooking session.
Q: Can I make this recipe dairy-free?
A: Yes! Replace the Greek yogurt with coconut yogurt (same amount) or create a dairy-free marinade using 1/4 cup lemon juice mixed with 2 tablespoons tahini and 2 tablespoons olive oil. The yogurt’s primary functions are tenderizing the meat and helping spices adhere, both of which these substitutions accomplish. The flavor profile will be slightly different but equally delicious, with tahini adding a rich, nutty dimension.
Q: How spicy is this recipe?
A: This recipe is not spicy at all—it’s aromatic and flavorful but contains no heat. Zaatar is an herbal blend without chili peppers, and the other spices (paprika, cumin) add depth rather than spiciness. If you’d like to add some heat, include 1/2-1 teaspoon of Aleppo pepper or cayenne to the marinade, or serve with a spicy sauce like harissa on the side.
Q: What’s the purpose of scoring the chicken skin?
A: Scoring (making shallow cuts in a crosshatch pattern) serves multiple purposes: it allows the marinade to penetrate deeper into the meat, helps render the fat layer beneath the skin during cooking (resulting in crispier skin), and creates more surface area for the zaatar crust to develop. The cuts should be shallow—about 1/4 inch deep—so you don’t cut into the meat itself.