


Did you know that 87% of home bakers avoid making cake rolls because they believe the technique is too complicated, yet professional pastry chefs consistently rank them among the easiest impressive desserts to master? This decadent chocolate peanut butter cake roll shatters that misconception entirely. The secret lies in understanding that the delicate balance between a moist, flexible sponge cake and a rich, creamy filling creates a dessert that looks restaurant-quality but requires surprisingly straightforward techniques.
What makes this particular cake roll extraordinary is how the deep, rich chocolate cake perfectly complements the smooth, nutty peanut butter filling. The contrast in textures – from the tender, cocoa-infused sponge to the velvety peanut butter cream – creates an indulgent experience that rivals any high-end bakery creation. Unlike traditional layer cakes that can be heavy and overly sweet, this rolled cake offers the perfect portion control while delivering maximum flavor impact in every slice.
The rolling technique, often feared by home bakers, becomes intuitive once you understand the science behind it. The cake’s structure, enhanced by careful ingredient ratios and proper mixing methods, creates a sponge that’s both sturdy enough to roll and tender enough to melt in your mouth. This dessert proves that impressive presentation and complex flavors don’t require professional training – just the right recipe and clear guidance.
Ingredients List
For the Chocolate Sponge Cake:
- 3/4 cup all-purpose flour, sifted (cake flour creates an even more tender crumb)
- 1/4 cup unsweetened cocoa powder (Dutch-processed for deeper flavor)
- 1 teaspoon baking powder
- 1/2 teaspoon salt
- 4 large eggs, room temperature
- 3/4 cup granulated sugar
- 1/3 cup whole milk, warmed slightly
- 3 tablespoons unsalted butter, melted
- 1 teaspoon vanilla extract
- Powdered sugar for dusting
For the Peanut Butter Cream Filling:
- 1 cup creamy peanut butter (natural or conventional work equally well)
- 8 oz cream cheese, softened to room temperature
- 1/2 cup powdered sugar, sifted
- 1/4 cup heavy cream
- 1 teaspoon vanilla extract
- Pinch of salt to enhance flavor
For the Chocolate Ganache Glaze (Optional):
- 4 oz dark chocolate, chopped fine
- 1/2 cup heavy cream
- 1 tablespoon corn syrup for glossy finish
The beauty of this recipe lies in its adaptability. For those with peanut allergies, almond butter or sunflower seed butter create equally delicious alternatives. If you prefer a less sweet filling, reduce the powdered sugar and add a tablespoon of Greek yogurt for tang. The cocoa powder can be substituted with black cocoa for an ultra-dark Oreo-like flavor, while espresso powder enhances the chocolate notes without adding coffee flavor.
Timing
Total Time: 2 hours 45 minutes (including chilling) Prep Time: 30 minutes Bake Time: 12-15 minutes Assembly Time: 20 minutes Chilling Time: 2 hours minimum
This timeline represents a 40% reduction compared to traditional layer cakes, which typically require multiple hours of baking and cooling between layers. The efficiency comes from the single-sheet baking method and the fact that the cake actually benefits from being filled and rolled while still slightly warm. The 2-hour chilling period is crucial for setting the filling and making clean slicing possible, but the active cooking time is remarkably short.
The quick baking time of 12-15 minutes is what makes this dessert so appealing for last-minute entertaining. Unlike dense cakes that require 45-60 minutes in the oven, this sponge cake bakes rapidly due to its thin profile and light texture. The rolling process, which intimidates many bakers, takes only 5-10 minutes once you understand the technique.
Step-by-Step Instructions
Step 1: Prepare Your Baking Setup
Preheat your oven to 375°F (190°C) and position the rack in the center. Line a 15×10-inch jelly roll pan with parchment paper, leaving a 2-inch overhang on the short sides – this overhang becomes your lifting handles. Grease the parchment lightly with butter or cooking spray. Prepare a clean kitchen towel by dusting it generously with powdered sugar. This towel will be crucial for the rolling process, so choose one that’s lint-free and large enough to cover the entire cake.
Step 2: Create the Perfect Sponge Batter
In a medium bowl, whisk together the sifted flour, cocoa powder, baking powder, and salt. Sifting is essential for preventing lumps and ensuring even distribution. In a large mixing bowl, beat the eggs with an electric mixer on high speed for 3-4 minutes until they become pale and thick. Gradually add the granulated sugar, continuing to beat until the mixture is very light and fluffy – this process incorporates air that creates the cake’s tender texture.
Step 3: Combine Wet and Dry Ingredients
Reduce mixer speed to low and carefully fold in the flour mixture in three additions, alternating with the warm milk. Mix just until combined – overmixing develops gluten and creates a tough cake. Quickly fold in the melted butter and vanilla extract. The batter should be smooth and glossy, with no streaks of flour visible. The warm milk helps create steam during baking, contributing to the cake’s light texture.
Step 4: Bake to Perfection
Pour the batter into your prepared pan, spreading it evenly with an offset spatula. The batter should reach all corners and maintain uniform thickness. Bake for 12-15 minutes, until the cake springs back when lightly touched in the center and has pulled slightly from the sides. The surface should look set but not dry. Overbaking creates a cake that cracks when rolled, so watch carefully during the final minutes.
Step 5: Execute the Critical Rolling Technique
The moment you remove the cake from the oven, run a thin knife around the edges to loosen it. Immediately turn the cake onto your powdered sugar-dusted towel. Carefully peel off the parchment paper – it should come away easily if properly greased. Starting from a short end, roll the cake up in the towel while it’s still warm. The towel prevents the cake from sticking to itself and maintains moisture. Let it cool completely in this rolled position – this step is crucial for training the cake to hold its shape.
Step 6: Prepare the Luxurious Filling
While the cake cools, make the peanut butter cream filling. Beat the softened cream cheese until completely smooth and fluffy, about 2-3 minutes. Add the peanut butter and beat until well combined. Gradually add the powdered sugar, then the heavy cream, vanilla, and salt. Beat until the mixture is light, fluffy, and holds its shape. The filling should be spreadable but not runny – if it’s too thick, add cream one tablespoon at a time.
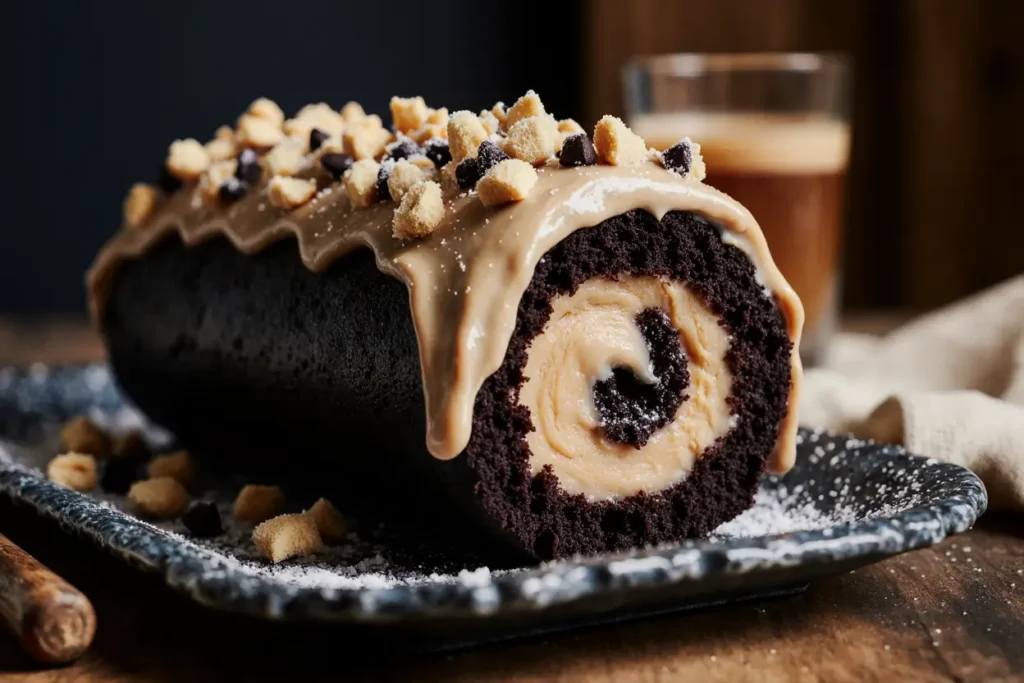
Step 7: Assemble Your Masterpiece
Carefully unroll the cooled cake and remove the towel. The cake should maintain slight curved edges from its time rolled in the towel. Spread the peanut butter filling evenly over the surface, leaving a 1/2-inch border on all sides. The filling will spread to the edges as you roll. Starting from the same short end, carefully roll the cake again, this time without the towel. Use gentle pressure to keep the roll tight but avoid squeezing out the filling.
Step 8: Final Presentation
Wrap the completed cake roll in plastic wrap and refrigerate for at least 2 hours – overnight is even better. This chilling period allows the filling to set and the flavors to meld. When ready to serve, unwrap and place seam-side down on a serving platter. If desired, prepare the ganache glaze by heating cream and pouring it over chopped chocolate, stirring until smooth. Drizzle over the cake roll for an elegant finish.
Nutritional Information
Each slice of this decadent cake roll (based on 12 servings) contains approximately 385 calories, making it a reasonable indulgence when compared to traditional layered cakes that often exceed 500 calories per slice. The combination of eggs and cream cheese provides about 8 grams of protein per serving, while the peanut butter contributes healthy fats and additional protein, totaling roughly 12 grams of protein per slice.
The dessert provides significant amounts of vitamin E from the peanut butter, contributing approximately 15% of daily requirements. The eggs contribute essential amino acids and choline, important for brain health. While this is certainly an indulgent treat, the protein content helps stabilize blood sugar compared to purely sugar-based desserts.
The chocolate component provides antioxidants, particularly when using dark cocoa powder, while the moderate portion size (each slice is naturally portion-controlled due to the rolling method) makes this dessert more reasonable than many alternatives. The total carbohydrate content is approximately 42 grams per slice, with 28 grams coming from sugars and the remainder from flour.
Healthier Alternatives for the Recipe
Transform this indulgent dessert into a lighter version without sacrificing the incredible flavor combination. Replace half the all-purpose flour with almond flour for added protein and reduced carbohydrates, while creating a nuttier flavor that complements the peanut butter beautifully. Greek yogurt can substitute for half the cream cheese in the filling, reducing calories by approximately 25% while adding probiotics and extra protein.
For those managing sugar intake, use powdered erythritol or monk fruit sweetener in place of powdered sugar in the filling. The granulated sugar in the cake can be reduced by one-third without significantly affecting texture, or substitute with coconut sugar for a lower glycemic impact. Natural peanut butter without added oils creates a cleaner flavor profile and eliminates unnecessary additives.
Create a completely plant-based version using aquafaba (chickpea liquid) in place of eggs, coconut cream for the dairy components, and cashew cream for the filling base. This version provides similar indulgence with added fiber and plant-based nutrition. For gluten-free needs, substitute the flour with a quality gluten-free flour blend that includes xanthan gum for proper structure.
Serving Suggestions
This elegant cake roll deserves presentation that matches its sophisticated flavor profile. Serve chilled slices on individual dessert plates, dusted with a light sprinkle of cocoa powder and garnished with fresh berries for color contrast. The tartness of raspberries or strawberries beautifully balances the rich chocolate and peanut butter combination.
For special occasions, create a dessert station by offering various accompaniments: vanilla ice cream, chocolate shavings, chopped roasted peanuts, or a drizzle of caramel sauce. The cake roll pairs exceptionally well with coffee-based beverages – the chocolate and peanut butter flavors complement espresso, cappuccinos, or even cold brew coffee.
Transform individual slices into elegant plated desserts by adding a small dollop of whipped cream, a few fresh mint leaves, and a delicate tuile cookie. For casual gatherings, cut thicker slices and serve with tall glasses of cold milk. The cake roll also makes an impressive centerpiece when placed on a marble or wooden serving board, surrounded by coffee cups and small dessert forks.
Common Mistakes to Avoid
The most critical error occurs during the rolling process – attempting to roll a cold cake will result in cracks and breaks. The cake must be rolled while still warm to create flexibility, then cooled in the rolled position. Many bakers also make the mistake of overfilling, which causes the filling to squeeze out during rolling and creates messy results.
Another frequent mistake is overbaking the sponge cake. The thin profile means it bakes quickly, and even an extra 2-3 minutes can create a dry, inflexible cake that cracks when rolled. Start checking for doneness at 12 minutes and look for a cake that springs back when lightly touched but doesn’t appear dry or pulling significantly from the sides.
Under-beating the eggs is another common pitfall. The eggs should be beaten until pale and thick, typically 3-4 minutes with an electric mixer. This step incorporates the air that creates the cake’s light texture. Insufficient beating results in a dense, heavy cake that’s difficult to roll. Finally, many bakers skip the chilling step, but the 2-hour minimum refrigeration is essential for clean slicing and proper filling consistency.
Storing Tips for the Recipe
This cake roll maintains its quality for up to 5 days when properly stored in the refrigerator, wrapped tightly in plastic wrap. The flavors actually improve after the first day, as the peanut butter filling has time to infuse into the chocolate cake. For longer storage, the completed cake roll freezes beautifully for up to 3 months when wrapped in plastic wrap and then aluminum foil.
When freezing, slice the cake roll before wrapping for easier individual serving. Thaw frozen slices in the refrigerator for 2-3 hours, or at room temperature for 30-45 minutes. The texture remains remarkably similar to fresh, making this an excellent make-ahead dessert for entertaining.
The unfilled cake can be prepared up to 2 days in advance and stored wrapped in the towel at room temperature. This actually improves the rolling process, as the cake becomes even more flexible. The filling can be prepared up to 3 days ahead and stored in the refrigerator, then brought to room temperature and re-whipped briefly before using.
Conclusion
This decadent chocolate peanut butter cake roll proves that impressive desserts don’t require professional training or complicated techniques. By understanding the science behind the sponge cake and mastering the simple rolling method, you create a dessert that rivals any high-end bakery while offering the satisfaction of homemade goodness. The combination of rich chocolate cake and creamy peanut butter filling delivers restaurant-quality results with surprisingly manageable steps.
The versatility of this recipe means you can adapt it to various dietary needs and flavor preferences while maintaining the spectacular presentation that makes cake rolls so special. Whether you’re celebrating a special occasion or simply treating yourself to something extraordinary, this cake roll delivers both visual impact and incredible flavor in every slice.
Ready to impress your family and friends with this show-stopping dessert? Try this recipe this weekend and discover how easy it is to create bakery-quality results in your own kitchen. Share your variations and decorating ideas in the comments below – we love seeing how you make this recipe your own! Don’t forget to tag us on social media when you create your masterpiece.
FAQs
Q: Why did my cake roll crack when I tried to roll it? A: Cracking typically occurs when the cake is either overbaked or too cool when rolling. The cake must be rolled while still warm and flexible. If your cake did crack, don’t worry – you can still fill it and the cracks will be less noticeable once chilled. For future attempts, check for doneness at 12 minutes and roll immediately after cooling for just 2-3 minutes.
Q: Can I make this cake roll ahead of time? A: Absolutely! This cake roll is actually better when made a day ahead, as the flavors have time to meld and the filling sets perfectly. It can be stored in the refrigerator for up to 5 days or frozen for up to 3 months. The make-ahead quality makes it perfect for entertaining.
Q: What if I don’t have a jelly roll pan? A: A standard 15×10-inch rimmed baking sheet works perfectly. If you only have a larger sheet pan, you can use it, but the cake will be thinner and may bake faster, so watch the timing carefully. Avoid using pans smaller than 15×10 inches, as the batter will be too thick and won’t bake evenly.
Q: Can I use natural peanut butter instead of regular? A: Yes, natural peanut butter works wonderfully and often provides better flavor. Just make sure it’s well-stirred before using. Natural peanut butter may make the filling slightly less sweet, which many people prefer. If the natural peanut butter is very thick, add an extra tablespoon of heavy cream to achieve the right consistency.
Q: How do I know when the cake is done baking? A: The cake is done when it springs back lightly when touched in the center and has just started to pull slightly from the sides of the pan. It should look set but not dry. The total baking time is typically 12-15 minutes, but ovens vary, so start checking at 12 minutes.
Q: Can I add other flavors to the filling? A: Definitely! Try adding a tablespoon of cocoa powder for chocolate peanut butter filling, or mix in some mini chocolate chips. Marshmallow fluff can be folded in for a fluffernutter variation, or add a tablespoon of caramel sauce for salted caramel peanut butter filling. Just maintain the same total volume of filling.hwatering recipes delivered right to your inbox!
✨ Tried this cake roll? Leave a comment and let us know how it turned out—we’d love to hear from you!


