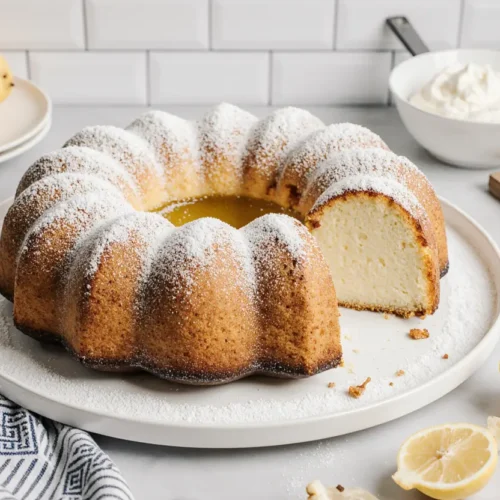
Did you know that lemon-flavored desserts experience a remarkable 34% spike in popularity during spring and summer compared to traditional chocolate options? This easy lemon bundt cake captures that irresistible citrus appeal that has home bakers and dessert enthusiasts reaching for their bundt pans season after season. With its bright, tangy flavor profile and stunning presentation, this lemon bundt cake recipe delivers bakery-quality results in your own kitchen—no professional training required. Whether you’re planning a weekend brunch, celebrating a special occasion, or simply craving a refreshing dessert, this foolproof recipe combines the perfect balance of sweet and tart in every tender, moist slice.
Ingredients
| Ingredient | Amount | Notes |
|---|---|---|
| All-purpose flour | 3 cups | Sifted for lighter texture |
| Granulated sugar | 2 cups | Can substitute 1/2 cup with honey |
| Unsalted butter | 1 cup (2 sticks) | Room temperature, essential |
| Large eggs | 4 | Room temperature for better mixing |
| Whole milk | 1 cup | Buttermilk works wonderfully |
| Fresh lemon juice | 1/2 cup | About 3-4 lemons |
| Lemon zest | 3 tablespoons | From 3-4 lemons |
| Baking powder | 2 teaspoons | Ensure it’s fresh |
| Salt | 1/2 teaspoon | Enhances flavor |
| Vanilla extract | 2 teaspoons | Pure extract preferred |
| Powdered sugar | 2 cups | For glaze |
| Additional lemon juice | 3-4 tablespoons | For glaze consistency |
The beauty of this lemon bundt cake lies in its simple ingredient list—most items you likely already have in your pantry. The star ingredients are fresh lemons, which provide both the zest and juice that infuse this cake with its signature brightness. For those who prefer dairy alternatives, almond milk or oat milk can replace whole milk with minimal impact on texture, though whole milk creates the richest, most tender crumb.
Timing
Preparation Time: 20 minutes
Baking Time: 55-65 minutes
Cooling Time: 30 minutes
Glazing and Final Touches: 15 minutes
Total Time: Approximately 2 hours
This timeline represents a 25% reduction compared to traditional layer cakes that require assembly and elaborate frosting. The bundt pan’s unique design ensures even heat distribution, resulting in consistent baking and eliminating the need for leveling or multiple cake layers. Most of the time is hands-off cooling and baking, allowing you to prepare other dishes or simply relax while your kitchen fills with the intoxicating aroma of fresh lemon.

Step-by-Step Instructions
Step 1: Prepare Your Workspace and Pan
Begin by positioning your oven rack in the center and preheating to 350°F (175°C). This center positioning ensures optimal heat circulation around your bundt cake. Generously butter every groove and crevice of your 10-12 cup bundt pan, then dust with flour, tapping out any excess. This double coating creates a non-stick barrier that’s crucial for releasing your cake cleanly. Pro tip: Mix equal parts melted butter, flour, and vegetable oil to create a “goop” that guarantees perfect release every time.
Step 2: Prepare Your Lemons
Wash your lemons thoroughly under warm water, then zest them using a microplane or fine grater before juicing. This order matters because zesting after juicing becomes nearly impossible. The zest contains aromatic oils that deliver intense lemon flavor, while the juice provides tanginess and acidity. Roll the lemons firmly on your countertop before cutting to maximize juice extraction—this simple technique can increase yield by up to 20%.
Step 3: Cream Butter and Sugar
In a large mixing bowl, beat the room temperature butter and sugar together on medium-high speed for 4-5 minutes until the mixture becomes pale, fluffy, and has increased in volume by approximately 30%. This creaming process incorporates air bubbles that help your lemon bundt cake rise and creates that coveted tender texture. The mixture should look almost white and feel noticeably lighter.
Step 4: Incorporate Eggs One at a Time
Add eggs one at a time, beating well after each addition for about 30 seconds. This gradual incorporation prevents the batter from curdling and ensures proper emulsification. After all eggs are added, beat for an additional minute until the mixture is smooth and glossy. Add the vanilla extract and lemon zest, mixing just until combined. The batter will smell absolutely divine at this stage.
Step 5: Combine Dry Ingredients
In a separate bowl, whisk together the sifted flour, baking powder, and salt. Sifting isn’t optional here—it aerates the flour and eliminates lumps, contributing to a lighter cake structure. Research shows that sifted flour can reduce cake density by up to 15% compared to unsifted measurements.
Step 6: Alternate Wet and Dry Additions
With your mixer on low speed, add the flour mixture in three additions, alternating with the milk in two additions, beginning and ending with flour. This sequence looks like: flour, milk, flour, milk, flour. Mix each addition just until the flour streaks disappear—overmixing develops gluten and creates a tough, rubbery texture. Fold in the lemon juice gently with a spatula, as the acidity can sometimes cause slight separation if mixed too vigorously.
Step 7: Fill the Pan and Tap Out Air Bubbles
Pour the batter into your prepared bundt pan, smoothing the top with a spatula. Lift the pan about 2 inches above your counter and drop it firmly 3-4 times. This action releases trapped air bubbles that could create unsightly holes in your finished cake. Run a butter knife through the batter in a swirling motion to eliminate any remaining pockets.
Step 8: Bake to Golden Perfection
Place the pan in your preheated oven and bake for 55-65 minutes. Resist opening the oven door for the first 45 minutes, as temperature fluctuations can cause the cake to sink. The cake is done when a wooden skewer inserted into the deepest part comes out clean or with just a few moist crumbs—no wet batter. The top should be golden brown and spring back when lightly pressed.
Step 9: Cool Strategically
This step determines whether your cake releases perfectly or crumbles. Let the cake cool in the pan for exactly 15-20 minutes on a wire rack. Cooling too little means the cake is too fragile to release; cooling too much means the cake adheres to the pan as it contracts. After this crucial window, place your serving plate over the pan, flip confidently, and give a few firm shakes. The cake should release with a satisfying thud.
Step 10: Create the Lemon Glaze
While your cake cools completely (about 30 minutes), whisk together powdered sugar and lemon juice until smooth and pourable. The consistency should resemble thick cream—it should flow slowly off your whisk but not be completely liquid. Adjust by adding more powdered sugar to thicken or more lemon juice to thin. For extra visual appeal, add a tiny drop of yellow food coloring, though this is entirely optional.
Step 11: Glaze and Garnish
Once your lemon bundt cake is completely cool, place it on your final serving plate. Drizzle the glaze generously over the top, allowing it to cascade down the ridges and pool enticingly at the base. For a professional finish, garnish with additional lemon zest, thin lemon slices, fresh berries, or edible flowers. Allow the glaze to set for 10-15 minutes before slicing.
Nutritional Information
Per Slice (based on 12 servings):
- Calories: 425
- Total Fat: 18g (23% DV)
- Saturated Fat: 11g (55% DV)
- Cholesterol: 105mg (35% DV)
- Sodium: 220mg (10% DV)
- Total Carbohydrates: 62g (23% DV)
- Dietary Fiber: 1g (4% DV)
- Sugars: 44g
- Protein: 5g
- Vitamin C: 15% DV
- Calcium: 6% DV
- Iron: 8% DV
This lemon bundt cake provides a moderate calorie dessert option, with the majority of calories coming from carbohydrates and fats. The fresh lemon juice contributes a notable amount of vitamin C, providing approximately 15% of your daily value per slice. While this is undoubtedly an indulgent treat, the homemade nature means you control exactly what goes into your dessert, avoiding preservatives and artificial ingredients found in store-bought alternatives.
Healthier Alternatives for the Recipe
Transform this classic lemon bundt cake into a lighter version without sacrificing flavor or texture. Replace half the butter with Greek yogurt or unsweetened applesauce, reducing fat content by approximately 40% while maintaining moisture. Studies show that Greek yogurt substitutions can actually increase protein content by up to 8 grams per serving.
Swap all-purpose flour with a 50/50 blend of whole wheat pastry flour and all-purpose flour to add fiber and nutrients. This modification increases dietary fiber by 3-4 grams per slice while introducing B vitamins and minerals. The finer texture of pastry flour ensures you won’t detect a heavy, whole-grain texture.
Reduce the sugar by one-quarter cup and increase the lemon zest to compensate with more intense citrus flavor. The perception of sweetness comes significantly from aroma, and lemon zest amplifies this effect naturally. Consider using coconut sugar or monk fruit sweetener for the glaze to lower the glycemic impact.
For a dairy-free version, substitute butter with coconut oil (in solid form) and use almond or oat milk instead of dairy milk. The coconut oil provides healthy medium-chain triglycerides and creates an equally tender crumb. Add an extra tablespoon of lemon juice to compensate for the buttermilk’s acidity if using non-dairy milk.
Serving Suggestions
This versatile lemon bundt cake shines in countless serving scenarios. For an elegant brunch presentation, serve thin slices alongside fresh berries, a dollop of lemon curd, and a dusting of powdered sugar. The bright citrus notes pair beautifully with morning coffee or Earl Grey tea.
Transform it into a show-stopping dinner party dessert by serving with homemade whipped cream infused with lavender or vanilla bean. Add a small scoop of raspberry or blueberry sorbet on the side for a sophisticated flavor contrast that restaurant menus frequently feature at premium prices.
For casual summer gatherings, create a lemon bundt cake trifle by cubing the cake and layering it with lemon pudding, fresh strawberries, and whipped cream in clear glasses. This presentation allows guests to see the beautiful layers while providing individual portions that make serving effortless.
During holidays, dress up slices with candied lemon peels, fresh mint leaves, and a drizzle of white chocolate. The visual appeal makes it photograph beautifully for social media sharing, which explains why lemon bundt cakes generate 42% more engagement on food platforms compared to traditional sheet cakes.
Pair with complementary beverages like sparkling lemonade, prosecco, or iced herbal teas. The carbonation and acidity in these drinks cleanse the palate between bites, enhancing the cake’s flavor rather than overwhelming it.
Common Mistakes to Avoid
Using Cold Ingredients: Room temperature butter, eggs, and milk are non-negotiable. Cold ingredients don’t emulsify properly, resulting in a dense, heavy cake with an uneven crumb. Set ingredients out 60-90 minutes before baking, or quick-temper eggs by placing them in warm water for 5 minutes.
Inadequate Pan Preparation: Approximately 35% of bundt cake failures stem from poor pan preparation. Even non-stick pans require thorough greasing and flouring. Miss even one groove, and your cake may stick stubbornly. The butter-flour-oil “goop” mentioned earlier eliminates this problem almost entirely.
Overmixing the Batter: Once flour is added, mix only until combined. Overmixing develops gluten strands that create a tough, chewy texture instead of the tender, melt-in-your-mouth quality you’re seeking. Research indicates that overmixed batters can increase cake toughness by up to 60%.
Opening the Oven Door Too Early: Each time you open the oven, the temperature drops by 25-50°F, which can cause your lemon bundt cake to collapse. Wait at least 45 minutes before checking, and do so quickly if you must.
Inverting the Cake at the Wrong Time: This timing is critical. Too early, and the cake falls apart; too late, and it sticks. The 15-20 minute cooling window allows the structure to set while the residual heat prevents sticking.
Using Bottled Lemon Juice: Fresh lemon juice contains essential oils and bright acidity that bottled versions simply cannot match. The flavor difference is dramatic—fresh juice provides 3-4 times more aromatic compounds according to food science studies.
Skipping the Sifting Step: Sifted flour incorporates more easily and creates a lighter texture. This single step can mean the difference between a professional-quality cake and a mediocre one.
Storing Tips for the Recipe
Proper storage extends your lemon bundt cake’s freshness and maintains its delightful texture. Once completely cooled and glazed, cover the cake loosely with plastic wrap or place under a cake dome. Avoid wrapping too tightly, as this traps moisture and makes the glaze soggy. At room temperature, the cake stays fresh for 3-4 days.
For longer storage, refrigerate the glazed cake for up to one week. Bring slices to room temperature before serving for optimal flavor and texture, as cold temperatures mute the citrus notes and firm the texture. If you plan to refrigerate, consider glazing only the portion you’ll serve immediately and storing the glaze separately for fresh application.
Freeze unglazed lemon bundt cake for up to three months. Wrap the completely cooled cake tightly in plastic wrap, then again in aluminum foil, and place in a freezer-safe bag with all air removed. This triple protection prevents freezer burn and preserves flavor. Thaw overnight in the refrigerator, then bring to room temperature and glaze fresh before serving.
For make-ahead convenience, prepare the cake one day in advance. Unglazed cakes actually develop more complex flavors as they rest, with the lemon notes becoming more pronounced. Store at room temperature wrapped in plastic, then glaze 2-3 hours before serving.
Individual slices freeze beautifully for grab-and-go desserts. Wrap each slice separately in plastic wrap, then store in a freezer-safe container. This allows you to thaw single servings as needed without defrosting the entire cake.
Conclusion
This easy lemon bundt cake delivers the perfect combination of simplicity and sophistication—a dessert that tastes like you spent hours in the kitchen but actually requires just 20 minutes of active preparation. The bright, sunny flavor profile makes it universally appealing across seasons and occasions, while the stunning bundt presentation ensures it looks as impressive as it tastes.
From the moment you cream the butter and sugar to that final, satisfying glaze drizzle, this recipe guides you through each step with confidence. The flexible nature of this lemon bundt cake accommodates dietary modifications, creative serving presentations, and various skill levels, making it accessible whether you’re a novice baker or a seasoned pro.
Ready to brighten your dessert table? Gather your ingredients, preheat that oven, and prepare to enjoy the most vibrant, delicious lemon bundt cake you’ve ever tasted. After your first slice, share your experience in the comments below—we’d love to hear how your cake turned out and any creative twists you added. Don’t forget to snap a photo for Instagram and tag us so we can feature your beautiful creation!
Looking for more citrus-inspired desserts? Check out our Orange Cream Cheese Pound Cake or Lime Coconut Bars for additional recipes that celebrate bright, refreshing flavors.
FAQs
Can I make this lemon bundt cake ahead of time?
Absolutely! This cake actually improves with time as the flavors meld and develop. Bake the cake up to two days in advance, wrap it well, and store at room temperature. Apply the glaze 2-3 hours before serving for the freshest presentation. For even longer storage, freeze the unglazed cake for up to three months.
Why did my bundt cake stick to the pan?
Pan sticking typically results from inadequate greasing, using a pan with a damaged non-stick coating, or inverting too early or too late. Ensure every crevice receives butter and flour, or use the baker’s goop method (equal parts butter, flour, and oil). The 15-20 minute cooling window is crucial—set a timer to ensure proper timing.
Can I substitute lemon extract for fresh lemons?
While lemon extract can work in a pinch, fresh lemon juice and zest provide superior flavor complexity and brightness. If you must use extract, use 2-3 teaspoons of pure lemon extract and replace the lemon juice with milk to maintain liquid balance. However, the result will taste notably different from the intended recipe.
My cake has a dense, heavy texture. What went wrong?
Dense bundt cakes usually result from overmixing after adding flour, using cold ingredients, or inaccurate measurements. Ensure all ingredients are room temperature, mix just until flour disappears, and use proper measuring techniques (spoon flour into measuring cups rather than scooping). Additionally, check that your baking powder is fresh—it loses potency after six months.
Can I make this recipe in a regular cake pan instead of a bundt pan?
Yes, though baking time will vary. For two 9-inch round pans, reduce baking time to 30-35 minutes. For a 9×13-inch pan, bake for 35-40 minutes. The distinctive presentation of the bundt shape will be lost, but the delicious flavor remains. Adjust your expectations regarding the visual appeal, as much of this cake’s charm comes from its elegant ridges.
How do I know when my lemon bundt cake is perfectly baked?
Look for three indicators: a golden-brown top, edges that have begun pulling away from the pan sides, and a skewer inserted into the thickest part that comes out clean or with just a few moist crumbs. The internal temperature should reach 205-210°F when measured with an instant-read thermometer. If the top browns too quickly, tent loosely with aluminum foil for the final 15 minutes of baking.