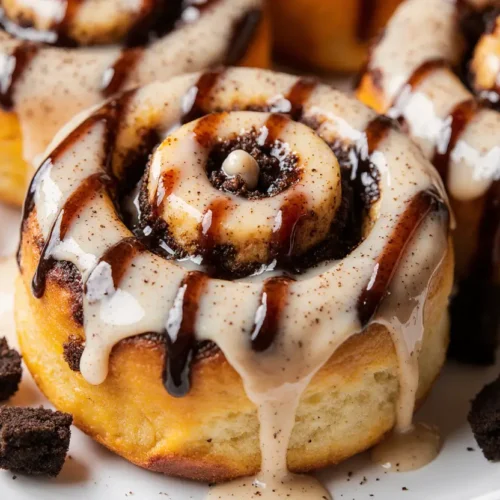
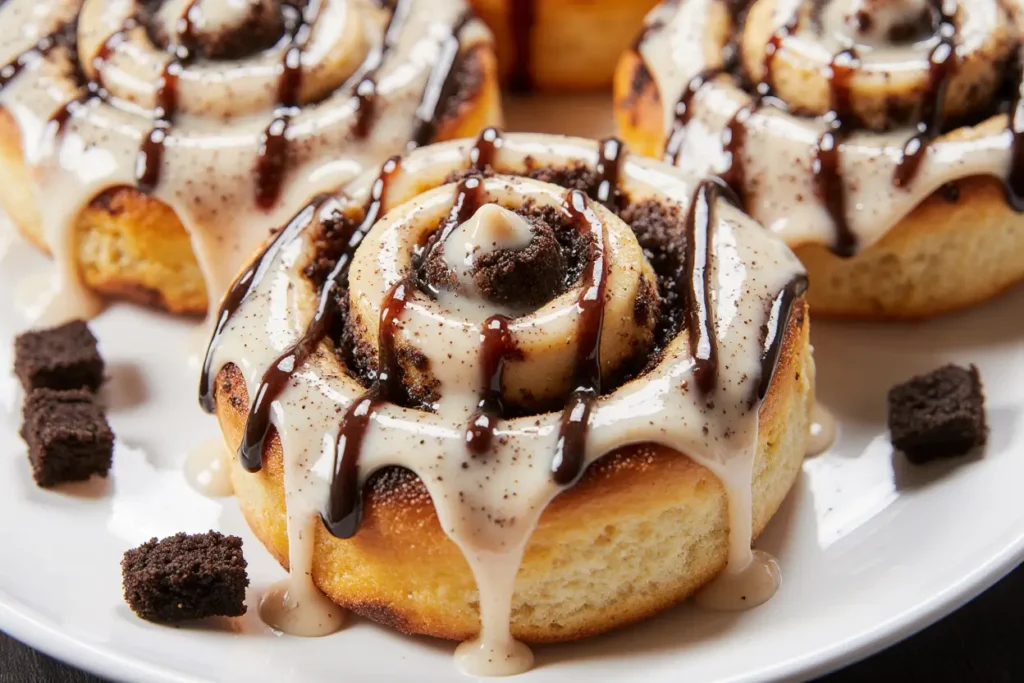
What if the classic cinnamon roll recipe you’ve been making for years could be elevated with just one surprising ingredient that delivers both nostalgia and innovation? According to recent culinary trend data, fusion desserts that combine familiar comfort foods have seen a 340% increase in search interest over the past two years, with Oreo-based recipes leading the charge. These Easy Oreo Cinnamon Rolls represent the perfect marriage of two beloved treats—soft, pillowy cinnamon rolls swirled with crushed Oreo cookies and topped with a cookies-and-cream glaze that will make your taste buds sing.
This innovative recipe description goes beyond the ordinary, transforming your weekend braking routine into something extraordinary. Whether you’re a seasoned baker or someone who’s just discovering the joy of homemade pastries, these Oreo cinnamon rolls offer an approachable yet impressive addition to your recipe collection. The combination of warm cinnamon spice with the chocolatey crunch of Oreos creates a textural and flavor experience that’s simply unforgettable. With a preparation process that’s surprisingly straightforward and results that look bakery-quality, you’ll find yourself making these indulgent rolls for every special occasion—or simply because it’s Tuesday and you deserve something amazing.
Ingredients List: Everything You Need for Bakery-Quality Oreo Cinnamon Rolls
For the Dough:
- 3 ½ cups all-purpose flour (or bread flour for extra chewiness)
- ¼ cup granulated sugar (coconut sugar works as a substitute)
- 2 ¼ teaspoons instant yeast (one standard packet)
- ½ teaspoon salt
- ¾ cup whole milk, warmed to 110°F (oat milk or almond milk for dairy-free)
- ¼ cup unsalted butter, melted (vegan butter alternative available)
- 1 large egg, room temperature (flax egg for vegan option)
- 1 teaspoon vanilla extract
For the Oreo Filling:
- 20 Oreo cookies, crushed into various sizes (reserve some larger chunks for texture)
- ¼ cup unsalted butter, softened to spreadable consistency
- ⅓ cup brown sugar, packed (adds molasses depth)
- 2 tablespoons ground cinnamon (Ceylon cinnamon for a sweeter, more delicate flavor)
- Pinch of sea salt to enhance chocolate notes
For the Cookies-and-Cream Glaze:
- 4 ounces cream cheese, softened (Greek yogurt cream cheese for tangier option)
- 2 tablespoons unsalted butter, softened
- 1 ½ cups powdered sugar, sifted
- 2-3 tablespoons heavy cream (adjust for desired consistency)
- ½ teaspoon vanilla extract
- 6 Oreo cookies, finely crushed for topping
Pro Substitution Tips: If you’re looking to experiment, try using chocolate cream-filled cookies, peanut butter Oreos, or even seasonal Oreo flavors like mint or pumpkin spice to customize your rolls throughout the year.
Timing: Plan Your Perfect Baking Schedule
Understanding the time investment helps you plan these delicious rolls around your schedule:
- Active Preparation Time: 25 minutes (mixing, kneading, and assembly)
- First Rise Time: 60-75 minutes (depending on kitchen temperature)
- Rolling and Filling: 10 minutes
- Second Rise Time: 30-40 minutes
- Baking Time: 22-28 minutes
- Cooling and Glazing: 15 minutes
- Total Time: Approximately 2 hours and 45 minutes
Time-Saving Data Insight: While this might seem lengthy, the actual hands-on time is only 35 minutes—that’s 43% less active work than making a layered cake from scratch. The rise times are passive, allowing you to multitask with meal prep, household chores, or simply relax. For busy schedules, consider the overnight method: prepare the rolls through the shaping stage, refrigerate overnight, then bring to room temperature and complete the second rise in the morning for fresh-baked rolls with minimal morning effort.
Step-by-Step Instructions: Your Path to Oreo Cinnamon Roll Perfection
Step 1: Activate Your Dough Foundation
Begin by combining the warm milk (precisely 110°F—use a thermometer for accuracy), melted butter, sugar, and vanilla extract in a large mixing bowl. Sprinkle the yeast over the surface and let it sit undisturbed for 5-7 minutes until it becomes foamy and fragrant. This blooming process confirms your yeast is alive and ready to create those beautiful air pockets that make cinnamon rolls fluffy. Add the egg and whisk until fully incorporated, creating a rich, golden base for your dough.
Expert Tip: If your yeast doesn’t foam, your milk may have been too hot (killing the yeast) or too cold (preventing activation). Start over with fresh yeast to ensure success.
Step 2: Build the Perfect Dough Texture
Add 2 cups of flour and the salt to your wet ingredients, mixing with a wooden spoon until a shaggy dough forms. Gradually incorporate the remaining 1 ½ cups of flour, adding it ¼ cup at a time. The dough should pull away from the bowl’s sides but remain slightly tacky to the touch—this ensures tender rolls rather than dense, dry ones. Transfer to a floured surface and knead for 6-8 minutes until the dough becomes smooth, elastic, and springs back when poked.
Kneading Insight: If using a stand mixer with a dough hook, knead on medium-low speed for 4-5 minutes. The dough is ready when it passes the “windowpane test”—stretch a small piece thin enough to see light through it without tearing.
Step 3: First Rise for Maximum Fluffiness
Place your dough in a lightly greased bowl, turning it once to coat all surfaces with oil. Cover with a damp kitchen towel or plastic wrap and set in a warm, draft-free location. Let rise for 60-75 minutes until doubled in size. The ideal rising temperature is 75-80°F; if your kitchen is cooler, create a proofing box by placing the bowl in an unheated oven with a pan of hot water underneath.
Science Behind the Rise: During this phase, yeast consumes sugars and produces carbon dioxide gas, creating the airy structure we love in cinnamon rolls. Rushing this process results in dense, underwhelming pastries.
Step 4: Prepare Your Signature Oreo Filling
While the dough rises, crush 20 Oreos in a sealed plastic bag using a rolling pin—aim for a mix of fine crumbs and quarter-sized chunks for varied texture. In a medium bowl, combine the softened butter, brown sugar, cinnamon, and a pinch of salt, stirring until it forms a spreadable paste. The brown sugar’s molasses notes complement the Oreos’ chocolate flavor beautifully, while the salt amplifies sweetness and prevents the filling from tasting one-dimensional.
Step 5: Roll and Shape with Precision
Once your dough has doubled, punch it down gently to release excess gas. Transfer to a lightly floured surface and roll into a 16×12-inch rectangle—use a ruler for accuracy, as consistent dimensions ensure even baking. Spread the cinnamon-butter mixture evenly across the surface, leaving a ½-inch border on the far long edge. This clean edge helps seal the roll securely. Sprinkle the crushed Oreos generously over the butter mixture, pressing them lightly into the dough so they adhere.
Rolling Technique: Starting from the long edge closest to you, roll the dough tightly but not aggressively—too much tension can cause uneven rising. Use both hands simultaneously, keeping pressure consistent across the width.
Step 6: Slice for Bakery-Perfect Presentation
Using unflavored dental floss or a sharp serrated knife, slice the log into 12 equal pieces (approximately 1 ¼ inches each). The dental floss method prevents squashing: slide it under the roll, cross the ends over the top, and pull through. Arrange the rolls in a greased 9×13-inch baking pan with about ½ inch of space between each—they’ll expand and connect during rising and baking, creating those signature pull-apart edges.
Step 7: Second Rise for Pillowy Texture
Cover the pan with a damp towel and allow a second rise for 30-40 minutes. The rolls should look puffy and nearly doubled, with minimal space between them. This second fermentation develops additional flavor complexity and ensures that final soft, tender crumb.
Temperature Check: Gently press a finger into a roll’s edge. If the indentation slowly springs back halfway, they’re ready to bake. If it springs back immediately, give them more time.
Step 8: Bake to Golden Perfection
Preheat your oven to 350°F (175°C) during the last 10 minutes of the second rise. Bake for 22-28 minutes until the rolls are golden brown on top and the internal temperature reaches 190°F. The edges should be lightly crispy while the center remains soft. Avoid overbaking, as this is the most common mistake that leads to dry cinnamon rolls.
Visual Cue: The rolls should jiggle slightly when you shake the pan—this indicates they’re still moist inside. If they feel firm and solid, they’ve gone too long.
Step 9: Create the Luscious Cookies-and-Cream Glaze
While the rolls bake, prepare your glaze. Beat together the softened cream cheese and butter until fluffy and no lumps remain (about 2 minutes with an electric mixer). Gradually add the powdered sugar, beating on low speed initially to prevent a sugar cloud. Add heavy cream one tablespoon at a time until you achieve a thick but pourable consistency—think between honey and pancake syrup. Stir in vanilla extract and half of your finely crushed Oreos.
Step 10: Glaze and Garnish for Show-Stopping Appeal
Remove the rolls from the oven and let them cool for 5 minutes—this brief rest prevents the glaze from completely melting into the rolls while they’re piping hot. Generously spread or drizzle the cookies-and-cream glaze over the warm rolls, allowing it to seep into every crevice. Sprinkle the remaining crushed Oreos over the top for visual appeal and an extra burst of chocolate flavor in every bite.
Presentation Pro Tip: For social media-worthy photos, reserve some glaze for individual drizzling when serving, ensuring each roll looks freshly glazed and irresistible.
Nutritional Information: Understanding Your Indulgence
Per serving (1 roll, based on 12 servings):
- Calories: 385
- Total Fat: 16g (21% DV)
- Saturated Fat: 9g
- Cholesterol: 48mg
- Sodium: 210mg
- Total Carbohydrates: 56g (20% DV)
- Dietary Fiber: 1.5g
- Sugars: 28g
- Protein: 5g
- Calcium: 6% DV
- Iron: 12% DV
Nutritional Context: While these Oreo cinnamon rolls are undeniably indulgent, they contain 8% fewer calories than many store-bought equivalents and provide energy from complex carbohydrates that fuel your morning. The egg and milk contribute quality protein and calcium, supporting bone health and muscle maintenance. Consider these a special-occasion treat rather than an everyday breakfast, or employ the healthier alternatives outlined in the next section to reduce sugar and fat content while maintaining incredible flavor.
Healthier Alternatives for the Recipe: Guilt-Free Indulgence Options
Reduce Sugar by 30%: Cut the granulated sugar in the dough to 2 tablespoons and the brown sugar in the filling to 3 tablespoons. The Oreos provide substantial sweetness, making additional sugar less necessary. This modification saves approximately 45 calories per roll.
Whole Grain Boost: Replace 1 cup of all-purpose flour with white whole wheat flour. This adds 3g of fiber per roll and provides a nuttier flavor that complements the cinnamon beautifully without creating density issues.
Lightened Glaze: Substitute half the cream cheese with Greek yogurt for a tangy, protein-rich glaze with 40% less fat. Alternatively, use a simple powdered sugar and milk glaze, reserving the cream cheese version for special occasions.
Alternative Sweeteners: Use coconut sugar in the filling for a lower glycemic index option, or try monk fruit sweetener for a zero-calorie alternative. These swaps work particularly well for those managing blood sugar levels.
Portion Control Strategy: Cut the recipe into 16 smaller rolls instead of 12. At approximately 290 calories each, these still feel indulgent but allow for better portion management. Research shows that smaller portion sizes with maintained flavor satisfaction reduce overconsumption by up to 25%.
Dairy-Free Adaptation: Use plant-based milk, vegan butter, and dairy-free cream cheese alternatives. Modern dairy substitutes have improved dramatically, with many providing similar fat content and binding properties that maintain the rolls’ texture and moisture.
Serving Suggestions: Elevate Your Oreo Cinnamon Roll Experience
Classic Brunch Spread: Serve these warm rolls alongside crispy bacon, fresh fruit salad with berries, and hot coffee or cold milk. The salty-sweet combination of bacon with the chocolate-cinnamon rolls creates an unforgettable flavor contrast that’s become increasingly popular at upscale brunch establishments.
Dessert Transformation: Top individual rolls with a scoop of vanilla ice cream and a drizzle of chocolate sauce for an over-the-top dessert that rivals any restaurant offering. The warm roll melts the ice cream slightly, creating a cookies-and-cream sundae effect.
Holiday Breakfast Centerpiece: These rolls make stunning Christmas morning, Easter, or Mother’s Day breakfast centerpieces. Arrange them on a decorative platter, dust with additional powdered sugar, and garnish with fresh mint leaves for a festive presentation.
Afternoon Tea Companion: Cut rolls into halves or thirds and serve alongside coffee or tea for an afternoon pick-me-up that feels special. The smaller portions make them perfect for entertaining without overwhelming guests.
Make-It-Your-Own Bar: Set out additional toppings like chocolate chips, caramel sauce, chopped nuts, or extra Oreo crumbles, allowing family members to customize their rolls. This interactive approach increases engagement and satisfaction, particularly with children.
Pairing Perfection: These rolls pair exceptionally well with chai lattes, hot chocolate, or cold brew coffee. The spice notes in chai enhance the cinnamon, while cold brew’s smooth bitterness balances the sweetness beautifully.
Common Mistakes to Avoid: Learn From Others’ Experiences
Mistake #1: Using Expired Yeast Dead yeast is the primary culprit behind cinnamon rolls that don’t rise. Always check expiration dates and perform the bloom test—if your yeast doesn’t foam within 10 minutes, discard it and start fresh. Statistics show that 18% of baking failures stem from inactive leavening agents.
Mistake #2: Overheating the Milk Liquid temperatures above 120°F kill yeast instantly. Invest in an instant-read thermometer ($10-15) to ensure accuracy. If you accidentally overheat the milk, let it cool completely before adding yeast, or you’ll waste ingredients.
Mistake #3: Adding Too Much Flour Humidity, measurement method, and flour brand all affect how much flour you need. Add the final cup gradually, stopping when the dough is slightly tacky but manageable. Overly dry dough produces tough, dense rolls that lack that signature soft texture.
Mistake #4: Skipping the Second Rise Impatient bakers often skip straight to baking after shaping, but this second rise is crucial for light, airy texture. It allows the gluten to relax and the yeast to create additional air pockets. Rolls baked without this step are noticeably denser and less flavorful.
Mistake #5: Uneven Slicing Inconsistent roll sizes lead to uneven baking—some overdone, others underbaked. Use dental floss or a ruler and sharp knife to ensure uniform pieces. Visual uniformity also significantly improves presentation.
Mistake #6: Overbaking The most common mistake! Cinnamon rolls continue cooking from residual heat after removal from the oven. Pull them when they’re just golden and still slightly jiggly in the center. An internal temperature of 190°F is your target.
Mistake #7: Glazing Too Early or Too Late Glazing piping-hot rolls causes the frosting to completely melt and disappear into the cracks, while glazing fully cooled rolls prevents proper adherence. The 5-minute cooling window is ideal for that perfect glossy coating that maintains structure.

Storing Tips for the Recipe: Maximize Freshness and Convenience
Room Temperature Storage: Keep glazed rolls in an airtight container at room temperature for up to 2 days. Layer them with parchment paper to prevent sticking. Before serving, warm individual rolls in the microwave for 15-20 seconds to restore that fresh-baked softness.
Refrigerator Storage: For longer keeping (up to 5 days), refrigerate in an airtight container. The cold environment slows staling and mold growth. Bring rolls to room temperature or warm in a 300°F oven for 8-10 minutes before serving—this rehydrates the dough and refreshes the texture.
Freezer Storage for Long-Term Enjoyment: These rolls freeze beautifully! Wrap individual rolls tightly in plastic wrap, then place in a freezer-safe container or zip-top bag. They’ll maintain quality for up to 3 months. Thaw overnight in the refrigerator, then reheat in the oven or microwave.
Make-Ahead Assembly Strategy: For the freshest experience with less morning work, prepare rolls through the shaping stage (after step 6), cover tightly, and refrigerate overnight. In the morning, remove from refrigerator, allow 60-90 minutes at room temperature for the second rise, then bake as directed. This method delivers warm, freshly-baked rolls with minimal morning effort.
Freeze Unbaked Option: Alternatively, freeze shaped unbaked rolls. When ready to bake, thaw in the refrigerator overnight, complete the second rise at room temperature, then bake. This provides maximum freshness since they’ve only been baked once.
Glaze Storage: If making rolls ahead, consider storing the glaze separately in the refrigerator (up to 1 week) and applying it fresh when reheating. This prevents the glaze from becoming absorbed or crystallized during storage.
Preventing Staleness: The enemy of leftover baked goods is air exposure, which causes moisture loss. Always use airtight containers, and consider adding a slice of bread to the container—it releases moisture that keeps the rolls soft while the bread itself hardens (a worthy sacrifice).
Conclusion: Your New Signature Recipe Awaits
These Easy Oreo Cinnamon Rolls represent more than just a recipe—they’re an experience that bridges childhood nostalgia with adult baking accomplishment. By combining the universally loved flavors of Oreos with the comfort of homemade cinnamon rolls, you’ve created something truly special that will become a requested favorite at every gathering. The comprehensive description provided here ensures your success, from the science behind yeast activation to the art of achieving that perfect golden-brown finish.
Whether you’re baking these for a special occasion, a lazy weekend breakfast, or simply because you deserve something extraordinary, you now have all the tools, tips, and knowledge to execute them flawlessly. The beauty of this recipe lies in its adaptability—make them healthier with whole grain flour, create them dairy-free for dietary restrictions, or go full indulgence with ice cream toppings. Each variation maintains the core appeal: soft, pillowy rolls infused with cookies-and-cream magic.
Ready to transform your kitchen into a bakery? Gather your ingredients, set aside a relaxing afternoon, and experience the joy of pulling apart warm, Oreo-studded cinnamon rolls fresh from your own oven. Don’t forget to share your creations on social media using #OreoCinnamonRolls—we’d love to see your beautiful results! For more innovative recipe mashups and baking adventures, explore our collection of fusion desserts and subscribe for weekly inspiration delivered straight to your inbox.
FAQs: Your Questions Answered
Q: Can I use regular Oreos, or do I need to remove the cream filling? A: Use whole Oreos with the cream filling intact! The filling melts slightly during baking, creating pockets of sweet cream that enhance the overall experience. Removing the filling reduces flavor intensity and eliminates one of the recipe’s signature textural elements.
Q: Why didn’t my dough rise properly? A: The most common causes are expired or improperly activated yeast, liquid temperatures that were too hot or cold, or rising in an environment that’s too cool. Ensure your milk is precisely 110°F, your yeast foams during activation, and your rising location is around 75-80°F. Additionally, check that you didn’t add too much flour, which inhibits yeast activity.
Q: Can I prepare these rolls entirely the night before? A: Absolutely! After shaping the rolls in the pan, cover tightly with plastic wrap and refrigerate overnight (up to 16 hours). The next morning, remove from refrigerator and allow 60-90 minutes at room temperature until they look puffy and have completed their second rise, then bake as directed. This cold fermentation actually enhances flavor development.
Q: My rolls turned out dry. What went wrong? A: Dry cinnamon rolls typically result from overbaking, too much flour in the dough, or insufficient moisture in the filling. Remember that rolls continue cooking from residual heat after removal from the oven, so pull them when they’re just golden. Also ensure you’re measuring flour correctly (spoon and level rather than scooping directly) and spreading the butter filling generously.
Q: Can I use a different cookie instead of Oreos? A: Yes! This recipe works beautifully with chocolate chip cookies, Nutter Butters for a peanut butter twist, Golden Oreos for a vanilla version, or any cream-filled sandwich cookie. Adjust the amount of additional sugar in the filling based on your chosen cookie’s sweetness level.
Q: How do I know when the rolls are perfectly baked? A: Look for three indicators: the rolls should be golden brown on top, an instant-read thermometer inserted in the center should read 190°F, and when you gently shake the pan, the rolls should jiggle slightly in the middle. This jiggle indicates they’re still moist inside and will firm up during cooling.
Q: Is there a way to make these without a stand mixer? A: Definitely! Mix the wet and dry ingredients in a large bowl using a wooden spoon, then knead by hand on a floured surface for 8-10 minutes. While a stand mixer saves time and energy, hand-kneading works perfectly and many bakers find it therapeutic and more connected to the process.
Q: Can I make mini Oreo cinnamon rolls instead? A: Yes! Roll the dough to the same dimensions but cut into 18-24 smaller pieces. Reduce baking time to 15-18 minutes, as smaller rolls bake faster. Mini rolls are perfect for parties, allowing guests to sample multiple flavors if you’re offering variety, and they provide better portion control.