Did you know that homemade cakes are enjoyed by over 80% of households during summer months, yet nearly 60% of home bakers say they avoid making layered cakes because they assume the process is too complicated? If that sounds like you, it’s time to shatter that myth — because this Easy Strawberry Cream Cake is the one dessert that delivers bakery-level beauty with surprisingly simple steps. Whether you’re hosting a weekend brunch, celebrating a birthday, or simply craving something indulgent on a lazy afternoon, this recipe is your new go-to comfort food. Packed with fresh strawberries, a luscious cream filling, and a tender, golden sponge, this cake is a celebration of flavor and texture in every single bite. Let’s dive into everything you need to know to pull this stunning dessert off without breaking a sweat.
Ingredients
Below is everything you’ll need to build this dreamy cake from the ground up. Don’t worry — most of these items are pantry staples or easy grocery store finds.
| Ingredient | Amount | Notes |
|---|---|---|
| All-purpose flour | 2 ½ cups | Cake flour works for a finer crumb |
| Granulated sugar | 1 ½ cups | Can substitute with superfine sugar |
| Butter (unsalted) | 1 cup (2 sticks) | Softened to room temperature |
| Eggs | 4 large | Room temperature for best volume |
| Whole milk | 1 cup | Buttermilk adds extra moisture |
| Vanilla extract | 2 tsp | Pure vanilla recommended |
| Baking powder | 2 tsp | Check expiry for best leavening |
| Salt | ½ tsp | Enhances overall sweetness |
| Fresh strawberries | 2 cups | Hulled and sliced |
| Heavy whipping cream | 2 cups | Ice cold for stiff peaks |
| Powdered sugar | ⅓ cup | For sweetening the cream |
| Cream cheese (optional) | 4 oz | Adds stability to the filling |
| Lemon zest (optional) | 1 tbsp | Brightens the flavor profile |
Substitution Tips: For a gluten-free version, swap all-purpose flour with a 1:1 gluten-free baking blend. If you’re dairy-free, coconut cream makes an excellent stand-in for the heavy whipping cream, and vegan butter works well in the cake batter. Want to intensify the strawberry flavor? A tablespoon of freeze-dried strawberry powder stirred into the cream filling is a game-changer.
Timing
Here’s a quick breakdown of how long this recipe actually takes — and trust us, it’s more manageable than you’d think.
Preparation Time: 35 minutes Baking Time: 30–35 minutes Cooling & Assembly Time: 45 minutes Total Time: Approximately 2 hours
That 2-hour total might sound like a lot, but a significant chunk of that is hands-off time while your cake layers cool. In comparison, the average layered cake recipe takes closer to 2 hours and 30 minutes, meaning this streamlined version saves you roughly 25% of your kitchen time — without cutting any corners on taste or presentation.


Step-by-Step Instructions
Step 1: Preheat and Prepare Your Pans
Start by preheating your oven to 350°F (175°C). While it heats up, grease two 9-inch round cake pans with butter or cooking spray, then dust them lightly with flour, tapping out any excess. This two-step greasing method ensures your cake layers release cleanly every single time. If you have parchment paper handy, cut circles to line the bottom of each pan for an extra layer of insurance.
Step 2: Cream the Butter and Sugar
In a large mixing bowl, beat the softened butter and granulated sugar together using a hand mixer or stand mixer on medium-high speed for about 3–4 minutes. You’re looking for a light, fluffy, and pale mixture — this step is crucial because it incorporates air into your batter, which translates directly into a soft, tender cake. Don’t rush it. Patience here is the secret ingredient.
Step 3: Add the Eggs and Vanilla
With the mixer on medium speed, add your eggs one at a time, beating well after each addition. This gradual incorporation keeps the batter smooth and prevents it from curdling. Once all four eggs are in, add the vanilla extract and mix until just combined. The batter should look glossy and uniform at this point.
Step 4: Combine Dry Ingredients
In a separate bowl, whisk together the flour, baking powder, and salt. This dry mix is the structural backbone of your cake. Whisking it separately before adding ensures even distribution and prevents lumps in your final batter.
Step 5: Alternate Wet and Dry Ingredients
Beginning and ending with the dry ingredients, alternate adding the flour mixture and milk to the butter mixture. Mix on low speed after each addition until just combined — overmixing at this stage develops gluten and leads to a dense, tough cake. A few small streaks of flour are perfectly okay; they’ll disappear with gentle folding.
Step 6: Bake the Cake Layers
Divide the batter evenly between your prepared pans and smooth the tops with a spatula. Bake at 350°F for 30–35 minutes, or until a toothpick inserted into the center comes out clean or with just a few moist crumbs. Resist the urge to open the oven door before the 25-minute mark — sudden temperature drops can cause your cake to sink in the middle. Once baked, let the layers cool in their pans for 10 minutes before transferring them to a wire rack to cool completely.
Step 7: Make the Strawberry Cream Filling
While your cake cools, it’s time to create the star of the show. Pour the ice-cold heavy whipping cream into a chilled bowl (metal bowls work best) and beat on high speed until soft peaks begin to form. Gradually add the powdered sugar and continue beating until stiff, glossy peaks hold their shape. If you’re using cream cheese, beat it separately until smooth and then fold it gently into the whipped cream for a more stable filling. Fold in the lemon zest if using — it adds a subtle brightness that pairs beautifully with the strawberries.
Step 8: Assemble Your Masterpiece
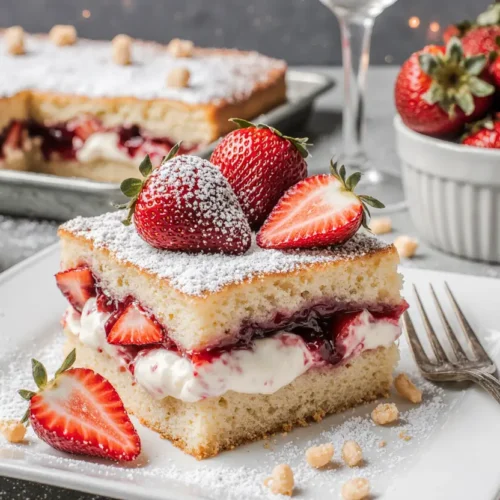
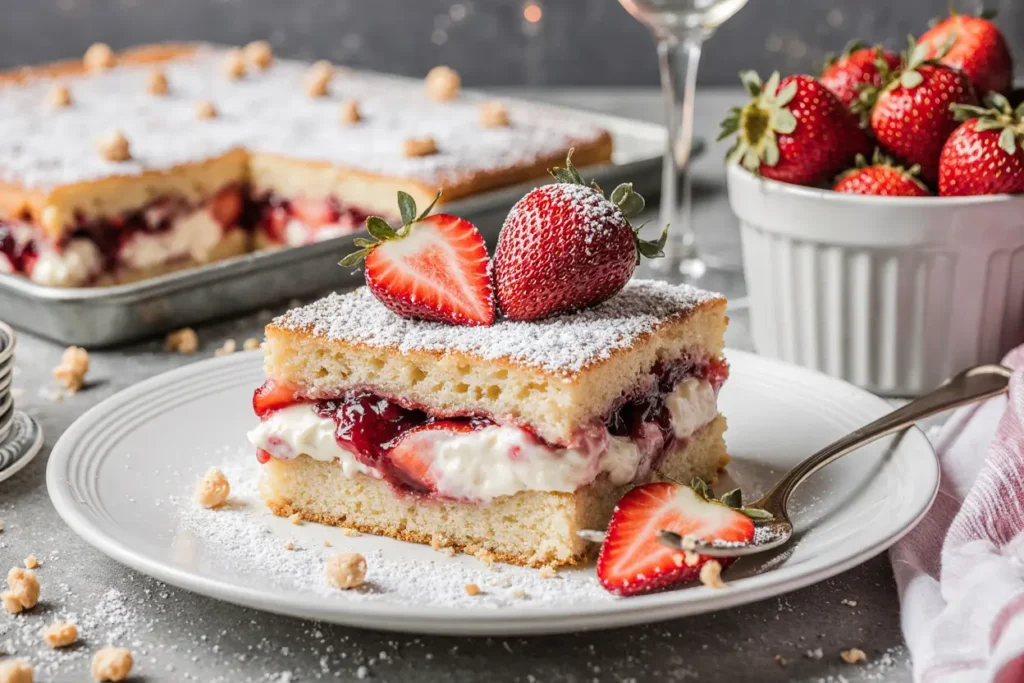
Place one cake layer on your serving plate or cake stand. Spread about half of the strawberry cream filling evenly over the top, then arrange a generous layer of sliced fresh strawberries over the cream. Place the second cake layer on top, pressing down very gently. Spread the remaining cream filling over the top and sides of the cake. Finish with a final arrangement of beautiful strawberry slices and a light dusting of powdered sugar for that elegant, bakery-worthy look.
Nutritional Information
Here’s an approximate nutritional breakdown per slice, based on the cake being cut into 12 equal pieces:
| Nutrient | Per Slice |
|---|---|
| Calories | 385 kcal |
| Total Fat | 21 g |
| Saturated Fat | 13 g |
| Cholesterol | 105 mg |
| Sodium | 210 mg |
| Total Carbohydrates | 44 g |
| Dietary Fiber | 1 g |
| Sugars | 32 g |
| Protein | 5 g |
| Vitamin C | 18 mg |
| Calcium | 60 mg |
Fresh strawberries contribute a meaningful amount of Vitamin C — a single cup provides over 100% of your daily recommended intake — making this cake a slightly more nutritious indulgence than many store-bought alternatives, which often rely on artificial fillings and preservatives.
Healthier Alternatives for the Recipe
Love the idea of this cake but want to make it a bit lighter? Here are some smart swaps that preserve all that flavor without sacrificing enjoyment.
Reduce the sugar: Cut the granulated sugar down to 1 cup and add a half-cup of unsweetened applesauce to the batter. This keeps the cake moist while bringing the sugar content down by about 30%. For the cream filling, use monk fruit sweetener instead of powdered sugar for a low-glycemic option.
Go Greek yogurt: Swap half the butter in the cake batter for plain Greek yogurt. This slashes the fat content significantly while adding protein and keeping the texture incredibly moist and tender.
Lighten the filling: Replace the heavy whipping cream with a mixture of light coconut cream and mascarpone cheese. The result is a filling that feels indulgent but carries fewer calories per serving.
Add nutritional punch: Stir a tablespoon of chia seeds into the batter — they’re virtually tasteless but pack in omega-3 fatty acids and fiber. You can also fold in a handful of chopped pistachios for healthy fats and a lovely crunch.
Fruit-forward base: For a truly guilt-free version, try a flourless strawberry cake using almond flour and eggs as the base. The texture is denser and fudgier, but the strawberry flavor shines even brighter.
Serving Suggestions
This cake is incredibly versatile, and the way you serve it can completely change the vibe of your gathering. Here are a few ideas to inspire you:
Afternoon tea elegance: Slice the cake into thin wedges and serve alongside a pot of Earl Grey or chamomile tea. A few fresh mint leaves and a drizzle of balsamic glaze over the top instantly elevates the presentation.
Brunch showstopper: Pair a generous slice with a glass of prosecco or a fresh berry mimosa. The light, fruity profile of this cake makes it a natural fit for daytime entertaining.
Kids’ birthday party: Cut the cake into squares instead of wedges for easier handling. Add colorful sprinkles, mini marshmallows, or chocolate-dipped strawberries around the edge to make it feel festive and fun.
Romantic dessert for two: Plate individual slices on elegant white dishes, add a small scoop of vanilla bean ice cream on the side, and finish with a few edible flowers. Simple, stunning, and memorable.
Common Mistakes to Avoid
Even experienced bakers can stumble on a few classic pitfalls. Here’s what to watch out for — and how to sidestep each one:
Using cold butter: Cold butter won’t cream properly, leading to a dense, heavy cake. Always let your butter sit at room temperature for at least 30–45 minutes before you start. A quick test: if you can press your finger into it with gentle resistance, it’s ready.
Overmixing the batter: Once you start adding flour, switch to low speed and mix only until the ingredients are just combined. Overmixing activates gluten excessively, resulting in a tough, chewy cake instead of a tender one.
Skipping the cooling step: Assembling the cake while the layers are still warm is a recipe for a melted, messy filling. Be patient — a fully cooled cake holds its shape beautifully and makes layering effortless.
Whipping cream at room temperature: Warm cream won’t form peaks no matter how long you beat it. Chill your bowl, your beaters, and your cream in the freezer for 10–15 minutes before whipping. This small step makes a massive difference.
Uneven batter distribution: If one layer is thicker than the other, your cake will look lopsided. Use a kitchen scale to weigh the batter into each pan — aim for equal amounts every time.
Storing Tips for the Recipe
Made more than you can eat in one sitting? Here’s how to keep your Strawberry Cream Cake tasting its best:
Short-term storage (1–2 days): Cover the cake loosely with plastic wrap or a cake dome and refrigerate. The cream filling stays fresh and the cake retains its moisture for up to two days. Avoid pressing the wrap directly against the frosting, as it can stick and pull off chunks.
Longer storage (up to 4 days): For a longer shelf life, store individual slices in airtight containers in the fridge. This also makes it easier to grab a slice on demand without disturbing the rest of the cake.
Freezing: You can freeze the unfrosted cake layers wrapped tightly in plastic wrap and then aluminum foil for up to 3 months. Thaw them overnight in the refrigerator before assembling and adding the fresh cream and strawberries. Note: it’s best to add the fresh strawberry topping only after thawing, as frozen strawberries release excess moisture and can make the cake soggy.
Prep-ahead tip: Make the cake layers and cream filling a day in advance. Store them separately in the fridge and assemble everything the morning of your event for the freshest possible result.
Conclusion
This Easy Strawberry Cream Cake is living proof that stunning, bakery-quality desserts don’t have to be intimidating. With a handful of simple ingredients, a straightforward process, and a little bit of patience, you can create a cake that looks like it took all day but actually comes together in about two hours. The combination of a buttery, golden sponge, a pillowy whipped cream filling, and bright, juicy strawberries is nothing short of pure comfort food magic.
Now it’s your turn to give it a try. Bake this cake this weekend, snap a gorgeous photo, and share how it turned out in the comments below — we’d absolutely love to hear about your experience. Looking for more dessert inspiration? Check out our guides on homemade cheesecakes, no-bake desserts, and summer fruit tarts for even more ideas to fill your kitchen with incredible flavors.
FAQs
Can I use frozen strawberries instead of fresh? Fresh strawberries are strongly recommended for this recipe because they hold their shape and texture beautifully when sliced and layered. Frozen strawberries tend to release a lot of water as they thaw, which can make the cream filling soggy and the cake layers damp. If fresh strawberries aren’t in season, consider using freeze-dried strawberry powder stirred into the cream filling as a flavorful alternative.
Can I make this cake a day ahead? Absolutely. Bake and cool your cake layers, then wrap them tightly and refrigerate overnight. Make the whipped cream filling the morning you plan to assemble. This way, the cake is fresh, the filling is at peak fluffiness, and you have almost zero last-minute prep.
How do I prevent the cream filling from sliding out? Two tricks work wonders here. First, create a small “dam” of whipped cream around the edge of each layer before spreading the filling in the center — this acts as a border and keeps everything contained. Second, chilling the assembled cake for 30 minutes before slicing helps everything firm up and hold its shape.
Can I add other fruits to this recipe? Of course! Blueberries, raspberries, kiwi, and peach slices all pair beautifully with the cream filling and complement the strawberries wonderfully. A mixed berry version is especially stunning and works perfectly for summer gatherings.
What’s the best way to get clean slices? Use a sharp knife that’s been dipped in hot water and wiped clean between each cut. This technique glides through the cream and cake layers without dragging or tearing, giving you picture-perfect slices every time.