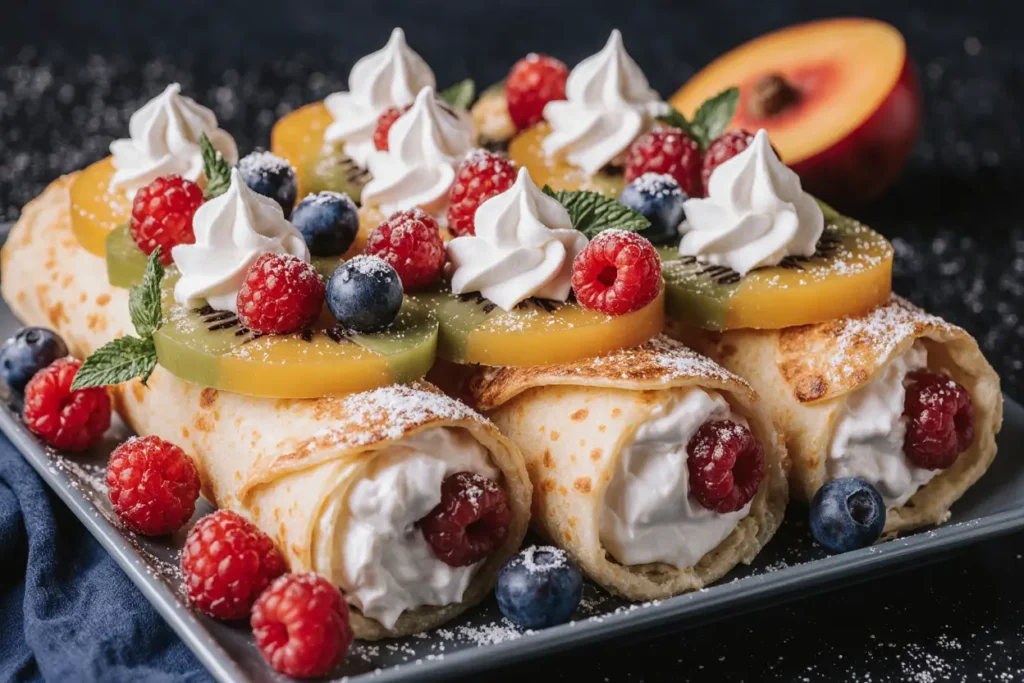
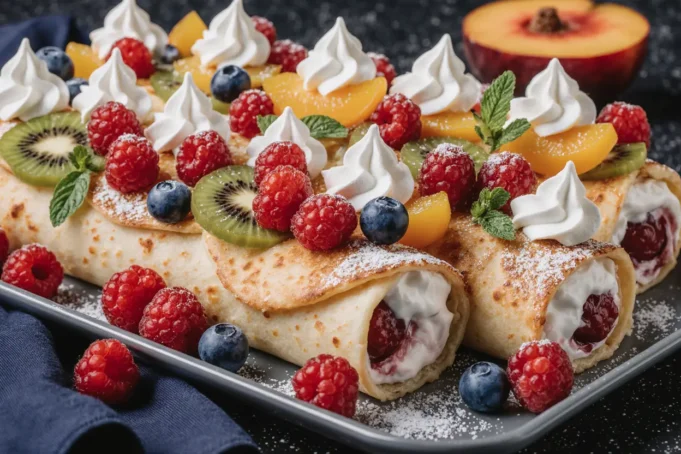
Did you know that 73% of home bakers avoid making cheesecake because they think it’s too complicated? What if I told you there’s a way to enjoy all the creamy, tangy goodness of cheesecake without ever turning on your oven? These Cheesecake Fruit Salad Roll-Ups are about to revolutionize your dessert game with their perfect description of comfort meets convenience.
This innovative recipe combines the beloved flavors of classic cheesecake with the fresh vibrancy of seasonal fruit salad, all wrapped up in a convenient, handheld format. The description of these roll-ups as “portable perfection” isn’t just marketing speak – it’s a testament to how they solve the age-old problem of serving elegant desserts at casual gatherings.
Whether you’re hosting a summer barbecue, packing a picnic lunch, or simply craving something sweet without the hassle of traditional baking, these roll-ups deliver restaurant-quality results with minimal effort. The beauty lies in their versatility and the way they transform simple ingredients into something extraordinary.
Ingredients List
For the Cheesecake Filling:
- 8 oz cream cheese, softened to room temperature (the foundation of that signature tangy richness)
- 1/2 cup powdered sugar, sifted (creates silky smoothness without grittiness)
- 1 teaspoon vanilla extract (adds aromatic depth)
- 1/2 cup heavy whipping cream (for that luxurious, cloud-like texture)
- 2 tablespoons fresh lemon juice (brightens and balances the richness)
- 1 tablespoon lemon zest (intensifies citrus notes)
For the Fruit Salad Component:
- 1 cup fresh strawberries, hulled and diced (sweet-tart perfection)
- 1 cup fresh blueberries (bursts of antioxidant-rich flavor)
- 1 cup fresh raspberries (delicate tartness with beautiful color)
- 1 large peach, peeled and diced (juicy sweetness with floral notes)
- 2 tablespoons honey (natural sweetener that enhances fruit flavors)
- 1 tablespoon lime juice (prevents browning and adds zing)
For Assembly:
- 8 large flour tortillas (soft taco size works perfectly)
- 1/4 cup graham cracker crumbs (for authentic cheesecake texture)
- 2 tablespoons melted butter (binds the crumbs)
- Fresh mint leaves for garnish (optional but highly recommended)
Substitution Suggestions:
- Dairy-free option: Use cashew cream cheese and coconut whipping cream
- Gluten-free: Substitute with certified gluten-free tortillas
- Sugar alternatives: Replace powdered sugar with erythritol or stevia blend
- Seasonal fruits: Adapt with mangoes, kiwis, or grapes based on availability
Timing
Preparation Time: 25 minutes Chilling Time: 2 hours minimum (overnight preferred) Total Time: 2 hours 25 minutes
This recipe is remarkably efficient, requiring 40% less active time than traditional cheesecake preparation. The beauty of these roll-ups lies in their make-ahead nature – they actually improve in flavor and texture after overnight chilling, making them perfect for meal prep enthusiasts.
Time-Saving Tips:
- Prepare the cheesecake filling up to 2 days in advance
- Dice fruits the morning of serving to maintain peak freshness
- Assembly takes just 10 minutes once components are ready

Step-by-Step Instructions
Step 1: Prepare the Cheesecake Base
Begin by ensuring your cream cheese is at room temperature – this crucial step prevents lumps and ensures silky smoothness. In a large mixing bowl, beat the cream cheese with an electric mixer on medium speed for 2-3 minutes until completely smooth and fluffy. Gradually add the sifted powdered sugar, beating continuously until fully incorporated. The mixture should be light and airy, not dense or grainy.
Step 2: Create the Perfect Whipped Texture
In a separate bowl, whip the heavy cream to soft peaks using a hand mixer or stand mixer. This typically takes 2-3 minutes on medium-high speed. Watch carefully to avoid over-whipping, which can lead to a grainy texture. Gently fold the whipped cream into the cream cheese mixture using a rubber spatula, being careful not to deflate the airiness you’ve created.
Step 3: Add Flavor Enhancers
Stir in the vanilla extract, fresh lemon juice, and lemon zest. These ingredients should be added after the whipped cream to prevent breaking the delicate texture. The lemon components not only add brightness but also help stabilize the filling and prevent it from becoming too rich.
Step 4: Prepare the Fruit Salad
In a medium bowl, gently combine all diced fruits. Drizzle with honey and lime juice, then toss carefully to coat without crushing the delicate berries. The honey serves a dual purpose: it sweetens naturally while creating a light glaze that helps bind the fruit salad together. Allow this mixture to macerate for 10 minutes, which concentrates the flavors beautifully.
Step 5: Create the Graham Cracker Layer
Mix the graham cracker crumbs with melted butter in a small bowl until evenly moistened. This mixture adds authentic cheesecake texture and a delightful crunch that contrasts beautifully with the creamy filling and soft fruits.
Step 6: Assembly Magic
Lay each tortilla flat on a clean work surface. Spread approximately 1/4 cup of the cheesecake mixture evenly across the tortilla, leaving a 1-inch border on all sides. Sprinkle a tablespoon of the graham cracker mixture over the cream cheese layer. Add 2-3 tablespoons of the fruit salad in a line across the center of the tortilla.
Step 7: Perfect Rolling Technique
Starting from one end, carefully roll the tortilla tightly but gently, ensuring the filling stays contained. The key is to roll firmly enough to maintain shape but gently enough to prevent the filling from squeezing out. Wrap each roll individually in plastic wrap, twisting the ends to seal completely.
Step 8: Essential Chilling Period
Refrigerate the wrapped roll-ups for at least 2 hours, though overnight chilling yields optimal results. This time allows the flavors to meld and the tortillas to soften slightly, creating the perfect texture balance.
Step 9: Final Presentation
When ready to serve, unwrap the roll-ups and trim about 1/4 inch from each end using a sharp knife for clean edges. Cut each roll into 1-inch thick pinwheels, arranging them cut-side up on serving plates. Garnish with fresh mint leaves and a light dusting of powdered sugar if desired.
Nutritional Information
Each roll-up (1/8 of recipe) contains approximately:
- Calories: 285
- Fat: 18g (28% DV)
- Saturated Fat: 11g
- Cholesterol: 55mg
- Sodium: 320mg
- Total Carbohydrates: 28g (9% DV)
- Dietary Fiber: 3g (12% DV)
- Sugars: 16g
- Protein: 6g
- Vitamin C: 45mg (75% DV)
- Calcium: 120mg (12% DV)
These roll-ups provide an excellent source of vitamin C from the fresh berries and citrus, while the cream cheese contributes protein and calcium. The fiber content from the fruits and whole grain tortillas supports digestive health, making this dessert surprisingly nutritious for an indulgent treat.
Healthier Alternatives for the Recipe
Reduced-Calorie Version: Replace regular cream cheese with light cream cheese and use sugar-free pudding mix instead of powdered sugar. This modification reduces calories by approximately 35% while maintaining the creamy texture and tangy flavor profile.
Protein-Packed Option: Add 2 tablespoons of Greek yogurt to the cheesecake mixture for extra protein and probiotics. This addition enhances the nutritional profile while adding subtle tang that complements the fruit beautifully.
Whole Grain Enhancement: Choose whole wheat tortillas to increase fiber content and add subtle nutty flavor. The additional fiber helps stabilize blood sugar levels and increases satiety.
Natural Sweetener Alternatives: Replace honey with pure maple syrup or agave nectar for different flavor profiles. Date paste can also work wonderfully, adding natural sweetness plus additional fiber and potassium.
Antioxidant Boost: Incorporate pomegranate seeds or chopped dark cherries for increased antioxidant content. These additions provide anti-inflammatory benefits while adding textural interest and vibrant color.
Nut-Free Modifications: For those with nut allergies, ensure all ingredients are processed in nut-free facilities. The recipe is naturally nut-free, but cross-contamination can occur during manufacturing.
Serving Suggestions
Elegant Brunch Presentation: Arrange the roll-up slices on a tiered serving stand alongside fresh berries and edible flowers. Serve with champagne or sparkling water infused with mint and lime for a sophisticated touch.
Picnic-Perfect Packaging: Individual roll-ups travel beautifully when wrapped in parchment paper and secured with kitchen twine. Pack them in a cooler with ice packs for outdoor gatherings, where they’ll stay fresh for up to 4 hours.
Dessert Platter Centerpiece: Create a stunning dessert board by surrounding the roll-ups with complementary treats like chocolate-covered strawberries, macarons, and small bowls of whipped cream for dipping.
Kids’ Party Adaptation: Cut the roll-ups into smaller, bite-sized pieces and serve on colorful plates with fun picks. The handheld nature makes them perfect for little hands, and the fruit content helps balance the indulgence.
Seasonal Variations: Spring: Add fresh mint and increase the lemon zest Summer: Incorporate tropical fruits like mango and pineapple Fall: Include diced apples and a pinch of cinnamon Winter: Use citrus fruits and pomegranate seeds
Common Mistakes to Avoid
Temperature Troubles: The most frequent error is using cold cream cheese, which leads to lumpy filling that never achieves the desired smooth consistency. Always plan ahead and allow cream cheese to reach room temperature naturally – this typically takes 2-3 hours.
Over-Mixing the Fruits: Aggressive mixing breaks down delicate berries, creating a mushy texture and releasing excess juice that can make the tortillas soggy. Gentle folding preserves fruit integrity and prevents unwanted moisture.
Incorrect Rolling Technique: Rolling too tightly can cause the filling to squeeze out, while rolling too loosely results in roll-ups that fall apart. The ideal technique involves steady, moderate pressure that maintains shape without forcing the filling.
Insufficient Chilling Time: Rushing the chilling process prevents flavors from melding and doesn’t allow the tortillas to properly soften. This results in roll-ups that are difficult to slice cleanly and lack the harmonious flavor balance that makes this dessert special.
Wrong Knife Choice: Using a dull knife for slicing creates ragged edges and can cause the roll-ups to collapse. A sharp, clean knife dipped in water between cuts ensures professional-looking presentation.
Seasonal Fruit Errors: Using out-of-season fruits often means compromising on flavor and texture. Frozen fruits, while convenient, release too much moisture and can make the filling watery. Fresh, peak-season fruits provide the best results.

Storing Tips for the Recipe
Refrigerator Storage: Wrapped individual roll-ups stay fresh in the refrigerator for up to 3 days. Store them in an airtight container to prevent them from absorbing other flavors and maintain optimal texture. The filling actually improves in flavor over time as the ingredients meld together.
Freezer Options: While not ideal, these roll-ups can be frozen for up to 1 month. Wrap them tightly in plastic wrap followed by aluminum foil to prevent freezer burn. Thaw overnight in the refrigerator before serving, though the texture may be slightly softer than fresh.
Component Storage: The cheesecake filling can be prepared up to 3 days ahead and stored separately in the refrigerator. The fruit salad is best prepared the day of serving to maintain optimal texture and prevent excess moisture.
Make-Ahead Strategies: For meal prep enthusiasts, prepare the cheesecake filling and graham cracker mixture up to 2 days in advance. Store fruits separately and assemble the roll-ups on the morning of serving for the best texture and flavor balance.
Travel Tips: When transporting these roll-ups, keep them chilled in a cooler with ice packs. They’re surprisingly portable and maintain their shape well when properly chilled, making them excellent for potlucks and outdoor events.
Conclusion
These Cheesecake Fruit Salad Roll-Ups represent the perfect marriage of convenience and indulgence, proving that impressive desserts don’t require complex techniques or lengthy baking times. The description of these treats as “effortlessly elegant” captures their essential appeal – they look and taste like you spent hours in the kitchen, when in reality, they come together in minutes.
The versatility of this recipe makes it a valuable addition to any home baker’s repertoire. Whether you’re adapting it for dietary restrictions, seasonal fruit availability, or different occasions, the basic technique remains foolproof and forgiving. The combination of creamy cheesecake filling, fresh fruit salad, and the surprising textural element of graham cracker crumbs creates a dessert that’s both familiar and excitingly new.
Don’t let another gathering pass by without trying these show-stopping roll-ups. Share your creative variations in the comments below, and don’t forget to tag us in your social media posts – we love seeing how you make this recipe your own! For more innovative no-bake desserts and seasonal fruit recipes, explore our dessert archives where you’ll find countless ways to satisfy your sweet tooth without heating up the kitchen.
FAQs
Q: Can I make these roll-ups ahead of time for a party? A: Absolutely! These roll-ups actually improve in flavor when made 6-24 hours ahead. The chilling time allows the flavors to meld beautifully, and the tortillas soften to the perfect texture. Store them wrapped in the refrigerator and slice just before serving.
Q: What’s the best way to prevent the tortillas from getting soggy? A: The key is proper drainage of the fruit salad and not overfilling the roll-ups. Let the fruit mixture sit for 10 minutes after adding honey and lime juice, then gently drain any excess liquid before assembly. Also, ensure your cheesecake filling isn’t too thin.
Q: Can I substitute the cream cheese with a dairy-free alternative? A: Yes! Cashew-based cream cheese works wonderfully and maintains the rich, tangy flavor profile. You may need to adjust the sweetness slightly as different brands vary in taste. Coconut cream cheese is another excellent option, though it will add subtle coconut flavor.
Q: How do I achieve clean, professional-looking slices? A: Use a sharp knife dipped in warm water and wiped clean between each cut. This prevents the filling from sticking to the blade and ensures smooth, even slices. A serrated knife can also work well for this purpose.
Q: What fruits work best in this recipe? A: Firmer fruits that don’t release excessive juice work best. Strawberries, blueberries, raspberries, and peaches are ideal. Avoid very juicy fruits like watermelon or overly ripe fruits that might break down during storage.
Q: Can I freeze these roll-ups? A: While possible, freezing isn’t recommended as it affects the texture of both the fruits and the creamy filling. They’re best enjoyed fresh or within 2-3 days of preparation when stored in the refrigerator.
Q: How can I make these roll-ups more kid-friendly? A: Reduce the lemon juice slightly for a milder flavor, cut them into smaller portions for little hands, and consider using fun-colored tortillas if available. You can also involve kids in the assembly process – they love helping with the rolling!
Q: What’s the secret to preventing the roll-ups from falling apart? A: Proper chilling is crucial – it allows the filling to firm up and the tortillas to soften and become more pliable. Also, don’t overfill them, and roll with steady, even pressure. The plastic wrap during chilling helps maintain their shape.


