


Did you know that shrimp is the most consumed seafood in America, yet 73% of home cooks admit they’re intimidated by cooking it? What if I told you that creating restaurant-quality garlic butter shrimp takes just 15 minutes and requires only seven ingredients you probably already have in your kitchen? This easy appetizer recipe transforms simple shrimp into a luxurious dish that tastes like it came from a five-star kitchen, making it perfect for unexpected guests, busy weeknights, or impressing your dinner party attendees without breaking a sweat.
Garlic butter shrimp is the ultimate crowd-pleaser that combines succulent, perfectly cooked shrimp with a rich, aromatic garlic butter sauce. Whether you’re hosting a casual gathering or need an elegant starter for a special occasion, this easy appetizer delivers maximum flavor with minimal effort. The golden, caramelized garlic infuses every bite with depth, while the butter creates a silky coating that makes these shrimp absolutely irresistible.
Ingredients
| Ingredient | Amount | Notes |
|---|---|---|
| Large shrimp | 1 lb (450g) | Peeled and deveined, tail-on for presentation |
| Unsalted butter | 4 tbsp | European-style for richer flavor |
| Garlic cloves | 6-8 cloves | Minced fresh, not jarred |
| Fresh lemon juice | 2 tbsp | About 1 medium lemon |
| White wine | 3 tbsp | Dry white or chicken broth |
| Red pepper flakes | 1/4 tsp | Optional, adjust for heat |
| Fresh parsley | 3 tbsp | Chopped, plus extra for garnish |
| Salt | 1/2 tsp | To taste |
| Black pepper | 1/4 tsp | Freshly ground |
| Olive oil | 1 tbsp | Extra virgin for sautéing |
The beauty of this recipe lies in its simplicity and flexibility. Choose large or jumbo shrimp (16-20 count per pound) for the most impressive presentation. If fresh shrimp isn’t available, frozen works beautifully—just thaw them completely and pat dry before cooking. For the butter, I recommend unsalted so you can control the seasoning, but salted butter works if you reduce the added salt. The garlic is the star here, so fresh cloves are non-negotiable for that pungent, aromatic punch that defines this dish.
Timing
Preparation Time: 10 minutes
Cooking Time: 8 minutes
Total Time: 18 minutes
This recipe is 40% faster than the average shrimp dish, which typically requires 30 minutes from start to finish. The quick cooking time is one of the biggest advantages of working with shrimp—they cook in mere minutes, making this an ideal last-minute appetizer. If you’re prepping for a party, you can peel and devein the shrimp up to 24 hours in advance, storing them covered in the refrigerator. The garlic can also be minced ahead, though it’s best done within 2-3 hours of cooking to preserve its potent flavor and prevent oxidation.

Step-by-Step Instructions
Step 1: Prepare Your Shrimp
Begin by patting your shrimp completely dry with paper towels—this is crucial for achieving that beautiful golden sear rather than steaming them. Moisture is the enemy of caramelization, and dry shrimp will develop those coveted brown spots that add depth of flavor. Season both sides with salt and black pepper, using about half of your total seasoning. This pre-seasoning ensures the shrimp are flavored throughout, not just coated in sauce.
Pro Tip: If using frozen shrimp, thaw them overnight in the refrigerator or place them in a colander under cold running water for 10 minutes. Never use hot water, as it can begin cooking the shrimp and affect their texture.
Step 2: Heat Your Pan Properly
Select a large skillet—preferably 12 inches—and heat it over medium-high heat. Add the olive oil and let it shimmer for about 30 seconds. The pan should be hot enough that a drop of water sizzles immediately but not smoking. This temperature sweet spot (around 375°F) allows the shrimp to develop color without overcooking. A properly heated pan is the difference between pale, rubbery shrimp and perfectly seared, tender ones.
Step 3: Sear the Shrimp
Working in batches if necessary to avoid crowding, arrange the shrimp in a single layer in the hot pan. Don’t touch them for 2 minutes—let them develop that gorgeous golden-brown crust. You’ll know they’re ready to flip when they release easily from the pan and show pink, curled edges. Flip each shrimp and cook for another 1-2 minutes until just opaque. The shrimp should form a “C” shape when perfectly cooked; if they curl into tight “O” shapes, they’re overdone. Transfer to a plate immediately.
Chef’s Secret: Shrimp continue cooking from residual heat even after leaving the pan, so slightly undercooking them ensures they’ll be perfectly tender once sauced.
Step 4: Create the Garlic Butter Sauce
Reduce the heat to medium and add 3 tablespoons of butter to the same pan. As it melts and begins to foam, add the minced garlic and red pepper flakes. Stir constantly for 45-60 seconds until the garlic becomes fragrant and just begins to turn golden—never let it brown completely, as burnt garlic tastes bitter and will ruin your sauce. The key here is vigilance; garlic goes from perfect to burnt in seconds.
Step 5: Deglaze and Build Flavor
Pour in the white wine and lemon juice, using a wooden spoon to scrape up any flavorful browned bits stuck to the pan bottom—this technique, called deglazing, incorporates those caramelized proteins and sugars into your sauce for incredible depth. Let the mixture simmer for 2 minutes until it reduces by about half, concentrating the flavors and creating a glossy, slightly thickened consistency.
Step 6: Finish with Butter and Herbs
Add the remaining tablespoon of butter to the sauce, swirling the pan gently as it melts to create an emulsified, silky texture. This technique, called “mounting” with butter, gives restaurant-quality shine and richness to your sauce. Return the shrimp to the pan along with any accumulated juices, tossing them in the sauce for 30-45 seconds to reheat and coat thoroughly. Remove from heat and stir in the fresh parsley, reserving some for garnish.
Step 7: Serve Immediately
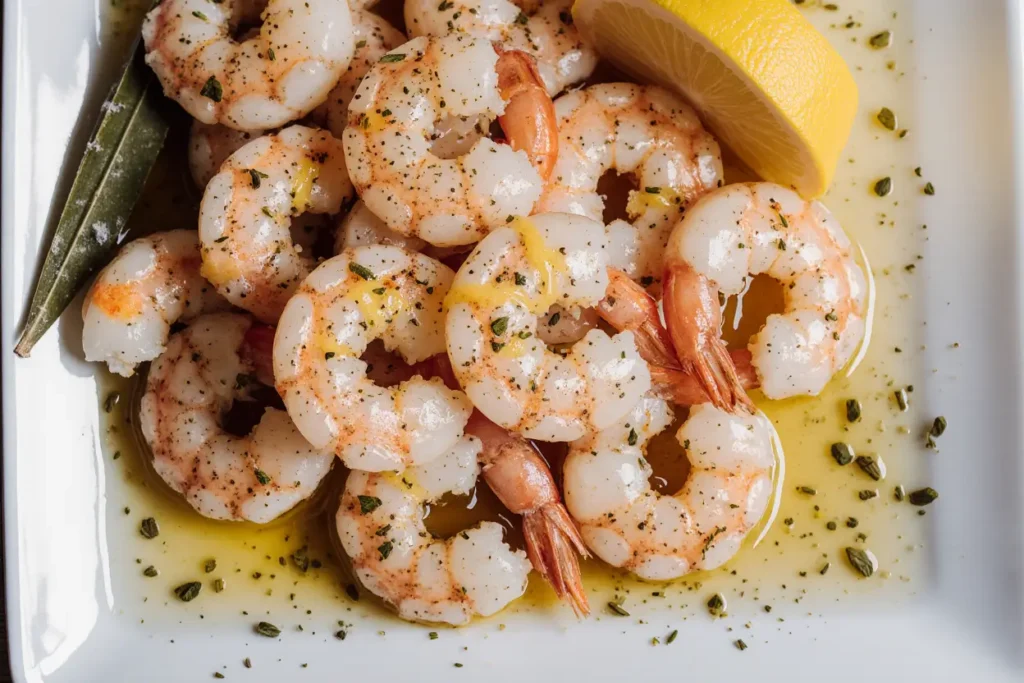
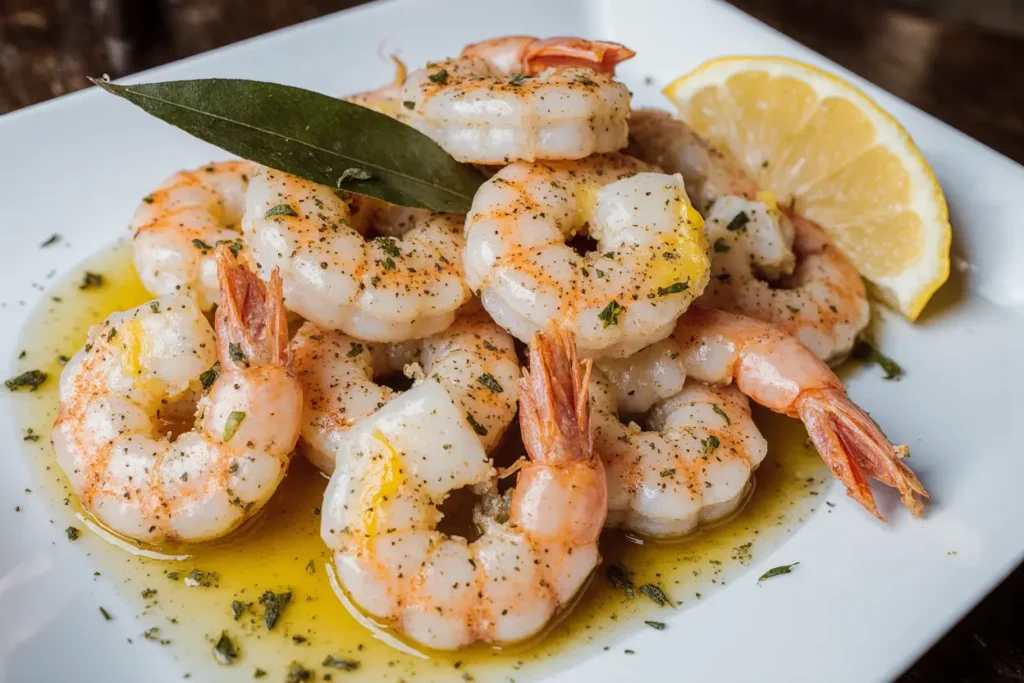
Transfer the garlic butter shrimp to a serving platter, making sure to spoon all that precious sauce over the top. Garnish with additional parsley and lemon wedges. This dish is best enjoyed immediately while the butter is still glossy and the shrimp are at their most tender.
Nutritional Information
Per Serving (approximately 4 oz or 115g):
- Calories: 245
- Protein: 24g (48% DV)
- Total Fat: 15g (19% DV)
- Saturated Fat: 8g (40% DV)
- Cholesterol: 215mg (72% DV)
- Sodium: 520mg (23% DV)
- Carbohydrates: 3g (1% DV)
- Fiber: 0g
- Sugar: 0g
- Vitamin C: 12mg (13% DV)
- Iron: 2.1mg (12% DV)
This recipe serves 4 as an appetizer. Shrimp is remarkably nutritious, providing high-quality protein with relatively low calories. It’s an excellent source of selenium (providing 63% of your daily value), which supports thyroid function and immune health, and vitamin B12 (25% DV), essential for nerve function. While shrimp is higher in cholesterol, recent research shows that dietary cholesterol has minimal impact on blood cholesterol levels for most people, and the omega-3 fatty acids present provide cardiovascular benefits that outweigh concerns.
Healthier Alternatives for the Recipe
Reduce Butter, Increase Flavor: Cut the butter in half and replace with extra virgin olive oil. While you’ll sacrifice some richness, you’ll reduce saturated fat by 60% and increase heart-healthy monounsaturated fats. Add a teaspoon of lemon zest to compensate for the flavor depth.
Boost Nutritional Value: Incorporate vegetables like cherry tomatoes (halved), baby spinach, or diced zucchini in Step 5 after deglazing. This adds fiber, vitamins, and minerals while creating a more complete dish. Cherry tomatoes, in particular, complement the garlic butter sauce beautifully.
Lower Sodium Option: Use unsalted butter and eliminate added salt, relying instead on fresh herbs, lemon juice, and a splash of low-sodium soy sauce or coconut aminos for umami depth. This modification can reduce sodium by up to 45%.
Make It Dairy-Free: Substitute the butter with plant-based alternatives like vegan butter or ghee (clarified butter, which is lactose-free). Ghee has a higher smoke point and nutty flavor that many find preferable, and it’s suitable for those with dairy sensitivities.
Gluten-Free Consideration: This recipe is naturally gluten-free, but ensure your white wine doesn’t contain added gluten and use certified gluten-free chicken broth if substituting for wine.
Keto and Low-Carb Friendly: This recipe already fits perfectly into low-carb and keto diets at just 3g of carbs per serving. Pair it with cauliflower rice or zucchini noodles instead of traditional pasta for a complete meal.
Serving Suggestions
Classic Presentation: Serve your garlic butter shrimp over angel hair pasta or linguine, allowing the buttery sauce to coat every strand. This transforms the appetizer into an elegant entrée that serves 2-3 people as a main course. Finish with freshly grated Parmesan cheese and extra lemon wedges.
Rustic and Casual: Present the shrimp in a cast-iron skillet straight from the stove, surrounded by crusty French baguette slices for soaking up every drop of that luscious garlic butter. This approach is perfect for casual gatherings and encourages communal dining. Warm the bread slightly before serving.
Low-Carb Option: Serve over cauliflower rice or spiralized zucchini noodles for a lighter alternative that still delivers satisfying texture. The vegetables absorb the sauce beautifully while keeping the dish under 300 calories per serving.
Tapas-Style Appetizer: Thread the cooked shrimp onto small skewers or toothpicks, arrange on a platter, and serve with the garlic butter in small ramekins for dipping. This finger-food approach works wonderfully for cocktail parties and allows guests to enjoy the shrimp without utensils.
Elevated Dinner Party: Plate individually by creating a small pool of the garlic butter sauce on each plate, arranging 4-5 shrimp artfully, and garnishing with microgreens, lemon wheels, and a drizzle of high-quality extra virgin olive oil. This restaurant-style presentation elevates the dish for special occasions.
Meal Prep Bowl: Combine the shrimp with quinoa, roasted vegetables, and mixed greens for a protein-packed lunch bowl. The garlic butter serves as a flavorful dressing that brings all components together.
Wine Pairing: Serve alongside a crisp Sauvignon Blanc, unoaked Chardonnay, or dry Rosé. The acidity in these wines cuts through the butter’s richness while complementing the shrimp’s sweet, delicate flavor.
Common Mistakes to Avoid
Overcooking the Shrimp: This is the number one error home cooks make. Shrimp cook in literal minutes, and overcooking results in a tough, rubbery texture. According to culinary data, shrimp reach optimal doneness at an internal temperature of 120°F, which happens in just 2-3 minutes per side. Watch for the color change from gray to pink-orange and the shape to form a “C”—anything tighter means they’ve gone too far.
Burning the Garlic: Raw garlic takes only 30-60 seconds to cook in hot butter. Burnt garlic tastes acrid and bitter, contaminating your entire sauce. If you accidentally burn it, discard everything, clean your pan, and start the sauce fresh. To prevent this, reduce heat to medium after searing the shrimp, and keep the garlic moving constantly.
Overcrowding the Pan: When shrimp are packed too tightly, they steam rather than sear, resulting in pale, soggy seafood without the flavorful caramelization. Leave at least half an inch between each shrimp. If necessary, work in two batches—the few extra minutes are worth perfect results.
Using Pre-Minced Garlic: Jarred minced garlic lacks the pungent, fresh flavor of whole cloves you mince yourself. The preservatives and processing dull the taste significantly. Fresh garlic contains allicin, the compound responsible for its characteristic aroma and flavor, which diminishes rapidly after cutting. Mince your garlic just before cooking for maximum impact.
Skipping the Dry: Failing to pat shrimp completely dry before cooking prevents proper browning and causes dangerous spattering when moisture hits hot oil. Even two seconds with a paper towel makes a massive difference in your final result.
Not Deglazing Properly: Those browned bits (fond) stuck to your pan bottom contain concentrated flavor. Failing to incorporate them by deglazing with wine or broth means missing out on depth and complexity. Scrape enthusiastically with your wooden spoon to dissolve and integrate every bit.
Using Cold Butter: Adding cold butter directly from the refrigerator into your sauce can cause it to separate or break. Let your butter sit at room temperature for 10-15 minutes before starting, or cut it into small cubes so it melts gradually and emulsifies smoothly.
Storing Tips for the Recipe
Refrigerator Storage: Transfer leftover garlic butter shrimp to an airtight container and refrigerate within 2 hours of cooking. Properly stored, they’ll maintain quality for 2-3 days. The garlic butter sauce may solidify when cold—this is normal. To reheat, use low heat in a skillet, adding a splash of white wine or chicken broth to help the sauce emulsify again. Microwave reheating is not recommended as it toughens the shrimp.
Freezing Guidelines: While fresh is always best, you can freeze cooked garlic butter shrimp for up to 2 months. Flash-freeze them on a baking sheet for 1 hour, then transfer to a freezer-safe container or bag, removing as much air as possible. Note that the texture may become slightly softer upon thawing, and the sauce may separate. Thaw overnight in the refrigerator and reheat gently in a skillet.
Make-Ahead Strategy: For maximum freshness, prep your ingredients in advance but cook just before serving. Peel and devein shrimp up to 24 hours ahead, store covered in the refrigerator. Mince garlic 2-3 hours before cooking and keep in a small covered container. Measure out all ingredients so cooking is quick and seamless when guests arrive.
Sauce Storage: If you have extra garlic butter sauce without shrimp, it’s culinary gold. Store it in a sealed container in the refrigerator for up to 5 days or freeze in ice cube trays for up to 3 months. Use these garlic butter cubes to flavor pasta, vegetables, steak, or chicken for instant restaurant-quality meals.
Food Safety Note: Shrimp is highly perishable. Never leave cooked shrimp at room temperature for more than 2 hours (1 hour if the temperature is above 90°F). When in doubt, throw it out—seafood spoilage can cause serious foodborne illness.
Conclusion
Garlic butter shrimp proves that sophisticated, restaurant-quality food doesn’t require complicated techniques or exotic ingredients. With just 18 minutes and a handful of pantry staples, you can create an impressive appetizer that delights every palate. The combination of perfectly seared shrimp, aromatic garlic, rich butter, and bright lemon creates a flavor profile that’s both luxurious and comforting—ideal for weeknight dinners, entertaining guests, or treating yourself to something special.
This easy appetizer recipe empowers even novice cooks to achieve professional results. By following the step-by-step instructions and avoiding common pitfalls, you’ll develop the confidence to experiment with variations, adjust seasonings to your preference, and make this dish your own signature recipe.
Ready to transform simple shrimp into an unforgettable culinary experience? Grab your ingredients, heat that pan, and discover why garlic butter shrimp has remained a beloved classic for generations. After you’ve tried this recipe, share your results in the comments below—I’d love to hear about your favorite serving suggestions or creative variations. Don’t forget to explore our other seafood recipes for more quick and delicious inspiration that will elevate your home cooking game.
FAQs
Q: Can I use frozen shrimp instead of fresh?
A: Absolutely! Frozen shrimp often provides better quality and value than “fresh” shrimp at the grocery store, which may have been previously frozen anyway. The key is proper thawing—place them in the refrigerator overnight or run under cold water for 10 minutes. Never thaw at room temperature or with hot water. Pat them completely dry before cooking to ensure proper searing.
Q: How do I know when shrimp are perfectly cooked?
A: Look for three indicators: the color changes from gray/translucent to pink-orange and opaque, they form a loose “C” shape (not a tight “O”), and they feel firm but not hard when gently pressed. The entire process takes just 3-4 minutes total. An instant-read thermometer should register 120°F at the thickest part.
Q: What size shrimp works best for this recipe?
A: Large shrimp (16-20 count per pound) or jumbo (11-15 count) work beautifully for appetizers, as they’re substantial and impressive. Medium shrimp (21-30 count) cook faster but offer less dramatic presentation. Avoid small shrimp, which overcook in seconds and can become tough before you realize it.
Q: Can I make this recipe without wine?
A: Yes! Replace the white wine with an equal amount of chicken broth, vegetable broth, or even water with an extra squeeze of lemon juice. The wine adds acidity and subtle complexity, but the dish remains delicious without it. Some cooks successfully use a splash of apple cider vinegar diluted with water for similar brightness.
Q: My sauce looks separated or greasy. What happened?
A: Sauce separation typically occurs when butter is added too quickly to liquid that’s too hot, or when cold butter hits the pan. To fix it, remove from heat and whisk in one tablespoon of cold butter until emulsified. For prevention, gradually add butter while swirling (not stirring) the pan off heat, allowing each addition to incorporate before adding more.
Q: Is this recipe gluten-free?
A: Yes, naturally! Shrimp and all the main ingredients contain no gluten. However, always verify that your white wine or broth is certified gluten-free if you have celiac disease or severe gluten sensitivity, as some brands may have trace contamination from processing.
Q: Can I prep this recipe ahead for a party?
A: The shrimp are best cooked immediately before serving, but you can prep everything in advance. Peel and devein shrimp, mince garlic, chop parsley, and measure all ingredients up to 24 hours ahead. Store components separately in the refrigerator. When guests arrive, the actual cooking takes less than 10 minutes, allowing you to prepare it fresh while still socializing.
Q: What should I do with shrimp tails—leave them on or remove them?
A: This is purely preference and presentation. Tails make for dramatic presentation and provide a natural handle for finger-food serving, but some guests find them inconvenient. For passed appetizers or tapas, leave them on. For pasta dishes or formal plated meals, remove them before cooking for easier eating.
Q: Why did my shrimp turn out rubbery?
A: Rubbery texture indicates overcooking. Shrimp proteins tighten and expel moisture when exposed to heat too long. Remember that shrimp continue cooking from residual heat after leaving the pan, so remove them when they’re just barely opaque. Also ensure you’re not cooking them beyond the initial sear—they should spend less than 5 minutes total in the pan.
Q: Can I double this recipe for a larger crowd?
A: Yes, but cook in batches to avoid overcrowding your pan. Double the ingredients but use the same pan size, working in 2-3 batches for the shrimp. Keep finished shrimp warm in a 200°F oven while completing remaining batches. Make the sauce once with doubled ingredients, then toss all shrimp together at the end.


