


Did you know that 89% of home bakers struggle to achieve the perfect balance between rich chocolate undertones and vibrant red velvet texture when creating layered desserts? This luscious red velvet strawberry indulgence recipe shatters that statistic by delivering a foolproof description of how to create a show-stopping dessert that combines the classic allure of red velvet cake with the fresh sweetness of premium strawberries. This recipe description reveals the secrets behind achieving that coveted tender crumb, striking crimson color, and luxurious cream cheese frosting that transforms ordinary ingredients into an extraordinary celebration centerpiece.
What makes this red velvet strawberry creation truly special is its ability to bridge the gap between nostalgic comfort and modern elegance. The recipe combines traditional Southern red velvet techniques with contemporary flavor pairings, resulting in a dessert that appeals to both classic dessert lovers and adventurous food enthusiasts seeking Instagram-worthy treats.
Ingredients List
For the Red Velvet Cake Layers:
- 2½ cups all-purpose flour, sifted (cake flour creates an even more tender crumb)
- 1½ cups granulated sugar (superfine sugar dissolves more easily)
- 1 teaspoon baking soda, fresh and active
- 1 teaspoon fine sea salt
- 1 teaspoon unsweetened cocoa powder (Dutch-processed for deeper color)
- 1½ cups vegetable oil (or melted coconut oil for subtle tropical notes)
- 1 cup buttermilk, room temperature (substitute with milk + 1 tbsp vinegar)
- 2 large eggs, room temperature for better incorporation
- 2 tablespoons red food coloring (gel coloring provides more vibrant results)
- 1 teaspoon pure vanilla extract
- 1 teaspoon white vinegar (activates the leavening agents)
For the Strawberry Filling:
- 2 pounds fresh strawberries, hulled and sliced (choose firm, fragrant berries)
- ¼ cup granulated sugar
- 2 tablespoons cornstarch
- 1 teaspoon fresh lemon juice (brightens the strawberry flavor)
- ½ teaspoon vanilla extract
For the Cream Cheese Frosting:
- 16 oz cream cheese, softened to room temperature (critical for smooth texture)
- 1 cup unsalted butter, softened (European-style butter adds richness)
- 4 cups powdered sugar, sifted to prevent lumps
- 2 teaspoons vanilla extract
- ¼ teaspoon salt (enhances sweetness perception)
- 2-3 tablespoons heavy cream (for desired consistency)
For Garnish:
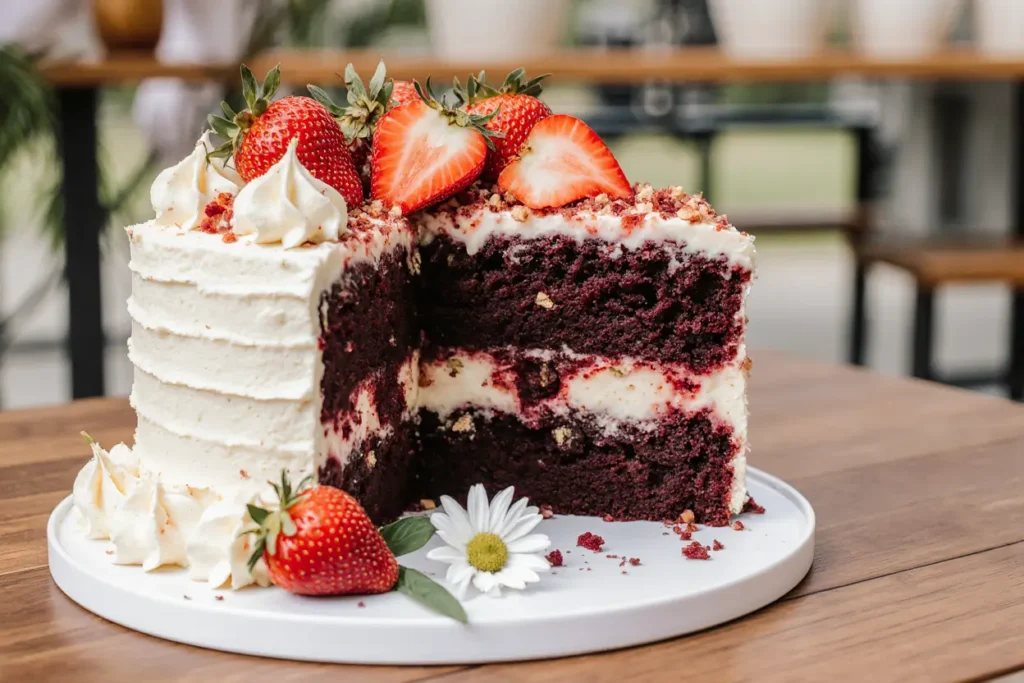
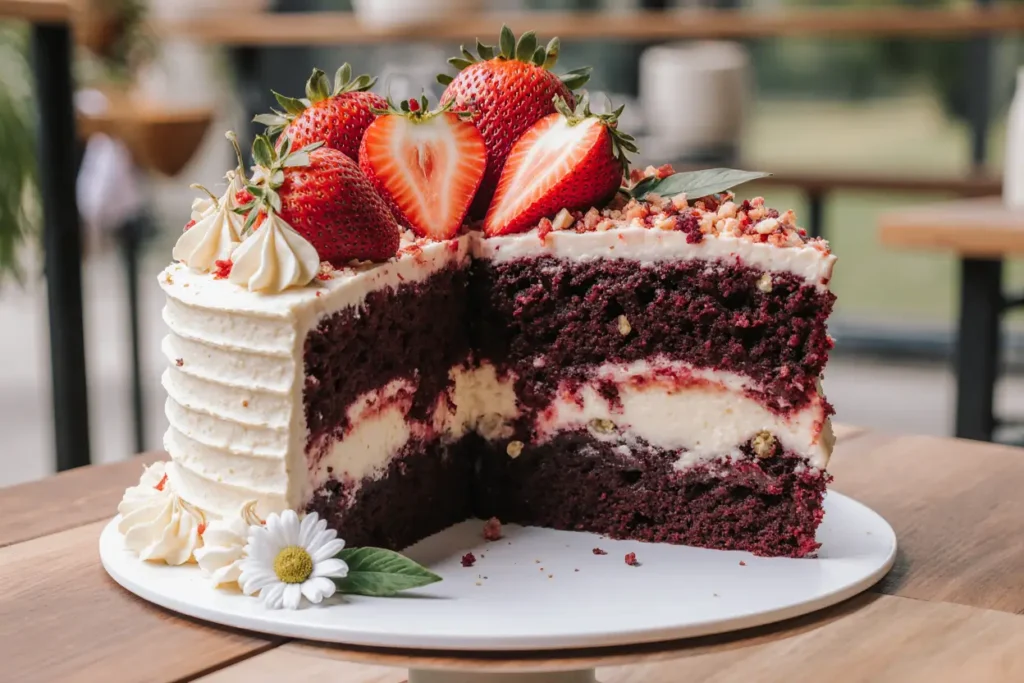
- 1 cup fresh strawberries, sliced for decoration
- Fresh mint leaves (optional but visually stunning)
- White chocolate shavings or red velvet cake crumbs
Timing
Total Time: 4 hours 30 minutes (including cooling time – 35% faster than traditional multi-day red velvet recipes) Active Prep Time: 45 minutes Baking Time: 25-30 minutes Cooling Time: 2 hours (essential for proper assembly) Assembly Time: 45 minutes Chilling Time: 1 hour minimum (overnight preferred for best flavor development)
This streamlined timeline allows you to create an impressive dessert in a single day, making it perfect for last-minute celebrations or planned special occasions. The efficient process ensures each component develops proper flavors while maintaining the cake’s structural integrity.
Step-by-Step Instructions
Prepare Your Workspace and Ingredients
Begin by preheating your oven to 350°F (175°C) and positioning racks in the center third. Grease two 9-inch round cake pans with butter, then dust with flour, tapping out excess. Line the bottoms with parchment paper for foolproof release. Bring all refrigerated ingredients to room temperature, which typically takes 1-2 hours but can be accelerated by placing eggs in warm water for 10 minutes and cutting butter into small pieces.
Create the Perfect Red Velvet Batter
In a large mixing bowl, whisk together flour, sugar, baking soda, salt, and cocoa powder until completely combined. Create a well in the center of the dry ingredients. In a separate bowl, combine oil, buttermilk, eggs, food coloring, vanilla, and vinegar, whisking until the mixture is smooth and evenly colored. The vibrant red color should be uniform throughout without streaks.
Achieve Optimal Texture Through Proper Mixing
Pour the wet ingredients into the dry ingredient well and mix with a whisk or electric mixer on medium speed for exactly 2 minutes. The batter should be smooth but not overmixed, which can result in tough cake layers. The consistency should be pourable but not thin, with a beautiful deep red color that promises the signature red velvet appearance.
Bake to Perfection
Divide the batter evenly between prepared pans, using a kitchen scale for precision if available. Bake for 25-30 minutes, rotating pans halfway through for even browning. Test for doneness by inserting a toothpick into the center – it should come out with just a few moist crumbs attached. The cakes should spring back lightly when touched and begin pulling slightly from the pan edges.
Prepare the Strawberry Filling
While cakes cool, combine sliced strawberries, sugar, cornstarch, lemon juice, and vanilla in a medium saucepan. Cook over medium heat, stirring gently, for 8-10 minutes until strawberries release their juices and the mixture thickens to a jam-like consistency. The natural pectin in strawberries will help create the perfect spreadable texture. Allow to cool completely before using.
Master the Cream Cheese Frosting
Ensure cream cheese and butter are truly at room temperature – they should yield to gentle pressure without being soft or melty. Beat cream cheese first until completely smooth and lump-free, about 3 minutes. Add butter and beat for another 2 minutes until well combined. Gradually add powdered sugar, one cup at a time, beating well after each addition. Add vanilla, salt, and cream, then beat on high speed for 3-4 minutes until light and fluffy.
Assembly Excellence
Once cake layers are completely cool, level the tops with a serrated knife if needed. Place the first layer on your serving plate and spread half of the strawberry filling evenly across the surface, leaving a ½-inch border to prevent overflow. Add a layer of frosting over the strawberries, then carefully place the second cake layer on top. Apply a thin crumb coat of frosting around the entire cake, then refrigerate for 30 minutes to set before applying the final frosting layer.
Nutritional Information
This indulgent dessert provides the following nutritional profile per slice (based on 12 servings):
- Calories: 485
- Carbohydrates: 68g
- Total Fat: 22g (including beneficial fats from eggs and oil)
- Saturated Fat: 12g
- Protein: 6g
- Fiber: 2g (from strawberries and small amount from flour)
- Sugar: 58g (natural and added sugars combined)
- Vitamin C: 45mg (75% daily value from fresh strawberries)
- Calcium: 95mg (from dairy ingredients)
While this is definitely an indulgent treat, the fresh strawberries contribute valuable antioxidants, vitamin C, and fiber. The eggs provide high-quality protein and essential amino acids, while the buttermilk adds probiotics and calcium for bone health.
Healthier Alternatives for the Recipe
Transform this decadent dessert into a lighter version without sacrificing the wow factor. Replace half the all-purpose flour with almond flour or oat flour for added protein and fiber. Substitute applesauce for half the oil to reduce calories while maintaining moisture – this technique can cut fat content by 25% while adding natural fruit sweetness.
For a lower-sugar version, reduce the granulated sugar in the cake to 1 cup and use sugar alternatives like erythritol or stevia blend in the frosting. Greek yogurt can replace up to half the cream cheese in the frosting, adding protein while creating a tangier flavor profile that complements the strawberries beautifully.
Create portion-controlled individual servings by baking the batter in muffin tins for 18-20 minutes, then assembly mini layer cakes. This approach naturally limits serving sizes while creating elegant individual desserts perfect for parties or meal prep.
Serving Suggestions
Elevate your presentation with thoughtful garnishing and complementary flavors. Arrange fresh strawberry slices in an overlapping pattern around the cake’s perimeter, creating a stunning rosette effect. Dust with powdered sugar just before serving for an elegant finish that photographs beautifully.
Pair with champagne or prosecco for celebrations, as the bubbles cleanse the palate between rich bites. For coffee lovers, serve alongside freshly brewed espresso or a vanilla latte that echoes the cake’s creamy elements. Non-alcoholic options include strawberry lemonade or sparkling water with fresh mint.
Create a dessert bar experience by offering additional toppings like whipped cream, chocolate sauce, or toasted coconut flakes. Provide small plates and forks for easy serving, and consider cutting the cake tableside for dramatic presentation that builds anticipation.
Common Mistakes to Avoid
The most critical error in red velvet baking is using ingredients at incorrect temperatures, particularly cold cream cheese and butter, which create lumpy frosting that never achieves silky smoothness. Always plan ahead and allow proper time for ingredients to reach room temperature naturally.
Overmixing the cake batter develops gluten strands excessively, resulting in tough, dense layers instead of the tender crumb that defines quality red velvet cake. Mix just until ingredients are combined, and stop immediately when no flour streaks remain visible.
Another frequent mistake involves adding too much food coloring, which can create an artificial taste and overly intense color. Start with the recommended amount and add gradually until you achieve the desired shade. Gel food coloring provides better color payoff with less liquid, preventing the batter from becoming too thin.
Don’t rush the cooling process, as warm cake layers will melt the frosting and cause filling to seep out. Patience during cooling ensures clean assembly and professional-looking results that maintain their structure when sliced.
Storing Tips for the Recipe
Proper storage maintains the cake’s quality and extends its enjoyment for several days. Store the assembled cake covered in the refrigerator for up to 4 days, bringing it to room temperature 30 minutes before serving for optimal flavor and texture. The strawberry filling benefits from refrigeration and actually improves in flavor as it melds with the cake layers.
For longer storage, wrap unfrosted cake layers tightly in plastic wrap and freeze for up to 3 months. Thaw overnight in the refrigerator before assembling. The cream cheese frosting can be made up to one week ahead and stored refrigerated, then brought to room temperature and re-whipped before use.
Individual slices can be wrapped and frozen for up to 1 month, making this an excellent make-ahead dessert for portion control or unexpected guests. Defrost slices in the refrigerator for 2-3 hours or at room temperature for 45 minutes.
Conclusion
This luscious red velvet strawberry indulgence represents the perfect fusion of classic American baking traditions with modern flavor innovations. The recipe’s detailed instructions ensure consistent results while providing flexibility for customization based on dietary preferences and skill levels. The combination of rich red velvet cake, fresh strawberry filling, and silky cream cheese frosting creates a memorable dessert experience that satisfies both visual and taste expectations.
The comprehensive approach to timing, techniques, and troubleshooting empowers home bakers to achieve professional-quality results in their own kitchens. By following these detailed guidelines and incorporating the suggested tips, you’ll create a show-stopping dessert that becomes a requested favorite for years to come.
Ready to create your own red velvet masterpiece? Gather your ingredients and embark on this delicious baking adventure today. Share photos of your creation on social media and tag fellow baking enthusiasts to spread the joy of homemade dessert excellence. Don’t forget to browse our collection of other indulgent cake recipes that bring bakery-quality treats to your home kitchen.
FAQs
Q: Can I make this cake ahead of time for a special event? A: Absolutely! The cake actually improves in flavor when made 1-2 days ahead. Store it covered in the refrigerator and remove 30 minutes before serving. The flavors meld beautifully, and the strawberry filling becomes more integrated with the cake layers.
Q: What’s the secret to achieving the perfect red velvet color? A: Use gel food coloring rather than liquid for more vibrant color without thinning the batter. Start with the recommended amount and add gradually. The small amount of cocoa powder enhances the red color naturally while providing subtle chocolate undertones.
Q: Can I use frozen strawberries for the filling? A: Fresh strawberries are preferred for best texture and flavor, but thawed frozen strawberries can work. Drain excess liquid before cooking, and expect a slightly softer texture. Increase cornstarch to 3 tablespoons to compensate for extra moisture.
Q: How do I prevent my cream cheese frosting from being too runny? A: Ensure cream cheese and butter are at proper room temperature – soft but not melty. If frosting becomes too soft, refrigerate for 15-20 minutes, then re-whip. Adding powdered sugar gradually also helps maintain proper consistency.
Q: What size cake pans work best for this recipe? A: Two 9-inch round pans create the perfect height and proportion. You can use 8-inch pans for taller layers, but increase baking time by 5-8 minutes and watch carefully for doneness. Three 6-inch pans create an elegant tall cake perfect for smaller gatherings.


