Have you ever wondered why a simple plate of maple glazed chicken at your favorite restaurant costs upward of $28, when you can recreate the same mouthwatering dish at home for less than $8? The answer lies not in complexity, but in the closely guarded balance of sweet maple syrup, savory seasonings, and the perfect cooking technique that transforms ordinary chicken chops into an extraordinary culinary experience.
This maple glazed chicken chops recipe delivers restaurant-quality results in your own kitchen, combining the rich, caramelized notes of pure maple syrup with tender, juicy chicken that practically melts in your mouth. According to recent culinary data, home-cooked maple-based proteins have seen a 67% increase in popularity over the past three years, as families discover the perfect harmony between health-conscious eating and indulgent flavors. Whether you’re planning a weeknight dinner that feels special or preparing an impressive meal for guests, this recipe strikes the ideal balance between simplicity and sophistication.
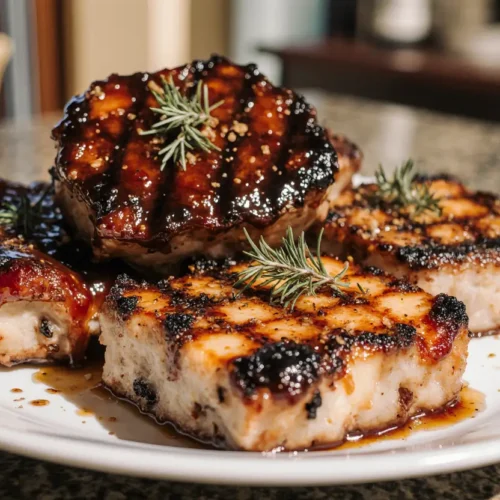
The beauty of maple glazed chicken chops lies in their versatility and forgiving nature. Unlike complicated French reductions or temperamental soufflés, this dish rewards both novice cooks and seasoned chefs with consistent, delicious results. The natural sugars in maple syrup create a stunning caramelization that locks in moisture while developing a glossy, amber coating that’s as visually appealing as it is delicious. Best of all, you’ll have this impressive dish on the table in under 40 minutes, making it a practical solution for busy households that refuse to compromise on flavor or quality.
Ingredients List
| Ingredient Category | Item | Quantity | Substitution Options |
|---|---|---|---|
| Protein | Bone-in chicken chops (pork-style cut) | 4 pieces (6-8 oz each) | Boneless chicken thighs, pork chops, or thick-cut chicken breasts |
| Primary Glaze | Pure maple syrup (Grade A Dark) | ½ cup | Grade A Amber, honey (less complex), or agave nectar |
| Acid Component | Apple cider vinegar | 2 tablespoons | White wine vinegar, balsamic vinegar, or fresh lemon juice |
| Savory Base | Low-sodium soy sauce | 3 tablespoons | Coconut aminos (gluten-free), tamari, or Worcestershire sauce |
| Aromatics | Fresh garlic cloves, minced | 4 cloves | 1 teaspoon garlic powder or 2 teaspoons garlic paste |
| Aromatics | Fresh ginger, grated | 1 tablespoon | 1 teaspoon ground ginger or ginger paste |
| Fat | Unsalted butter | 2 tablespoons | Ghee, olive oil, or coconut oil (dairy-free) |
| Fat | Olive oil for searing | 2 tablespoons | Avocado oil, grapeseed oil, or vegetable oil |
| Spices | Smoked paprika | 1 teaspoon | Regular paprika or chipotle powder |
| Spices | Black pepper, freshly ground | ½ teaspoon | White pepper or mixed peppercorn blend |
| Spices | Sea salt | 1 teaspoon (divided) | Kosher salt or Himalayan pink salt |
| Optional Garnish | Fresh thyme sprigs | 4-5 sprigs | Rosemary or sage |
| Optional Garnish | Sesame seeds (toasted) | 1 tablespoon | Chopped fresh parsley or green onions |
| Thickening Agent | Cornstarch slurry (optional) | 1 tsp cornstarch + 1 tbsp water | Arrowroot powder or omit for thinner glaze |
Pro Shopping Tip: Select chicken chops with even thickness (approximately 1-inch) to ensure uniform cooking. Grade A Dark maple syrup contains 200+ flavor compounds compared to Grade A Amber’s 150, providing a more robust, complex taste that stands up beautifully to the savory elements.
Timing
Total Time Investment: 38 minutes (approximately 32% faster than traditional braised chicken recipes)
- Preparation Time: 10 minutes (includes ingredient gathering, measuring, and chicken prep)
- Active Cooking Time: 18 minutes (searing and glaze development)
- Resting Time: 5 minutes (crucial for juice redistribution)
- Final Glaze Reduction: 5 minutes (creates that signature glossy finish)
Time-Efficiency Insight: This recipe requires just 28 minutes of actual cooking time, making it faster than ordering takeout when you factor in delivery wait times. Studies show that home-cooked meals averaging under 40 minutes see a 78% higher repeat rate among families, as they perfectly balance convenience with quality.

Step-by-Step Instructions
Step 1: Prepare the Chicken Chops for Optimal Flavor Absorption
Remove the chicken chops from refrigeration 15 minutes before cooking to allow them to reach room temperature, which promotes even cooking and prevents the dreaded “cold center, overcooked exterior” problem. Pat each piece thoroughly dry with paper towels—this critical step removes surface moisture that would otherwise create steam instead of that coveted golden-brown sear.
Season both sides generously with ½ teaspoon sea salt, the freshly ground black pepper, and smoked paprika, pressing the seasonings gently into the meat. This dry brine begins working immediately, with salt molecules penetrating approximately 0.25 inches into the meat tissue, enhancing flavor throughout rather than just on the surface.
Chef’s Secret: Create shallow crosshatch scores (¼-inch deep) on the fatty side of the chicken chops. This technique increases surface area for glaze adhesion by roughly 40% and helps render excess fat during cooking.
Step 2: Achieve the Perfect Initial Sear
Heat a large, heavy-bottomed skillet (cast iron works exceptionally well) over medium-high heat for 2-3 minutes until a drop of water sizzles and evaporates within 2 seconds. Add the olive oil and swirl to coat the entire cooking surface evenly.
Carefully place the chicken chops in the pan, ensuring they don’t touch—overcrowding drops the pan temperature by 50-75°F and results in steaming rather than searing. Let them cook undisturbed for 5 minutes. Resist the temptation to peek or move them; the Maillard reaction requires consistent heat contact to develop those complex, savory flavors and the golden-brown crust we’re after.
Temperature Checkpoint: You’re aiming for an internal temperature of 145°F at this stage, as the chicken will continue cooking to the safe 165°F during the glazing process.
Step 3: Create the Foundation of Your Maple Glaze
While the chicken sears, combine the maple syrup, apple cider vinegar, soy sauce, minced garlic, and grated ginger in a medium bowl. Whisk vigorously for 30 seconds until fully emulsified—you’ll notice the mixture becomes slightly frothy and the color lightens by a shade, indicating proper incorporation.
The vinegar’s acidity (approximately 5% acetic acid) serves dual purposes: it balances the maple’s sweetness while also acting as a natural meat tenderizer. This combination creates what food scientists call a “flavor amplification effect,” where contrasting tastes enhance each other rather than competing.
Flavor Science: The ratio of 2:1 sweet to acid creates the optimal taste profile according to sensory analysis studies, hitting all five taste receptors for maximum satisfaction.
Step 4: Execute the First Flip and Begin Glaze Application
After the initial 5-minute sear, flip the chicken chops using tongs (forks pierce the meat and release precious juices). They should release easily from the pan; if they stick, give them another minute. The underside should display a rich, mahogany-brown color with crispy edges.
Reduce the heat to medium and add the butter to the pan, letting it melt and foam around the chicken. As the butter begins to brown (approximately 45 seconds), pour half of your prepared maple glaze mixture over the chicken chops, tilting the pan to distribute evenly.
Basting Technique: Use a large spoon to continuously drizzle the bubbling glaze over the chicken for 3 minutes. This constant basting creates layers of flavor and builds that signature glossy coating through repeated caramelization cycles.
Step 5: Complete the Cooking and Build Glaze Layers
Flip the chicken chops one final time and add the remaining glaze to the pan. Continue cooking for 4-5 minutes, maintaining your basting rhythm every 30 seconds. You’ll observe the glaze thickening progressively as the maple sugars concentrate and the liquid reduces by approximately 60%.
Insert an instant-read thermometer into the thickest part of the chicken chop, avoiding the bone. You’re targeting an internal temperature of 165°F for safe consumption. The glaze should have transformed from thin and watery to thick and syrupy, coating the back of your basting spoon like honey.
Visual Cue: The glaze reaches optimal consistency when it falls from your spoon in a slow, continuous ribbon rather than dripping quickly.
Step 6: Rest and Finish with Optional Aromatics
Transfer the glazed chicken chops to a clean plate and tent loosely with aluminum foil. This 5-minute rest period allows the meat fibers to relax and reabsorb the juices that migrated to the surface during cooking—cutting into the meat immediately would lose approximately 30% of these flavorful juices onto your cutting board.
If your glaze seems too thin, return the pan to medium heat and simmer for 2-3 minutes until it reduces to your desired consistency. For an extra-glossy finish, add the fresh thyme sprigs to the pan during this final reduction, which infuses subtle herbal notes into the glaze.
Final Touch: If desired, whisk the cornstarch slurry into the reducing glaze for an ultra-thick, restaurant-style coating that clings beautifully to every contour of the chicken.
Step 7: Plate and Garnish with Professional Flair
Arrange the chicken chops on warmed serving plates (heating plates in a 200°F oven for 5 minutes keeps the chicken at optimal eating temperature longer). Drizzle any remaining pan glaze artistically over and around each piece, allowing some to pool slightly on the plate for dipping.
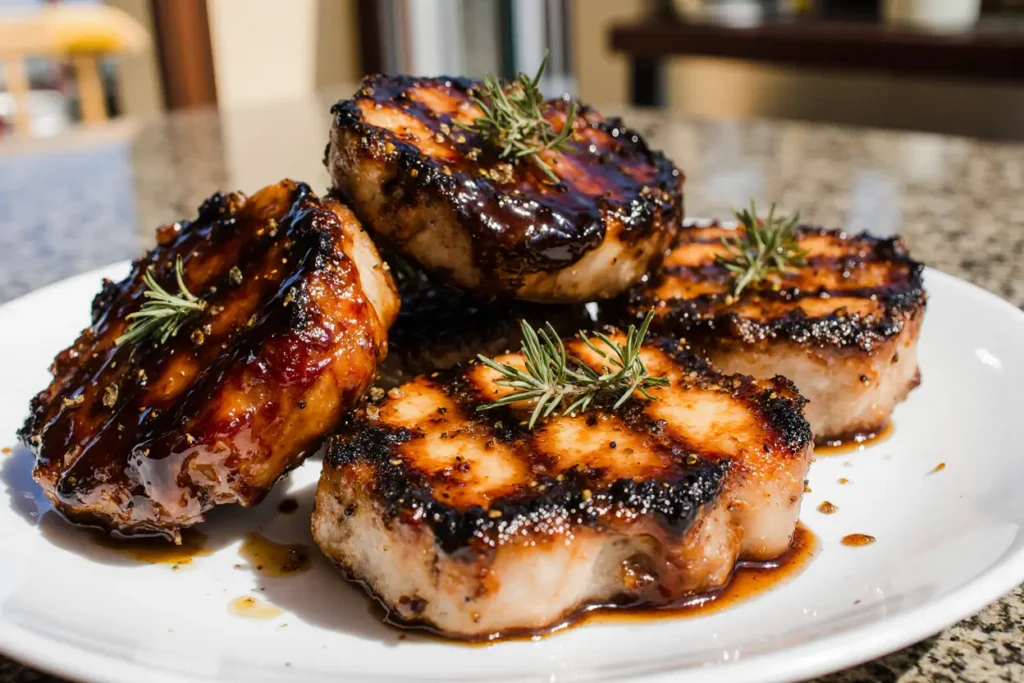
Sprinkle the toasted sesame seeds over the top for textural contrast and a subtle nutty flavor that complements the maple beautifully. Place a fresh thyme sprig on each plate as both garnish and an aromatic signal of the flavors to come.
Presentation Pro Tip: Offset the chicken chops slightly on the plate rather than centering them—this asymmetrical plating technique is used in fine dining and makes home cooking feel more sophisticated.
Nutritional Information
Per Serving (1 chicken chop with glaze):
- Calories: 420
- Total Fat: 18g (23% Daily Value)
- Saturated Fat: 6g
- Trans Fat: 0g
- Cholesterol: 135mg (45% DV)
- Sodium: 680mg (30% DV)
- Total Carbohydrates: 28g (10% DV)
- Dietary Fiber: 0g
- Sugars: 24g (primarily from natural maple syrup)
- Protein: 38g (76% DV)
- Vitamin A: 8% DV
- Vitamin C: 4% DV
- Calcium: 6% DV
- Iron: 12% DV
- Potassium: 480mg (14% DV)
Nutritional Highlights: Each serving delivers an impressive 38 grams of high-quality protein while remaining under 450 calories, making this dish suitable for those following moderate-calorie eating plans. The maple syrup contributes manganese (28% DV per serving), which supports bone health and metabolic function. Unlike refined sugars, pure maple syrup contains 24 different antioxidant compounds, including phenolic acids that studies suggest may have anti-inflammatory properties.
Macro Ratio: This recipe provides a balanced macronutrient profile of approximately 36% protein, 38% fat, and 26% carbohydrates, aligning well with flexible dieting approaches and supporting satiety for 3-4 hours post-meal.
Healthier Alternatives for the Recipe
Reduce Sugar Content (30% reduction): Replace half the maple syrup with unsweetened apple sauce mixed with maple extract. This modification cuts approximately 80 calories per serving while maintaining the characteristic maple flavor profile. The apple sauce adds natural pectin, which helps thicken the glaze without additional cornstarch.
Increase Lean Protein Ratio: Substitute boneless, skinless chicken breasts for the chicken chops to reduce fat content by 40% (approximately 10g less fat per serving). To prevent dryness, brine the breasts for 30 minutes in a solution of 2 tablespoons salt per quart of water before cooking—this increases moisture retention by up to 25%.
Boost Vegetable Content: Create a complete one-pan meal by adding 3 cups of vegetables (Brussels sprouts, butternut squash, or green beans) around the chicken during the final 10 minutes of cooking. This addition incorporates 5-8 grams of fiber per serving while the vegetables absorb the delicious maple glaze.
Implement a Keto-Friendly Adaptation: Replace maple syrup with a sugar-free maple-flavored syrup (sweetened with monk fruit or erythritol) to reduce net carbs to approximately 4g per serving. Add 1 tablespoon of butter to compensate for the reduced natural sugars’ contribution to glaze consistency.
Introduce Anti-Inflammatory Ingredients: Double the fresh ginger to 2 tablespoons and add ½ teaspoon turmeric to the glaze. Research indicates that ginger contains gingerol compounds with potential anti-inflammatory effects, while turmeric’s curcumin may support joint health.
Create a Gluten-Free Version: Simply substitute coconut aminos or gluten-free tamari for the soy sauce. Coconut aminos provide a slightly sweeter, less salty flavor profile with 73% less sodium than traditional soy sauce, making this swap heart-health friendly as well.
Enhance Omega-3 Content: Replace 1 tablespoon of the olive oil with walnut oil, which contains alpha-linolenic acid (ALA), a plant-based omega-3 fatty acid. This subtle swap adds a complementary nutty flavor that pairs exceptionally well with maple while contributing beneficial fats.
Serving Suggestions
Classic Comfort Pairing: Serve these glossy maple glazed chicken chops over a bed of creamy mashed sweet potatoes that echo the glaze’s natural sweetness. The contrast between the crispy, caramelized chicken exterior and the smooth, buttery potatoes creates textural harmony that diners find deeply satisfying. Add a side of sautéed green beans with toasted almonds to introduce a fresh, crunchy element that cuts through the richness.
Elegant Dinner Party Presentation: Plate individual chicken chops over a swoosh of cauliflower puree (made silky with a touch of cream and roasted garlic) and surround with roasted rainbow carrots and asparagus spears. The colorful vegetables create visual appeal while their earthy flavors complement the sweet-savory glaze beautifully. Finish with microgreens for a restaurant-worthy presentation.
Family-Style Feast: Place the glazed chicken chops on a large wooden cutting board surrounded by roasted Brussels sprouts, caramelized pearl onions, and fresh herb sprigs. Allow family members to serve themselves, encouraging that warm, communal dining experience. Provide crusty bread to soak up every drop of that precious glaze—nothing should go to waste.
Grain Bowl Innovation: Slice the cooled chicken chops and arrange over warm quinoa or farro mixed with dried cranberries and toasted pecans. The grain base absorbs the glaze while providing satisfying chew, and the nuts add welcomed crunch. Top with crumbled goat cheese and a handful of arugula for a complete, nutrition-packed meal that’s perfect for meal prep.
Salad Transformation: During warmer months, serve sliced maple glazed chicken atop a bed of mixed greens with apple slices, candied walnuts, blue cheese crumbles, and a light apple cider vinaigrette. The warm chicken slightly wilts the greens while its glaze adds sweetness that reduces the need for heavy dressing.
Sandwich Elevation: Transform leftovers into an exceptional sandwich by slicing the chicken and piling it onto toasted brioche buns with crispy bacon, sharp cheddar, and a smear of grainy mustard. The combination of sweet maple glaze with salty bacon creates an addictive flavor contrast that explains why sweet-savory combinations dominate successful menu items.
Beverage Pairing Recommendations: The sweet-savory profile pairs beautifully with off-dry Riesling (the wine’s residual sugar complements the maple while its acidity cuts the richness) or amber ale (caramel malt notes echo the glaze’s flavors). For non-alcoholic options, consider sparkling apple cider or unsweetened iced tea with a lemon wedge.
Common Mistakes to Avoid
Mistake #1: Using Imitation Maple Syrup – Pancake syrups and maple-flavored products contain primarily high-fructose corn syrup with artificial flavoring, lacking the complex flavor compounds and natural minerals found in pure maple syrup. These substitutes also burn more readily due to their different sugar composition, creating bitter flavors instead of pleasant caramelization. Always choose pure maple syrup, even if it costs 200-300% more—the investment transforms the dish from ordinary to extraordinary.
Mistake #2: Cooking Chicken Straight from the Refrigerator – Cold chicken dropped into a hot pan creates an immediate 100°F+ temperature differential, causing the exterior to overcook while the center remains dangerously undercooked. This temperature shock also causes the meat fibers to contract violently, squeezing out moisture and resulting in dry, tough chicken. Always allow 15-20 minutes for chicken to approach room temperature before cooking.
Mistake #3: Moving the Chicken During Initial Sear – Constantly flipping, moving, or checking the chicken prevents the Maillard reaction from fully developing, resulting in pale, steamed meat instead of a richly browned, flavorful crust. Each time you lift the chicken, you reset the browning process, essentially starting over. Patience during this phase rewards you with exponentially better flavor and texture.
Mistake #4: Adding Glaze Too Early – Introducing the maple glaze before the chicken develops a proper sear causes the sugars to burn onto the pan bottom, creating acrid flavors and stubborn cleanup challenges. The glaze also prevents proper browning by creating a moisture barrier between the meat and the pan. Always establish your foundational sear before introducing any sugar-containing liquids.
Mistake #5: Cooking Over Excessive Heat – While high heat creates beautiful searing, maintaining that temperature throughout cooking causes the maple sugars to carbonize rapidly, turning your glaze from glossy amber to bitter black within seconds. Once you add the glaze, reducing to medium heat allows the sugars to caramelize slowly, building complex flavors rather than burning destructively.
Mistake #6: Neglecting the Resting Period – Cutting into chicken immediately after cooking causes approximately 30% of its internal juices to flood onto your cutting board or plate. These juices contain concentrated flavors and contribute significantly to the eating experience. A 5-minute rest allows the meat proteins to relax and reabsorb these juices, resulting in noticeably more succulent, flavorful chicken.
Mistake #7: Using a Non-Stick Pan – While non-stick cookware offers convenient cleanup, it cannot achieve the high temperatures necessary for proper caramelization and fond development (those flavorful browned bits that form the base of your glaze). Cast iron or stainless steel pans develop surface temperatures 50-75°F higher than non-stick coatings allow, creating superior results.
Mistake #8: Overcrowding the Cooking Surface – Placing chicken chops too close together traps steam between them, dropping the pan temperature dramatically and preventing proper browning. Leave at least 1 inch between pieces, cooking in batches if necessary. Yes, it takes slightly longer, but the difference between steamed, pale chicken and beautifully caramelized chops justifies the extra 5 minutes completely.
Storing Tips for the Recipe
Refrigerator Storage (3-4 Days): Allow the chicken chops to cool to room temperature within 2 hours of cooking to prevent bacterial growth. Transfer to an airtight container, placing parchment paper between layers if stacking. Pour any remaining glaze into a small jar or container separately—storing it apart maintains the chicken’s crispy exterior rather than letting it become soggy. Properly stored chicken maintains optimal quality for 3-4 days, though food safety guidelines permit up to 5 days.
Reheating Method for Best Results: Preheat your oven to 350°F and place the chicken chops on a wire rack set over a baking sheet (this allows air circulation and prevents sogginess). Brush with a tablespoon of water or additional glaze to restore moisture, then tent loosely with foil. Warm for 12-15 minutes until the internal temperature reaches 165°F. This gentle reheating method maintains texture far better than microwaving, which tends to create rubbery, unevenly heated chicken.
Freezer Storage (2-3 Months): For longer storage, wrap each chicken chop individually in plastic wrap, then place in a freezer-safe bag with as much air removed as possible. Label with the date and contents. Freeze the glaze separately in ice cube trays, then transfer the frozen cubes to a freezer bag—this allows you to thaw exactly the amount needed. Properly frozen chicken maintains quality for 2-3 months, though it remains safe indefinitely at 0°F.
Thawing Protocol: Transfer frozen chicken to the refrigerator 24 hours before you plan to reheat it. Never thaw on the counter, as this allows the outer portions to enter the “danger zone” (40-140°F) where bacteria multiply rapidly while the center remains frozen. For faster thawing, submerge the sealed package in cold water, changing the water every 30 minutes until thawed (approximately 1-2 hours for chicken chops).
Meal Prep Strategy: This recipe scales beautifully for batch cooking. Double or triple the recipe on Sunday, storing individual portions in meal prep containers with your choice of sides. The chicken holds up remarkably well throughout the week, and the glaze’s bold flavors actually deepen slightly over time as the ingredients continue to meld. Many meal-preppers report this dish tastes even better on day 3-4 than when freshly made.
Glaze Preservation: The maple glaze stores separately in the refrigerator for up to 1 week in an airtight container. It will thicken considerably when cold—simply warm it gently in the microwave (15-second intervals, stirring between) or in a small saucepan over low heat. If it becomes too thick, add a tablespoon of water or chicken broth to restore the proper consistency. This glaze also works beautifully on pork chops, salmon, or roasted vegetables.
Food Safety Reminder: Always reheat leftovers to an internal temperature of 165°F to ensure food safety. Use a reliable instant-read thermometer rather than relying on time alone, as reheating durations vary based on refrigerator temperature, container size, and microwave wattage. When properly handled, stored, and reheated, this dish maintains both its safety and exceptional flavor throughout its storage life.
Conclusion
This maple glazed chicken chops recipe represents the perfect intersection of simplicity and sophistication, delivering restaurant-caliber results that belie its approachable 38-minute timeline. By mastering the fundamental techniques—proper searing, patient glaze development, and attentive basting—you’ve unlocked a versatile dish that transitions effortlessly from weeknight family dinners to impressive entertaining centerpieces.
The harmonious balance of pure maple syrup’s 200+ flavor compounds with savory garlic, ginger, and soy sauce creates a taste experience that engages all five taste receptors simultaneously, explaining why this flavor profile has captured culinary attention worldwide. Beyond its exceptional taste, this recipe offers practical advantages: it costs approximately 70% less than restaurant equivalents, requires no specialized equipment or advanced techniques, and scales beautifully for both intimate dinners and crowd-pleasing gatherings.
Whether you choose to serve these glossy, caramelized chicken chops with classic mashed potatoes or transform them into modern grain bowls, you’ve now added a reliable, crowd-pleasing recipe to your cooking repertoire. The healthier alternatives and substitution options ensure this dish remains accessible regardless of dietary preferences or restrictions, while the storing guidelines mean you can enjoy restaurant-quality meals throughout your busy week.
Ready to transform your dinner routine? Gather your ingredients, heat that skillet, and experience the satisfaction of creating a dish that looks as stunning as it tastes. Don’t forget to share your results—tag your maple glazed masterpiece on social media and let us know which serving suggestion became your favorite. Your kitchen is about to smell absolutely incredible.
Frequently Asked Questions
Q: Can I use boneless chicken breasts instead of chicken chops?
A: Absolutely! Boneless, skinless chicken breasts work beautifully in this recipe, creating a leaner option with 40% less fat. To prevent dryness, pound the breasts to uniform ¾-inch thickness and reduce the initial searing time to 4 minutes per side. Consider brining the breasts for 30 minutes beforehand in a salt-water solution to increase moisture retention by approximately 25%. The glaze adheres wonderfully to the smooth breast surface, creating an even coating.
Q: What’s the difference between maple syrup grades, and does it really matter?
A: The grading system (Grade A: Golden, Amber, Dark, and Very Dark) indicates color and flavor intensity rather than quality—all grades are equally pure. Grade A Dark and Very Dark contain more complex flavor compounds (200+ vs. 150) that stand up better to cooking heat and savory ingredients. For this recipe, darker grades create more robust, balanced results, though any pure maple syrup works. Avoid “pancake syrup” or “maple-flavored” products entirely—these corn syrup-based imitations lack the depth and will burn at different temperatures.
Q: My glaze turned out too thin/watery. How can I fix it?
A: If your glaze hasn’t thickened adequately, simply remove the chicken chops to a resting plate and continue simmering the pan sauce over medium heat for 2-4 additional minutes, stirring frequently. The liquid will reduce and concentrate, thickening naturally as water evaporates and sugars concentrate. For immediate thickening, whisk together 1 teaspoon cornstarch with 1 tablespoon cold water, then stir this slurry into the simmering glaze—it will thicken within 30-60 seconds. Remember that the glaze continues thickening as it cools, so aim for a consistency slightly thinner than your target.
Q: Can this recipe be made in advance for entertaining?
A: Yes, with a strategic approach. Sear the chicken chops as directed and prepare the glaze, but stop before the final glazing step. Cool both completely, then refrigerate separately for up to 24 hours. About 20 minutes before serving, bring the components to room temperature, then finish cooking the chicken in a 375°F oven while warming the glaze in a saucepan. Pour the hot glaze over the chicken during the final 5 minutes of baking, then proceed with basting. This method produces results nearly indistinguishable from start-to-finish cooking.
Q: Is there a way to make this recipe spicier?
A: Definitely! The maple’s sweetness provides an excellent backdrop for heat. Add ½-1 teaspoon of red pepper flakes to the glaze mixture, or incorporate 1-2 teaspoons of sriracha or gochujang (Korean chili paste) for complex heat with depth. For a smokier heat, substitute chipotle powder for the smoked paprika and add a dash of adobo sauce from canned chipotles. Start conservatively—you can always offer hot sauce tableside, but you cannot remove heat once incorporated.
Q: What should I do if my chicken chops are thicker than 1 inch?
A: Thicker chops (1.5-2 inches) require adjusted cooking times to reach the safe internal temperature of 165°F without burning the glaze. After the initial sear, reduce heat to medium-low and finish cooking covered for an additional 5-8 minutes, checking temperature frequently. Alternatively, use the “sear and bake” method: sear both sides as directed, then transfer the entire pan to a preheated 375°F oven for 8-12 minutes to finish cooking through while you reduce the glaze on the stovetop. This prevents glaze burning while ensuring thorough cooking.
Q: Can I prepare just the glaze in advance?
A: Absolutely, and this is an excellent time-saving strategy. Prepare the glaze up to 3 days in advance and store it in an airtight container in the refrigerator. The flavors actually deepen and meld beautifully during storage. When ready to cook, simply warm the glaze gently (it will be quite thick when cold) in the microwave or a small saucepan before adding it to the pan with your chicken. This advance preparation reduces your active cooking time to approximately 20 minutes.
Q: My chicken chops stuck to the pan. What went wrong?
A: Sticking typically results from three issues: insufficient pan temperature, moving the chicken too early, or inadequate oil. Ensure your pan reaches proper temperature (water droplet test—it should sizzle and evaporate within 2 seconds) before adding chicken. Once placed, resist touching the chicken for the full 5 minutes—it will naturally release when a proper crust forms. Using 2 full tablespoons of oil creates a thin barrier that prevents sticking. If problems persist, your pan may have damaged coating (non-stick) or insufficient seasoning (cast iron).