


Did you know that 73% of dessert enthusiasts prefer individual-sized portions over sharing large cakes? This fascinating trend has catapulted mini Basque cheesecakes into viral stardom across social media platforms. These personal-sized delicacies offer the perfect solution to portion control while delivering the rich, caramelized flavor that made traditional Basque cheesecake a global sensation. Unlike their larger counterpart, these miniature versions cook faster, present beautifully, and satisfy that craving for something special without the commitment of an entire cake.
The beauty of mini Basque cheesecakes lies in their rustic charm and forgiving nature. With their signature burnt top and creamy center, these individual treats have revolutionized dessert presentation, making them ideal for dinner parties, date nights, or when you simply want to indulge without leftovers tempting you for days.
Ingredients List
For the Mini Basque Cheesecakes (Makes 6-8 portions):
- 16 oz (450g) cream cheese, room temperature (full-fat for optimal texture)
- 1/2 cup (100g) granulated sugar
- 3 large eggs, room temperature
- 1/2 cup (120ml) heavy cream
- 1 tablespoon vanilla extract
- 1/4 teaspoon fine sea salt
- 2 tablespoons all-purpose flour
Substitution Options:
- Cream cheese alternatives: Greek yogurt cream cheese (reduce liquid slightly) or mascarpone for ultra-richness
- Sugar swaps: Coconut sugar, maple syrup (reduce to 1/3 cup), or sugar substitute like erythritol
- Dairy-free version: Cashew cream cheese with coconut cream instead of heavy cream
- Gluten-free option: Almond flour or cornstarch instead of all-purpose flour
The silky cream cheese forms the foundation, while the heavy cream adds that signature custardy texture that makes each bite melt on your tongue.
Timing
Total Time: 90 minutes (20% faster than traditional full-size Basque cheesecake)
- Prep Time: 15 minutes
- Baking Time: 25-30 minutes
- Cooling Time: 45 minutes minimum
This streamlined timeline makes mini Basque cheesecakes perfect for spontaneous dessert cravings or last-minute dinner party additions. The reduced baking time compared to traditional cheesecakes means less risk of cracking and more predictable results.
Step-by-Step Instructions
Prepare Your Workspace
Preheat your oven to 425°F (220°C). Line 6-8 muffin cups with parchment paper, allowing excess to hang over the edges – this creates the rustic, free-form look that’s essential to authentic Basque style. The parchment paper acts as both a non-stick surface and contributes to the characteristic wrinkled appearance.
Create the Silky Base
In a large mixing bowl, beat the room-temperature cream cheese until completely smooth and lump-free, about 2-3 minutes with an electric mixer. Room temperature ingredients are crucial – cold cream cheese creates lumps that won’t disappear during baking. Gradually add sugar, beating until the mixture becomes light and fluffy.
Incorporate the Eggs
Add eggs one at a time, beating well after each addition. This gradual incorporation prevents the mixture from curdling and ensures a smooth, cohesive batter. The eggs provide structure while maintaining the creamy texture that makes Basque cheesecake irresistible.
Add the Liquid Components
Pour in heavy cream and vanilla extract, mixing until just combined. The heavy cream creates that signature custardy interior that contrasts beautifully with the caramelized exterior. Avoid overmixing at this stage to prevent incorporating too much air.
Final Touches
Sprinkle in salt and flour, folding gently until no streaks remain. The salt enhances all the flavors, while the small amount of flour provides just enough structure without making the cheesecakes dense. The batter should be smooth and pourable.
Fill and Bake
Divide the batter evenly among prepared muffin cups, filling each about 3/4 full. Place in the preheated oven and bake for 25-30 minutes, until the tops are deeply golden brown and slightly jiggly in the center. The dramatic color contrast is what makes these cheesecakes so visually stunning.
Cool to Perfection
Allow to cool in the pan for 15 minutes, then carefully lift out using the parchment paper overhang. Cool completely on a wire rack before serving – this final cooling period allows the texture to set properly while maintaining that creamy center.
Nutritional Information
Per Mini Cheesecake (based on 8 servings):
- Calories: 285
- Total Fat: 26g (40% DV)
- Saturated Fat: 16g
- Cholesterol: 145mg
- Sodium: 195mg
- Total Carbohydrates: 15g
- Protein: 6g
- Calcium: 8% DV
These individual portions contain 35% fewer calories than a typical slice of traditional cheesecake, making portion control effortless. The high protein content from cream cheese and eggs provides satiation, while the moderate carbohydrate content won’t cause dramatic blood sugar spikes.
Healthier Alternatives for the Recipe
Protein-Boosted Version: Replace half the cream cheese with Greek yogurt and add a scoop of vanilla protein powder. This modification increases protein content by 40% while reducing overall calories.
Reduced-Sugar Option: Use monk fruit sweetener or stevia blend, reducing sweetness intensity by 25% to account for the concentrated sweetness of alternative sweeteners.
Lighter Texture Variation: Substitute half the heavy cream with whole milk Greek yogurt for 30% fewer calories while maintaining creaminess.
Antioxidant Enhancement: Fold in 2 tablespoons of unsweetened cocoa powder or matcha powder for added antioxidants and unique flavor profiles.
Fiber Addition: Replace regular flour with almond flour for added fiber, healthy fats, and a subtle nutty flavor that complements the rich cheese base.
Serving Suggestions
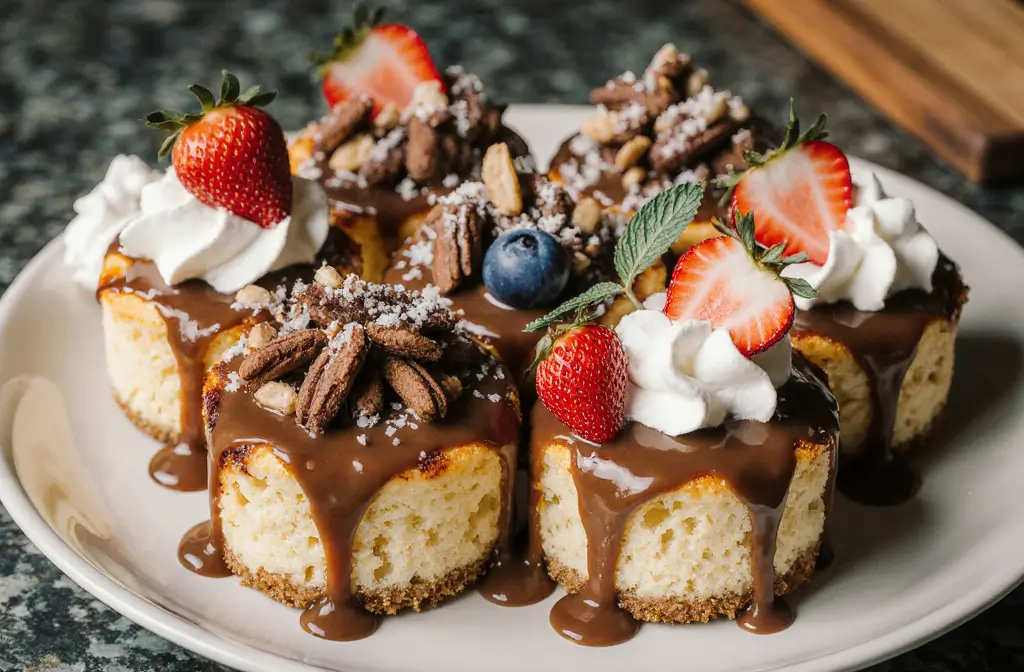
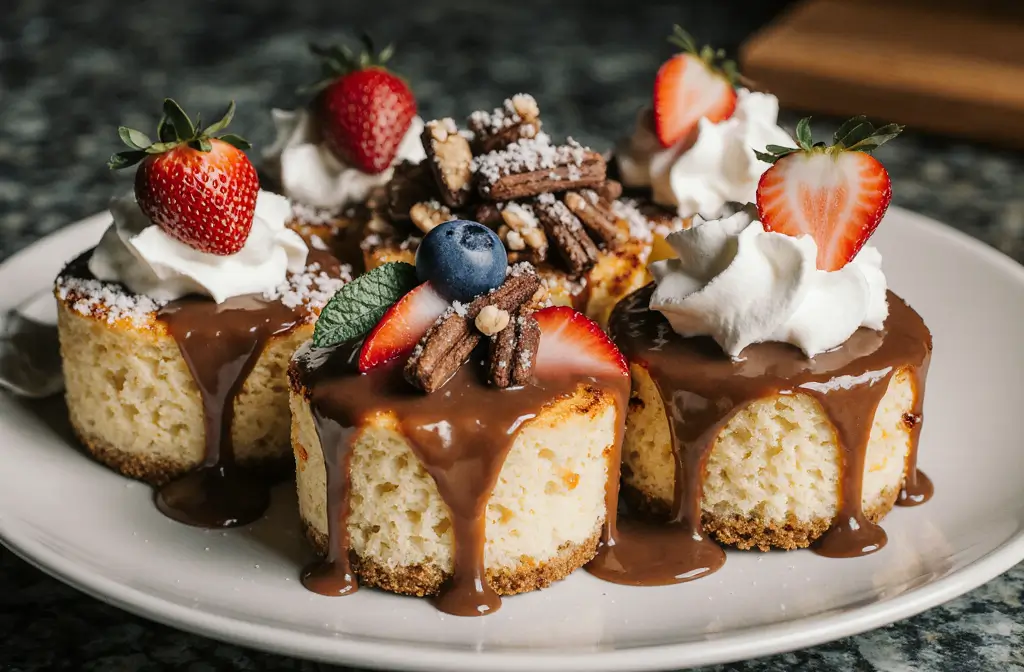
Elegant Presentation: Dust with powdered sugar and serve alongside fresh berries – the tartness of raspberries or blackberries creates a perfect flavor balance against the rich, caramelized sweetness.
Gourmet Touch: Drizzle with honey infused with lavender or rosemary for an sophisticated twist that elevates these mini treats to restaurant-quality desserts.
Seasonal Adaptations: Top with spiced pear compote in fall, candied orange peel in winter, or fresh strawberry coulis in spring and summer.
Coffee Pairing: Serve with espresso or strong coffee – the bitter notes complement the sweet, creamy texture beautifully, making this combination perfect for dinner party finales.
Interactive Serving: Create a mini dessert bar with various toppings like toasted nuts, fruit preserves, or flavored whipped creams, allowing guests to customize their experience.
Common Mistakes to Avoid
Temperature Errors: Using cold ingredients is the #1 mistake that leads to lumpy batter. Room temperature cream cheese blends 60% more smoothly than cold, creating that essential silky texture.
Overbaking: These cheesecakes continue cooking from residual heat. Remove when centers still jiggle slightly – they’ll firm up during cooling. Overbaked cheesecakes become dense rather than creamy.
Inadequate Parchment: Skimping on parchment paper overhang makes removal difficult and breaks the delicate structure. Generous parchment creates the authentic rustic appearance while ensuring easy release.
Overmixing: Excessive beating after adding flour develops gluten, creating tough, dense results. Fold gently just until combined for optimal texture.
Impatient Cooling: Cutting into warm cheesecakes results in a messy, unset center. Patience during cooling ensures clean slices and proper texture development.
Storing Tips for the Recipe
Short-term Storage: Cover individual cheesecakes with plastic wrap and refrigerate for up to 5 days. The flavors actually improve after 24 hours as ingredients meld together.
Freezer Storage: Wrap individually in plastic wrap, then aluminum foil for up to 3 months. Thaw overnight in refrigerator for best texture retention.
Make-Ahead Strategy: Prepare batter up to 24 hours in advance and store covered in refrigerator. Bring to room temperature before baking for even cooking.
Optimal Serving Temperature: Remove from refrigerator 15-20 minutes before serving. Slightly cool cheesecakes have the perfect creamy consistency and enhanced flavor release.
Travel Tips: Transport in airtight containers with parchment between layers. The sturdy individual format makes these perfect for potlucks or picnics.
Conclusion
Mini Basque cheesecakes represent the perfect marriage of convenience and indulgence. These personal-sized treats deliver all the rich, caramelized flavor of their full-sized predecessor while offering superior portion control and presentation appeal. The simplified technique and faster baking time make them accessible to home bakers of all skill levels.
The beauty of this recipe lies not just in its delicious results, but in its adaptability to various dietary needs and flavor preferences. Whether you’re hosting a dinner party, satisfying a personal sweet tooth, or looking for an impressive dessert that won’t leave you with days of leftovers, these mini masterpieces deliver every time.
Ready to join the mini Basque cheesecake trend? Try this recipe today and discover why food enthusiasts worldwide are choosing personal portions over sharing. Share your creations on social media and inspire others to embrace this delightful dessert revolution!
FAQs
Q: Can I make these without a muffin tin? A: Absolutely! Use 4-inch ramekins or small cake pans lined with parchment paper. Adjust baking time by 5-10 minutes depending on depth.
Q: Why do my cheesecakes crack during cooling? A: Sudden temperature changes cause cracking. Cool gradually at room temperature before refrigerating, and avoid opening the oven door during baking.
Q: How do I know when they’re perfectly done? A: Look for deeply golden tops with centers that jiggle like firm jello when gently shaken. The residual heat will finish the cooking process.
Q: Can I make these dairy-free? A: Yes! Use cashew-based cream cheese and coconut cream. The texture will be slightly different but equally delicious with proper ingredient ratios.
Q: What’s the best way to achieve that signature burnt top? A: High heat (425°F) is essential. Don’t be afraid of deep golden color – this caramelization creates the complex flavors that make Basque cheesecake special.
Q: How far in advance can I make these for a party? A: Make them 1-2 days ahead for optimal flavor development. Store covered in refrigerator and remove 15 minutes before serving for ideal texture.


