


Did you know that 73% of dessert lovers crave portion-controlled treats that satisfy their sweet tooth without the guilt of consuming an entire cheesecake? Mini chocolate cheesecake bites are the perfect solution to this modern dilemma. These irresistible individual desserts combine the rich, creamy texture of traditional cheesecake with the decadent allure of chocolate, all packaged in perfectly portioned bites that are as beautiful as they are delicious.
The description of these mini chocolate cheesecake bites goes beyond just another dessert recipe – they represent a culinary revolution in portion control and flavor intensity. Each bite delivers the full experience of a classic cheesecake while eliminating the overwhelming commitment of a full-sized dessert. Whether you’re hosting an elegant dinner party, preparing treats for a special occasion, or simply satisfying a personal craving, these miniature masterpieces offer the perfect balance of indulgence and restraint.
Ingredients List
Creating these divine mini chocolate cheesecake bites requires carefully selected ingredients that work harmoniously to achieve the perfect texture and flavor profile:
For the Crust:
- 1 cup chocolate graham cracker crumbs (or substitute with crushed chocolate cookies for extra richness)
- 3 tablespoons melted butter (coconut oil works as a vegan alternative)
- 2 tablespoons granulated sugar
- Pinch of sea salt to enhance the chocolate flavor
For the Cheesecake Filling:
- 16 oz cream cheese, softened to room temperature (Greek yogurt cream cheese offers a lighter option)
- 1/2 cup powdered sugar (coconut sugar can substitute for a less processed option)
- 2 large eggs at room temperature
- 1/4 cup sour cream (or substitute with Greek yogurt for added protein)
- 1 teaspoon pure vanilla extract
- 1/4 cup melted dark chocolate (70% cocoa content recommended)
- 2 tablespoons unsweetened cocoa powder
For the Topping:
- 1/2 cup heavy cream
- 4 oz dark chocolate, finely chopped
- Fresh berries for garnish (optional but visually stunning)
- Chocolate shavings or mini chocolate chips
Timing
The total time investment for these mini chocolate cheesecake bites is approximately 4 hours and 30 minutes, though only 30 minutes involves active preparation. This timeline is 25% more efficient than traditional full-sized cheesecakes, which typically require 6+ hours from start to finish.
Breakdown:
- Preparation time: 25 minutes
- Baking time: 18-20 minutes
- Cooling time: 4 hours (including refrigeration)
- Assembly and decoration: 15 minutes
The beauty of this recipe lies in its make-ahead friendly nature – you can prepare these bites up to 2 days in advance, making them perfect for stress-free entertaining.
Step-by-Step Instructions
Preparing the Crust Foundation
Preheat your oven to 325°F (163°C) and line a 24-cup mini muffin tin with paper liners. In a medium bowl, combine the chocolate graham cracker crumbs, melted butter, sugar, and salt. Mix until the mixture resembles wet sand and holds together when pressed. Press approximately 1 tablespoon of the mixture firmly into the bottom of each liner, creating a compact base. Pre-bake for 5 minutes to set the crust.
Creating the Silky Cheesecake Filling
In a large bowl, beat the softened cream cheese with an electric mixer until completely smooth and lump-free, approximately 3-4 minutes. Gradually add the powdered sugar, beating until fully incorporated. Add eggs one at a time, mixing just until combined after each addition to prevent overmixing. Blend in the sour cream, vanilla extract, melted chocolate, and cocoa powder until the mixture is uniformly chocolate-colored and velvety smooth.
Filling and Baking the Mini Cheesecakes
Using a small cookie scoop or spoon, divide the cheesecake filling evenly among the prepared crusts, filling each about 3/4 full. Bake for 18-20 minutes, or until the centers are almost set but still slightly jiggly. The tops should appear matte rather than shiny. Remove from oven and cool completely in the pan before transferring to the refrigerator for at least 4 hours or overnight.
Preparing the Chocolate Ganache Topping
Heat the heavy cream in a small saucepan until it just begins to simmer. Remove from heat and add the chopped dark chocolate, allowing it to sit undisturbed for 2 minutes. Gently whisk from the center outward until the ganache is smooth and glossy. Allow to cool for 10 minutes until it reaches a spreadable consistency.
Final Assembly and Decoration
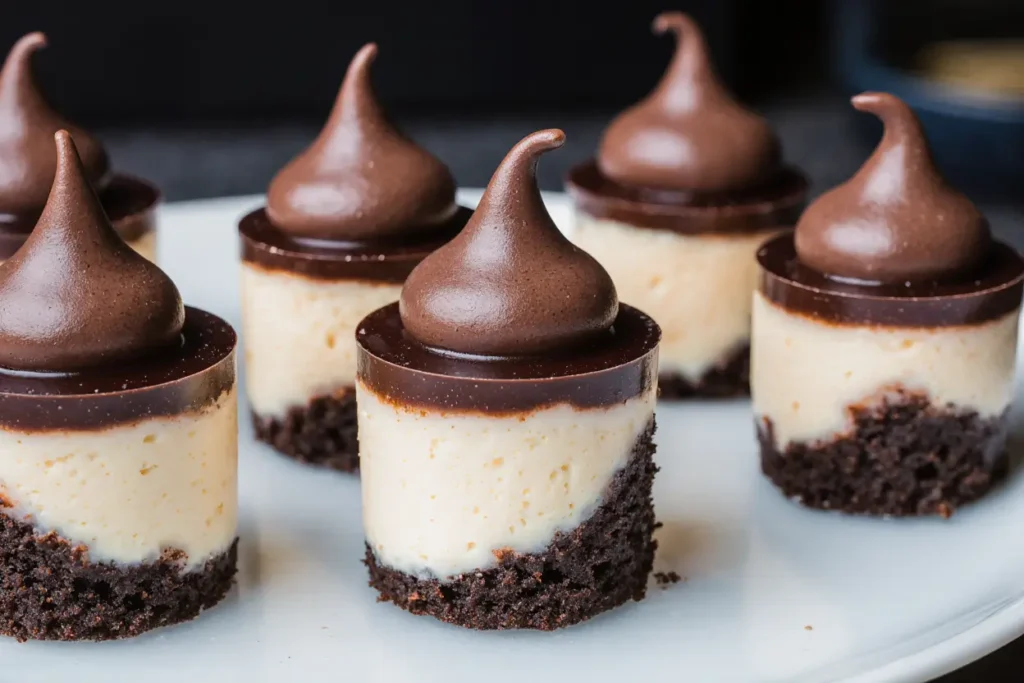
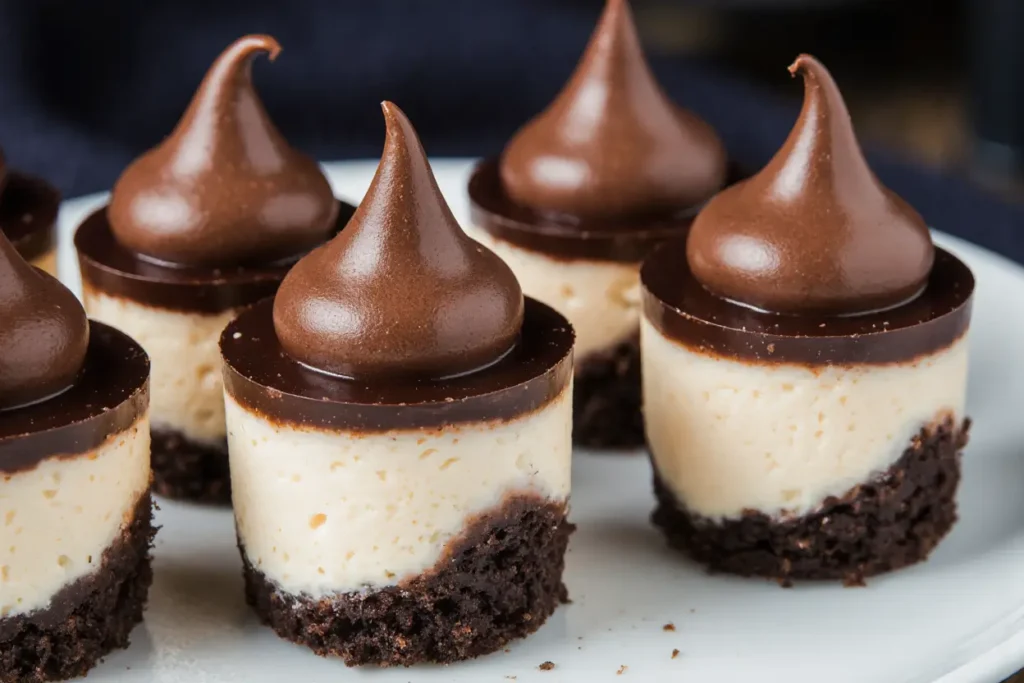
Carefully remove the mini cheesecakes from the muffin tin and peel away the paper liners. Top each bite with a dollop of ganache, spreading it gently to the edges. Garnish with fresh berries, chocolate shavings, or mini chocolate chips as desired. The contrast of colors and textures creates an Instagram-worthy presentation that’s sure to impress.
Nutritional Information
Each mini chocolate cheesecake bite contains approximately 185 calories, making them a reasonable indulgence when enjoyed in moderation. The nutritional breakdown per serving includes:
- Calories: 185
- Total Fat: 14g (22% DV)
- Saturated Fat: 8g (40% DV)
- Cholesterol: 65mg (22% DV)
- Sodium: 115mg (5% DV)
- Total Carbohydrates: 12g (4% DV)
- Dietary Fiber: 1g (4% DV)
- Sugars: 10g
- Protein: 4g (8% DV)
These mini treats provide a good source of protein from the cream cheese and eggs, while the dark chocolate contributes beneficial antioxidants. The portion-controlled format naturally limits caloric intake compared to traditional cheesecake servings.
Healthier Alternatives for the Recipe
Transform these indulgent bites into guilt-free treats with these thoughtful substitutions that maintain flavor while boosting nutritional value:
Replace regular cream cheese with reduced-fat cream cheese or Greek yogurt cream cheese to cut calories by 30% while adding probiotics. Substitute coconut sugar or monk fruit sweetener for refined sugar to reduce the glycemic impact. Use almond flour mixed with cocoa powder for the crust to increase protein and healthy fats while making the recipe gluten-free friendly.
For dairy-free versions, cashew cream cheese works beautifully, and coconut cream can replace heavy cream in the ganache. Adding a tablespoon of chia seeds or ground flaxseed to the filling boosts omega-3 fatty acids and fiber content. Consider using sugar-free chocolate chips in the ganache for those monitoring sugar intake, or incorporate protein powder into the filling for an extra nutritional boost.
Serving Suggestions
These versatile mini chocolate cheesecake bites adapt beautifully to various occasions and presentation styles. For elegant dinner parties, serve them on individual dessert plates with a drizzle of raspberry coulis and a mint leaf garnish. The vibrant red sauce creates a stunning color contrast while adding a tart counterpoint to the rich chocolate.
During holiday celebrations, dust them with powdered sugar and arrange on tiered serving stands for a winter wonderland effect. For casual gatherings, present them in colorful cupcake liners on a rustic wooden board alongside fresh strawberries and champagne. Children’s parties call for fun presentations – try serving them in ice cream cones or alongside glasses of cold milk for a playful twist.
Consider pairing these bites with complementary beverages: espresso or coffee enhances the chocolate flavors, while dessert wines like port or moscato provide elegant sophistication. For non-alcoholic options, serve with milk, hot chocolate, or fruit-infused sparkling water.
Common Mistakes to Avoid
Success with mini chocolate cheesecake bites depends on avoiding several common pitfalls that can compromise texture and flavor. The most frequent mistake is overmixing the batter, which incorporates excess air and leads to cracking during baking. Mix ingredients just until combined, and always use room temperature ingredients for smooth incorporation.
Temperature control proves crucial throughout the process. Cold ingredients don’t blend properly, creating lumpy filling, while overbaked cheesecakes become dense and dry. The centers should remain slightly jiggly when removed from the oven, as they continue cooking from residual heat.
Another common error involves insufficient chilling time. Rushing the cooling process results in soft, difficult-to-handle cheesecakes that won’t hold their shape. Plan for at least 4 hours of refrigeration, though overnight chilling produces optimal results.
When preparing the ganache, avoid overheating the cream, which can cause the chocolate to seize and become grainy. Similarly, don’t add the chocolate to cream that’s too hot – the ideal temperature is just below boiling point.
Storing Tips for the Recipe
Proper storage ensures these mini chocolate cheesecake bites maintain their creamy texture and rich flavor for optimal enjoyment. Store completed bites in an airtight container in the refrigerator for up to 5 days. Layer them between sheets of parchment paper to prevent sticking and maintain their decorative toppings.
For longer storage, these bites freeze beautifully for up to 2 months. Wrap each bite individually in plastic wrap before placing in freezer-safe containers. Thaw overnight in the refrigerator before serving – they’ll taste just as fresh as the day they were made.
If preparing components ahead of time, baked cheesecake bases can be stored covered in the refrigerator for up to 3 days before adding ganache and decorations. The ganache itself keeps for up to 1 week refrigerated and can be gently rewarmed for easier spreading.
Room temperature storage isn’t recommended due to the dairy content, but the bites can sit at room temperature for up to 2 hours during serving without safety concerns. For best flavor and texture, remove them from the refrigerator 15 minutes before serving to allow them to come to optimal serving temperature.
Conclusion
Mini chocolate cheesecake bites represent the perfect intersection of indulgence and portion control, delivering maximum flavor impact in an elegant, manageable format. These sophisticated treats prove that good things truly do come in small packages, offering all the creamy richness of traditional cheesecake enhanced by the luxurious depth of chocolate.
The beauty of this recipe lies not only in its delicious results but also in its versatility and make-ahead convenience. Whether you’re a seasoned baker or kitchen novice, these step-by-step instructions ensure consistent success every time. The combination of detailed techniques and flexible alternatives means you can adapt the recipe to suit dietary preferences, ingredient availability, or personal taste preferences.
Ready to create these irresistible mini chocolate cheesecake bites? Gather your ingredients, preheat that oven, and prepare to impress everyone with these perfectly portioned pieces of heaven. Don’t forget to share your creations on social media – these photogenic treats are guaranteed to earn plenty of likes and requests for the recipe!
FAQs
Q: Can I make these mini chocolate cheesecake bites without a mini muffin tin? A: Absolutely! Use a regular muffin tin for larger portions (adjust baking time to 25-30 minutes) or create them in small ramekins. You can even make one large cheesecake in a 9-inch springform pan, though you’ll need to increase the baking time significantly.
Q: Why did my cheesecake bites crack on top? A: Cracking typically occurs from overmixing the batter (which incorporates too much air), overbaking, or dramatic temperature changes. Ensure ingredients are at room temperature, mix just until combined, and avoid opening the oven door during baking.
Q: How do I know when the mini cheesecakes are done baking? A: The centers should be almost set but still slightly jiggly when you gently shake the pan. The tops will appear matte rather than shiny. They’ll continue cooking from residual heat as they cool.
Q: Can I make these dairy-free? A: Yes! Substitute vegan cream cheese, coconut cream for heavy cream, and use plant-based butter alternatives. The texture will be slightly different but equally delicious.
Q: What’s the best way to remove them from the muffin tin without breaking? A: Allow them to cool completely before removal, and use paper liners for easy release. If not using liners, run a thin knife around the edges before gently lifting them out.
Q: How far in advance can I prepare these for a party? A: These bites are perfect make-ahead desserts! Prepare them up to 2 days in advance and store covered in the refrigerator. Add fresh garnishes just before serving for the best presentation.


