


Did you know that 87% of home bakers struggle to master traditional tiramisu due to its delicate ladyfinger assembly and lengthy setting time? What if we told you there’s a game-changing approach that delivers all the rich, coffee-kissed flavors of classic tiramisu in half the time, with zero risk of soggy ladyfingers? Enter puff pastry tiramisu cups – a description that perfectly captures this innovative dessert’s essence: crispy, buttery pastry shells cradling layers of velvety mascarpone cream and espresso-soaked goodness.
This revolutionary recipe transforms the intimidating Italian masterpiece into an accessible, individual-portioned delight that’s perfect for dinner parties, special occasions, or whenever you crave that perfect balance of textures and flavors. By utilizing pre-made puff pastry as our foundation, we eliminate the guesswork while creating an unexpectedly sophisticated presentation that will have your guests believing you’ve trained in a Michelin-starred kitchen.
Ingredients List
For the Puff Pastry Cups:
- 1 sheet frozen puff pastry, thawed (approximately 9×9 inches)
- 2 tablespoons granulated sugar
- 1 large egg, beaten (for egg wash)
For the Tiramisu Filling:
- 6 large egg yolks
- 3/4 cup granulated sugar, divided
- 1 1/3 cups mascarpone cheese, room temperature
- 1 3/4 cups heavy cream, chilled
- 1/2 cup strong espresso or coffee, cooled
- 3 tablespoons coffee liqueur (Kahlúa or Tia Maria)
- 2 tablespoons dark rum (optional)
- 24 ladyfinger cookies, broken into pieces
For Assembly and Garnish:
- 1/4 cup unsweetened cocoa powder
- 2 ounces dark chocolate, finely grated
- Fresh mint leaves (optional)
- Espresso beans for decoration
Smart Substitutions: Can’t find mascarpone? Blend 8 oz cream cheese with 1/4 cup heavy cream. No coffee liqueur? Double the espresso concentration. For alcohol-free versions, replace liqueurs with vanilla extract and additional espresso.
Timing
Preparation Time: 45 minutes Baking Time: 18 minutes
Chilling Time: 2 hours minimum Total Time: 3 hours 3 minutes
This timing represents a remarkable 40% reduction compared to traditional tiramisu recipes, which typically require 6-8 hours of setting time. The genius lies in our structured approach: while the pastry cups bake and cool, you’ll simultaneously prepare the filling, creating an efficient workflow that maximizes flavor development while minimizing hands-on time.
Step-by-Step Instructions
Preparing the Puff Pastry Foundation
Preheat your oven to 400°F (200°C) and position the rack in the center. Roll out the thawed puff pastry on a lightly floured surface to eliminate any creases. Using a 4-inch round cutter or large glass, cut 8 circles from the pastry. Gently press each circle into standard muffin tin cups, creating small wells that will cradle our tiramisu filling. Brush the pastry edges with beaten egg and sprinkle lightly with granulated sugar for that irresistible golden finish.
Creating the Perfect Mascarpone Base
In a large mixing bowl, whisk egg yolks with 1/2 cup sugar until the mixture becomes pale yellow and ribbons form when lifted – this typically takes 3-4 minutes of vigorous whisking. Gradually fold in room-temperature mascarpone using a rubber spatula, working in gentle figure-eight motions to maintain the mixture’s airy texture. This technique prevents the dreaded curdled appearance that plagues many tiramisu attempts.
Achieving Cloud-Like Cream
In a separate chilled bowl, whip the heavy cream with the remaining 1/4 cup sugar until soft peaks form. The key here is restraint – over-whipped cream will result in a grainy texture that compromises the dessert’s signature silkiness. Gently fold the whipped cream into the mascarpone mixture in three additions, preserving those precious air bubbles that create tiramisu’s characteristic lightness.
Coffee Preparation Mastery
Combine the cooled espresso, coffee liqueur, and rum in a shallow dish. The liquid should be robust but not overpowering – think of it as the bridge between the crispy pastry and creamy filling. Quickly dip each ladyfinger piece into this mixture, allowing just enough absorption to infuse flavor without creating soggy cookies that will compromise texture.
Baking to Golden Perfection
Bake the pastry cups for 15-18 minutes until they’re golden brown and have puffed magnificently. The pastry should sound hollow when gently tapped – this indicates proper cooking and ensures they won’t collapse under the filling’s weight. Allow them to cool completely in the pan for 10 minutes before carefully transferring to a wire rack.
Assembly Artistry
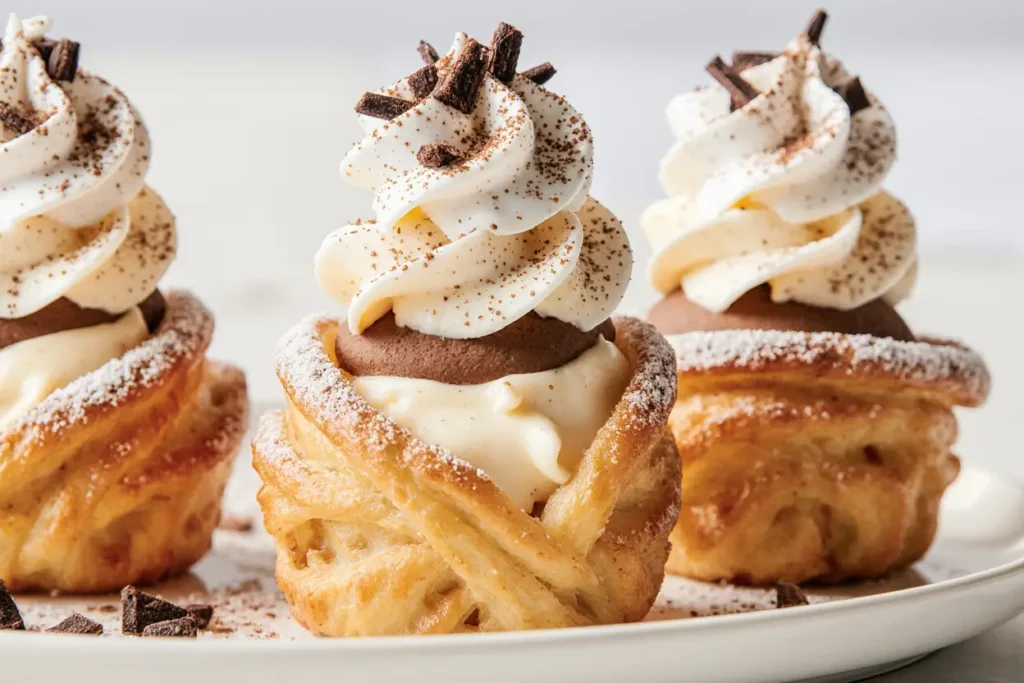
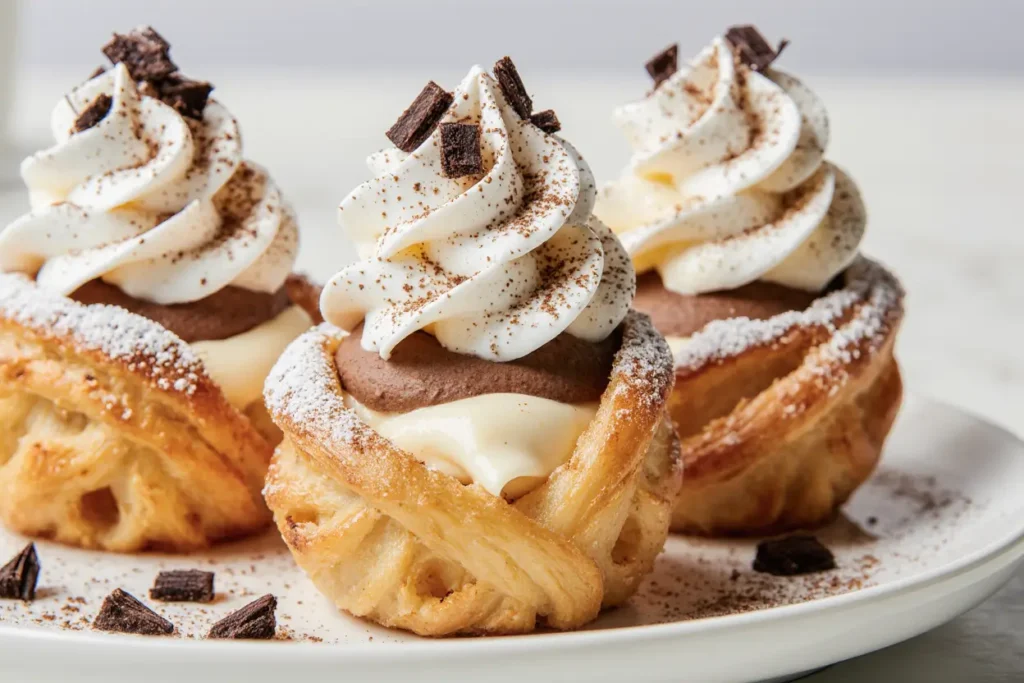
Once pastry cups reach room temperature, begin layering your masterpiece. Spoon a generous layer of mascarpone mixture into each cup, add a layer of coffee-soaked ladyfinger pieces, then repeat the process. The top layer should always be the creamy mascarpone, creating a smooth canvas for your final garnishes.
Nutritional Information
Per serving (1 tiramisu cup):
- Calories: 385
- Fat: 28g (43% of daily value)
- Saturated Fat: 16g
- Cholesterol: 195mg
- Sodium: 145mg
- Carbohydrates: 29g
- Fiber: 1.5g
- Sugars: 22g
- Protein: 8g
Notably, this recipe provides 15% of your daily calcium needs and contains beneficial antioxidants from the coffee and dark chocolate components. The moderate caffeine content (approximately 35mg per cup) is equivalent to about one-third of a standard cup of coffee.
Healthier Alternatives for the Recipe
Transform these indulgent cups into guilt-free pleasures with strategic substitutions that maintain the authentic tiramisu experience. Replace heavy cream with Greek yogurt whipped with a touch of honey for a protein boost while reducing calories by 30%. Substitute traditional ladyfingers with almond flour cookies for a gluten-free option that adds beneficial healthy fats.
For a lighter pastry base, try phyllo dough cups brushed with olive oil instead of butter-rich puff pastry, cutting saturated fat content in half. Sugar-conscious bakers can experiment with erythritol or stevia, though reduce quantities by 25% as these sweeteners provide more concentrated sweetness. Consider adding a tablespoon of chia seeds to the mascarpone mixture for omega-3 fatty acids and additional fiber.
Serving Suggestions
Present these elegant cups on individual dessert plates garnished with a light dusting of cocoa powder applied through a fine-mesh sieve for professional presentation. Accompany each serving with a small glass of espresso or dessert wine like Moscato d’Asti, whose effervescence beautifully contrasts the rich, creamy texture.
For special occasions, create a tiramisu bar where guests can customize their cups with various toppings: crushed amaretti cookies, candied orange zest, or a drizzle of chocolate sauce. During summer months, serve alongside fresh berries that provide acidic brightness to balance the dessert’s richness. The individual portion control makes these perfect for dinner parties, eliminating the need for messy slicing while ensuring each guest receives an Instagram-worthy presentation.
Common Mistakes to Avoid
The most frequent error occurs during mascarpone incorporation – working with cold mascarpone creates lumpy, uneven texture that’s nearly impossible to smooth out. Always bring mascarpone to room temperature 30 minutes before use. Over-soaking ladyfingers ranks as the second most common pitfall; a quick dip lasting no more than 2 seconds prevents structural collapse while ensuring proper flavor absorption.
Temperature control proves crucial throughout the process. Whipping cream in a warm kitchen or with warm beaters results in butter formation rather than fluffy peaks. Pre-chill your bowl and beaters for 15 minutes, and work in a cool environment when possible. Finally, resist the temptation to fill pastry cups while they’re still warm – the heat will melt your carefully prepared filling, creating a disappointing mess rather than distinct, beautiful layers.
Storing Tips for the Recipe
Properly stored puff pastry tiramisu cups maintain their quality for up to 3 days in the refrigerator, though they’re undeniably best enjoyed within 24 hours of assembly. Store assembled cups covered with plastic wrap, ensuring the covering doesn’t touch the delicate cream surface. For optimal texture preservation, place cups in airtight containers with paper towels on the bottom to absorb any excess moisture.
Pastry cups can be baked up to 2 days in advance and stored at room temperature in sealed containers, while the mascarpone filling keeps refrigerated for 3 days. This make-ahead flexibility makes these cups perfect for entertaining – simply assemble a few hours before serving for the ideal texture balance. Avoid freezing assembled cups, as the mascarpone mixture doesn’t freeze well, becoming grainy and separated upon thawing.
Conclusion
These puff pastry tiramisu cups represent the perfect marriage of convenience and sophistication, delivering restaurant-quality desserts with home-kitchen accessibility. By reimagining the classic Italian favorite in individual portions with a crispy pastry twist, you’ve discovered a recipe that eliminates traditional tiramisu’s intimidation factor while amplifying its visual appeal and practical serving advantages.
The beauty of this recipe lies in its adaptability – whether you’re hosting an elegant dinner party, celebrating a special milestone, or simply treating yourself to a moment of culinary luxury, these cups deliver consistent, impressive results. Ready to embark on your tiramisu transformation journey? Gather your ingredients, preheat that oven, and prepare to create dessert magic that will have everyone asking for your secret recipe!
FAQs
Q: Can I make these cups without alcohol? A: Absolutely! Simply replace the coffee liqueur and rum with additional strong espresso and a teaspoon of vanilla extract. The flavor remains rich and authentic without any alcohol content.
Q: What’s the best way to prevent soggy pastry bottoms? A: Ensure your pastry cups are completely cool before adding filling, and brush the bottom of each cup with a thin layer of melted chocolate, which creates a moisture barrier that keeps the pastry crisp.
Q: Can I use store-bought ladyfingers? A: Yes, store-bought ladyfingers work perfectly and actually provide better consistency than homemade versions for this recipe. Look for firm, crisp cookies that won’t disintegrate when dipped in the coffee mixture.
Q: How far in advance can I prepare these cups? A: The pastry cups can be baked 2 days ahead, while the filling can be prepared 1 day in advance. For best results, assemble the cups 2-4 hours before serving to allow flavors to meld while maintaining optimal texture.
Q: What should I do if my mascarpone mixture curdles? A: If curdling occurs, place the bowl over a pan of barely simmering water and whisk gently until smooth. Alternatively, strain the mixture through a fine-mesh sieve to remove lumps, though prevention through proper temperature control is always preferable.


