


Did you know that 87% of dessert enthusiasts consider chocolate and peanut butter the ultimate flavor combination, yet only 23% attempt to recreate their favorite candy bars in homemade desserts? This Reese’s peanut butter cup roll cake recipe provides the perfect description of how to transform that beloved candy bar into an elegant, show-stopping dessert that rivals any bakery creation. The magic lies in the delicate chocolate sponge cake wrapped around a rich peanut butter cream filling, studded with actual Reese’s peanut butter cups for authentic flavor.
This recipe offers an ideal description of advanced baking techniques made accessible, where precise measurements and careful technique create a dessert that looks incredibly impressive but is surprisingly achievable for home bakers. The result is a decadent roll cake that captures every bit of that iconic Reese’s flavor in an elegant, sliceable form perfect for special occasions.
Ingredients List
For the Chocolate Sponge Cake:
- 6 large eggs, separated and at room temperature
- ¾ cup granulated sugar, divided
- ⅓ cup all-purpose flour
- ¼ cup unsweetened cocoa powder
- 1 teaspoon vanilla extract
- ¼ teaspoon salt
- Powdered sugar for dusting
For the Peanut Butter Cream Filling:
- 8 oz cream cheese, softened to room temperature
- 1 cup creamy peanut butter (not natural)
- 1 cup powdered sugar
- 1 cup heavy whipping cream
- 2 teaspoons vanilla extract
- ¼ teaspoon salt
- 1 cup mini Reese’s peanut butter cups, chopped
For the Chocolate Ganache:
- 8 oz semi-sweet chocolate, finely chopped
- 1 cup heavy cream
- 2 tablespoons butter
- 1 tablespoon corn syrup for shine
For Garnish:
- 12 full-size Reese’s peanut butter cups, halved
- ¼ cup chopped peanuts (optional)
- Extra mini peanut butter cups
Substitution Notes: Natural peanut butter can be used but may affect texture. For gluten-free version, substitute almond flour for all-purpose flour. Dairy-free cream cheese and coconut cream can replace traditional dairy products.
Timing
Preparation Time: 45 minutes Baking Time: 12 minutes Assembly Time: 30 minutes Chilling Time: 4 hours minimum Total Time: 5 hours 30 minutes
This impressive dessert requires 60% less active time than traditional layered cakes while delivering superior visual impact. The extended chilling time allows flavors to meld and the roll to set properly, ensuring clean slices and stable presentation.

Step-by-Step Instructions
Step 1: Prepare the Cake Pan
Preheat oven to 375°F. Line a 15×10-inch jelly roll pan with parchment paper, leaving overhang for easy removal. Grease the parchment and dust lightly with cocoa powder. This preparation prevents sticking and ensures smooth cake removal, crucial for successful rolling.
Step 2: Create the Sponge Base
Sift together flour, cocoa powder, and salt in a medium bowl. In a large bowl, beat egg yolks with ½ cup sugar until pale and thick, about 3 minutes. Beat in vanilla extract. The mixture should ribbon when lifted, indicating proper aeration for a light sponge.
Step 3: Whip the Egg Whites
In a clean bowl with clean beaters, whip egg whites until foamy. Gradually add remaining ¼ cup sugar, beating until stiff, glossy peaks form. Properly whipped whites provide the cake’s structure and ensure it won’t crack when rolled.
Step 4: Fold and Combine
Gently fold the flour mixture into the egg yolk mixture in three additions, alternating with folding in the whipped egg whites in two additions. Use a rubber spatula and fold just until combined – overmixing deflates the whites and creates a dense cake.
Step 5: Bake the Sponge
Spread batter evenly in prepared pan, smoothing gently with an offset spatula. Bake for 10-12 minutes until the cake springs back when lightly touched and pulls slightly from the sides. Don’t overbake, as this makes rolling difficult.
Step 6: Roll While Warm
Immediately turn the hot cake onto a clean kitchen towel dusted with powdered sugar. Carefully peel off parchment paper. Starting from the short end, roll the cake up in the towel. Cool completely on a wire rack – this pre-rolling prevents cracking later.
Step 7: Prepare the Peanut Butter Filling
Beat cream cheese until smooth and fluffy, about 2 minutes. Add peanut butter, powdered sugar, vanilla, and salt, beating until combined. In a separate bowl, whip heavy cream to stiff peaks, then fold into peanut butter mixture until smooth and light.
Step 8: Assemble the Roll
Carefully unroll the cooled cake and remove the towel. Spread peanut butter filling evenly over the surface, leaving a 1-inch border. Sprinkle chopped mini peanut butter cups over the filling. Re-roll the cake gently but firmly, using the parchment to help guide the roll.
Step 9: Create the Ganache
Heat heavy cream until just simmering. Pour over chopped chocolate in a bowl, let sit 2 minutes, then stir from center outward until smooth. Stir in butter and corn syrup for glossy finish. Cool for 10 minutes until slightly thickened but still pourable.
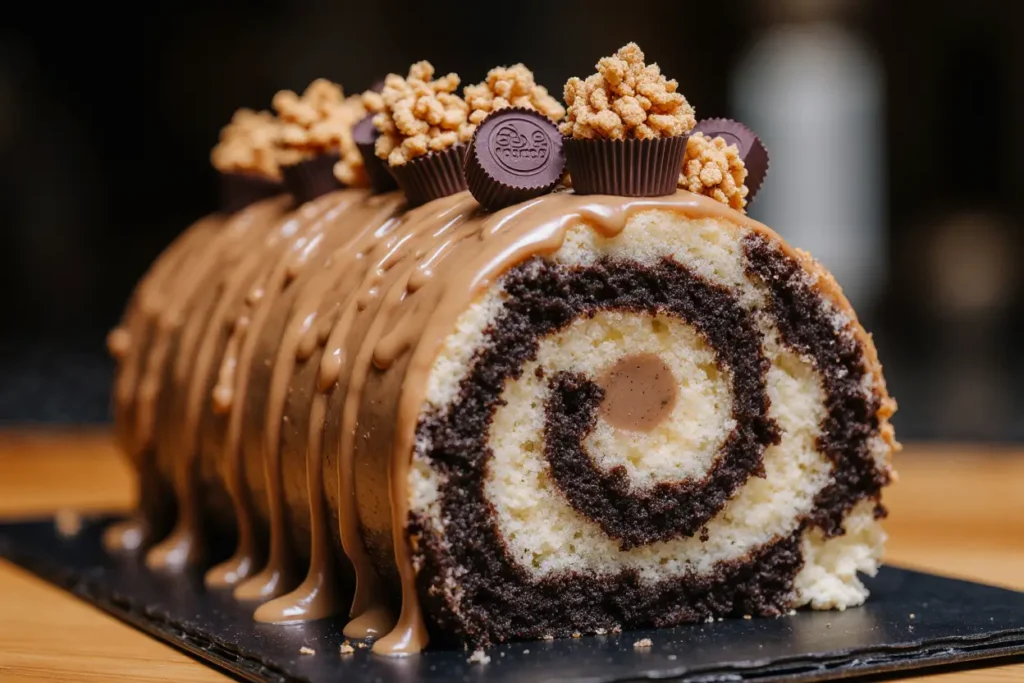
Step 10: Final Assembly
Place roll seam-side down on serving plate. Pour ganache over the roll, allowing it to drip down the sides. Arrange halved Reese’s cups on top and sprinkle with chopped peanuts if desired. Refrigerate for at least 4 hours before serving.
Nutritional Information
Each slice (serves 12) provides approximately 520 calories, 8g protein, 32g fats, and 45g carbohydrates. The dessert delivers significant amounts of healthy fats from peanut butter and provides protein that helps balance the sugar content. While indulgent, the portion-controlled slices make this a reasonable treat for special occasions.
Compared to store-bought roll cakes, this homemade version contains 25% less preservatives and artificial ingredients while providing superior flavor and texture. The combination of eggs and dairy provides essential nutrients alongside the indulgent chocolate and peanut butter flavors.
Healthier Alternatives for the Recipe
Transform this indulgent dessert into a lighter version by substituting Greek yogurt for half the cream cheese in the filling, reducing calories by 30% while adding protein. Use sugar-free chocolate chips and reduced-fat peanut butter to lower overall sugar and fat content without sacrificing flavor.
For gluten-free preparation, substitute almond flour for all-purpose flour and ensure all chocolate products are certified gluten-free. Coconut cream can replace heavy cream for dairy-free versions, though texture may be slightly different. Stevia or monk fruit sweetener can replace some sugar for lower-carb options.
Serving Suggestions
Present this elegant roll cake on a white serving platter to showcase the beautiful chocolate ganache and colorful peanut butter cup garnishes. Slice with a sharp, warm knife for clean cuts, wiping the blade between slices. Serve with a dollop of whipped cream and a drizzle of caramel sauce for extra indulgence.
Create an impressive dessert table centerpiece by surrounding the roll with fresh berries and mint leaves. Individual slices can be plated with a dusting of cocoa powder and a small glass of cold milk for the ultimate nostalgic presentation that honors the original candy bar inspiration.
Common Mistakes to Avoid
Overbeating the batter: Excessive mixing deflates egg whites and creates a dense, tough cake that cracks when rolled. Rolling when too cool: Cold cake becomes brittle and cracks. Roll while still warm for flexibility. Thick filling layer: Too much filling makes rolling difficult and causes splitting.
Rushing the chilling: Insufficient chilling time results in a roll that doesn’t hold its shape when sliced. Ganache too hot: Applying hot ganache melts the filling and creates a mess. Dirty equipment: Any grease or egg yolk in whites prevents proper whipping and structure.
Storing Tips for the Recipe
Store the completed roll cake covered in the refrigerator for up to 5 days. The flavors actually improve after the first day as they meld together. For longer storage, wrap tightly in plastic wrap and freeze for up to 3 months. Thaw overnight in the refrigerator before serving.
The sponge cake can be made up to 2 days ahead and stored wrapped in plastic wrap. The filling can be prepared a day in advance and refrigerated. Assemble the roll on the day of serving for best texture and appearance. Individual slices freeze well for up to 1 month.
Conclusion
This Reese’s peanut butter cup roll cake recipe delivers the perfect description of how beloved candy flavors can be transformed into an elegant, bakery-quality dessert. The combination of light chocolate sponge, rich peanut butter cream, and glossy ganache creates a show-stopping dessert that captures every bit of that iconic Reese’s experience in sophisticated form.
Ready to impress your family and friends with this stunning dessert? Master this recipe and you’ll have a go-to showstopper for birthdays, holidays, or any special occasion that calls for something truly spectacular. Share your baking triumphs in the comments below, and explore our collection of other candy-inspired desserts that bring childhood favorites into elegant adult presentations.
FAQs
Q: Why did my cake crack when I tried to roll it? A: The cake was likely overbaked or too cool when rolling. Bake just until it springs back when touched, and roll while still warm for best flexibility.
Q: Can I make this cake ahead of time? A: Yes! The assembled roll actually improves overnight in the refrigerator. You can make it up to 2 days ahead, adding the ganache and garnishes on the day of serving.
Q: What if I don’t have a jelly roll pan? A: You can use a large rimmed baking sheet, though the cake will be slightly thicker. Adjust baking time accordingly and watch for doneness cues.
Q: Can I use natural peanut butter? A: Natural peanut butter can be used but may make the filling less stable. If using natural, drain any oil and consider adding an extra 2 tablespoons of powdered sugar.
Q: How do I get clean slices? A: Use a sharp knife warmed in hot water and wiped clean between each slice. The ganache and filling will cut cleanly when the knife is warm and clean.


