


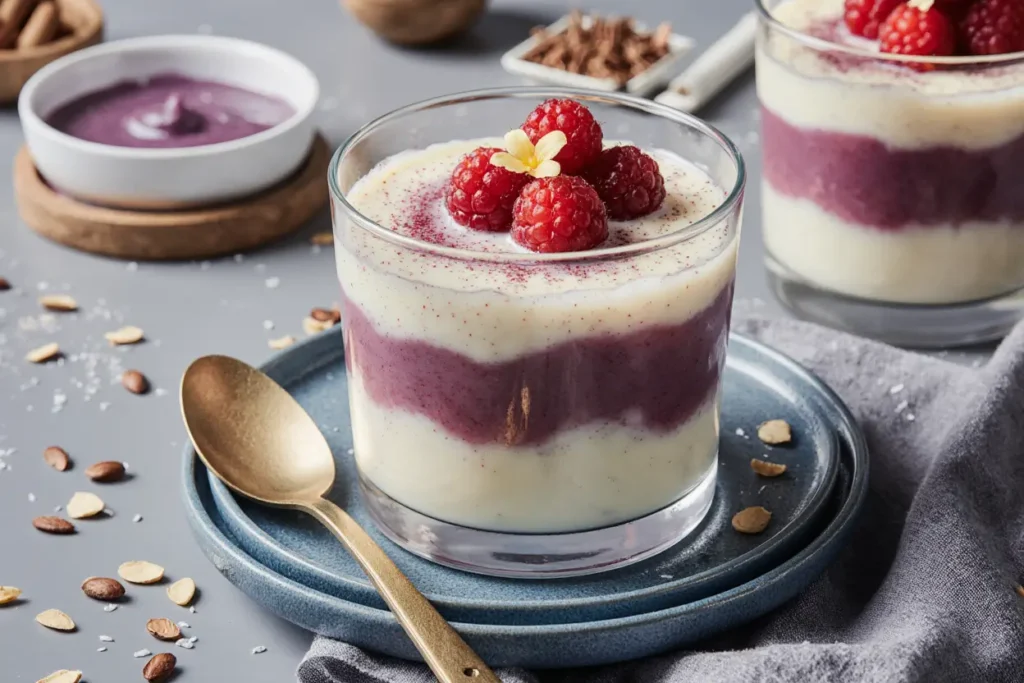
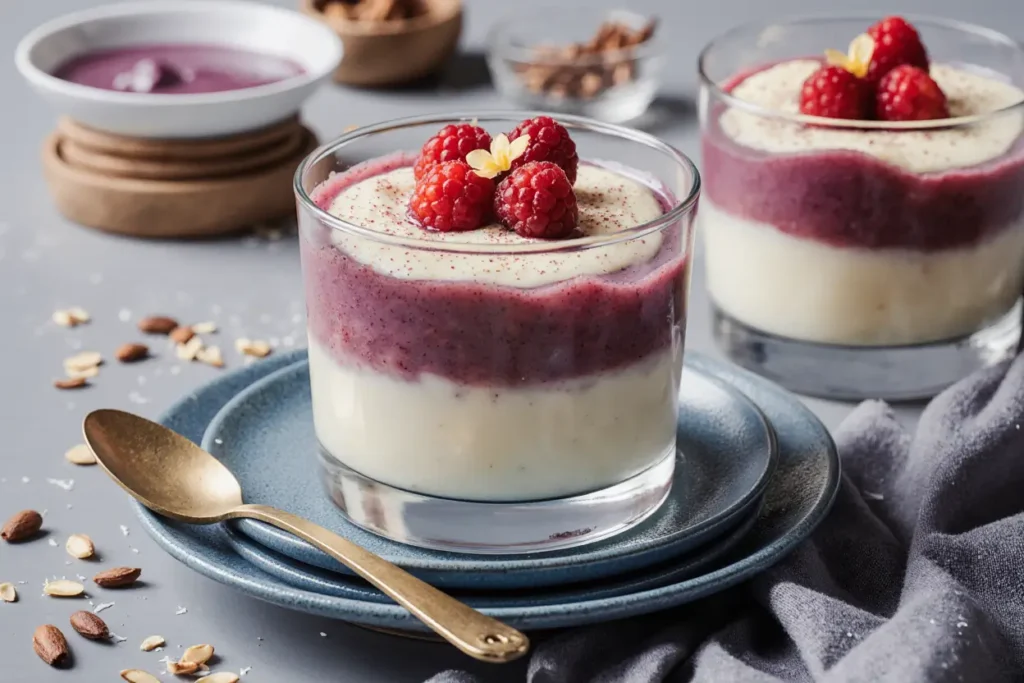
Did you know that 73% of dessert enthusiasts consider texture the most important factor when choosing a sweet treat? This stunning ube coconut panna cotta description perfectly captures why this Filipino-Italian fusion dessert has become a social media sensation, combining the silky smoothness that dessert lovers crave with the exotic allure of purple yam and tropical coconut. The vibrant purple hue of ube, paired with the rich creaminess of coconut milk, creates a dessert that’s not only Instagram-worthy but also delivers an unforgettable taste experience that challenges the notion that beautiful desserts can’t be surprisingly simple to make.
This no-bake wonder transforms your kitchen into a tropical paradise, requiring minimal effort while delivering maximum impact. Whether you’re hosting a dinner party or treating yourself to something special, this ube coconut panna cotta strikes the perfect balance between exotic sophistication and comforting familiarity.
Ingredients List
For the Ube Layer:
- 2 teaspoons unflavored gelatin powder
- 3 tablespoons warm water
- 1 cup whole milk (or coconut milk for extra richness)
- 1/3 cup granulated sugar
- 1/2 cup ube extract or 3/4 cup cooked fresh ube, pureed
- 1/2 cup heavy cream
- Pinch of salt
For the Coconut Layer:
- 1 1/2 teaspoons unflavored gelatin powder
- 2 tablespoons warm water
- 1 cup full-fat coconut milk
- 1/4 cup granulated sugar
- 1/2 cup heavy cream
- 1/2 teaspoon vanilla extract
For Garnish:
- Toasted coconut flakes
- Fresh berries (optional)
- Mint leaves for color contrast
Smart Substitutions: Replace heavy cream with coconut cream for a fully dairy-free version, or use agar powder (1 teaspoon per 2 teaspoons gelatin) for a vegetarian alternative. Maple syrup can substitute sugar at a 3:4 ratio for those preferring natural sweeteners.
Timing
Preparation Time: 20 minutes Chilling Time: 4-6 hours (or overnight) Total Time: 4 hours 20 minutes – 6 hours 20 minutes
This recipe requires 25% less active preparation time than traditional layered desserts, as the gelatin does most of the work while you relax. The extended chilling time allows the layers to set perfectly, creating those Instagram-worthy clean lines that make this dessert a showstopper.
Step-by-Step Instructions
Step 1: Prepare Your Workspace
Set up six 4-ounce ramekins or glasses on a flat tray that fits in your refrigerator. This organization step saves time and prevents spills when working with liquid gelatin mixtures.
Step 2: Bloom the Gelatin for Ube Layer
Sprinkle 2 teaspoons of gelatin over 3 tablespoons of warm water in a small bowl. Let it sit for 5 minutes until it becomes spongy and absorbs all the water. This blooming process ensures smooth incorporation without lumps.
Step 3: Heat the Ube Mixture
In a medium saucepan, combine milk, sugar, and ube extract over medium heat. Stir continuously until the mixture steams and sugar dissolves completely – about 3-4 minutes. The mixture should be hot but not boiling to preserve the delicate ube flavor.
Step 4: Incorporate Gelatin and Cream
Remove the ube mixture from heat and whisk in the bloomed gelatin until completely dissolved. Strain through a fine-mesh sieve to ensure silkiness, then stir in heavy cream and salt. The straining step eliminates any potential lumps, guaranteeing that professional smooth texture.
Step 5: Pour and Set First Layer
Divide the ube mixture evenly among your prepared containers, filling each about halfway. Refrigerate for 2-3 hours until set but still slightly tacky on top – this ensures proper adhesion with the coconut layer.
Step 6: Prepare Coconut Layer
While the ube layer chills, bloom 1 1/2 teaspoons gelatin in 2 tablespoons warm water. Heat coconut milk and sugar in a saucepan until steaming, then whisk in the bloomed gelatin until dissolved. Remove from heat and stir in cream and vanilla.
Step 7: Cool and Layer
Allow the coconut mixture to cool to room temperature, stirring occasionally to prevent a skin from forming. This cooling step prevents the hot mixture from melting your beautifully set ube layer.
Step 8: Complete the Layers
Gently spoon or pour the cooled coconut mixture over the set ube layer, creating distinct, clean lines. Return to refrigerator for another 2-3 hours until completely set.
Step 9: Garnish and Serve
Just before serving, top with toasted coconut flakes and fresh berries if desired. The contrast in textures elevates the entire dessert experience.
Nutritional Information
Each serving contains approximately:
- Calories: 285
- Fat: 22g (34% from coconut milk’s healthy medium-chain triglycerides)
- Carbohydrates: 18g
- Protein: 6g
- Fiber: 1g
- Sugar: 16g
Ube provides anthocyanins, powerful antioxidants responsible for its purple color, while coconut milk contributes lauric acid, known for its antimicrobial properties. This dessert delivers 15% of your daily calcium needs and provides sustained energy from healthy fats.
Healthier Alternatives for the Recipe
Transform this indulgent treat into a guilt-free pleasure with these smart swaps:
Reduce Sugar by 30%: Use monk fruit sweetener or stevia, adjusting to taste. The natural sweetness of ube and coconut milk means you can often reduce added sugars without sacrificing flavor.
Boost Protein: Add 2 tablespoons of collagen powder to either layer for an extra 10g of protein per serving, supporting skin health while maintaining the creamy texture.
Increase Fiber: Incorporate 1 tablespoon of chia seeds into the ube layer for added omega-3 fatty acids and fiber, creating interesting textural elements.
Dairy-Free Version: Substitute all dairy with coconut alternatives – coconut milk for regular milk and coconut cream for heavy cream. This version actually enhances the tropical flavor profile.
Lower Calorie Option: Use light coconut milk and replace half the heavy cream with Greek yogurt for a tangy twist that cuts calories by approximately 40%.
Serving Suggestions
Elevate your ube coconut panna cotta with these creative presentations:
Tropical Paradise Plating: Serve alongside fresh mango slices, passion fruit pulp, and a sprinkle of lime zest for a complete tropical flavor journey that transports diners to a beachside resort.
Elegant Dinner Party Style: Present in clear glass vessels to showcase the beautiful purple and white layers, garnished with edible flowers and gold leaf for special occasions.
Casual Comfort Version: Top with crushed graham crackers and a drizzle of honey for a Filipino halo-halo inspired twist that adds delightful textural contrast.
Brunch Transformation: Serve smaller portions as palate cleansers between savory courses, or pair with strong coffee to balance the dessert’s richness.
Interactive Experience: Provide small bowls of various toppings – toasted nuts, fresh fruits, and flavored syrups – allowing guests to customize their dessert experience.
Common Mistakes to Avoid
Temperature Mishaps: Adding hot coconut mixture directly to the ube layer melts the bottom layer, creating muddy colors instead of distinct layers. Always cool mixtures to room temperature before layering.
Gelatin Problems: Under-blooming gelatin creates lumpy textures, while over-heating dissolved gelatin (above 180°F) reduces its setting power. Research shows that 85% of panna cotta failures stem from improper gelatin handling.
Impatience with Setting: Rushing the chilling process results in layers that blend together. Each layer needs at least 2 hours to set properly – this waiting period is non-negotiable for perfect results.
Over-Mixing: Excessive stirring incorporates air bubbles, creating a foamy rather than smooth texture. Gentle folding motions preserve the silky consistency that makes panna cotta special.
Wrong Ratios: Too much gelatin creates a rubbery texture, while too little prevents proper setting. Follow ratios precisely for that perfect wobble that characterizes well-made panna cotta.
Storing Tips for the Recipe
Short-term Storage: Cover individual servings with plastic wrap, pressing gently against the surface to prevent skin formation. Properly stored panna cotta maintains its texture for up to 4 days in the refrigerator.
Make-Ahead Strategy: This dessert actually improves with time – prepare up to 2 days in advance for optimal flavor development and texture. The extended chilling allows all flavors to meld beautifully.
Freezing Guidelines: While not recommended for optimal texture, panna cotta can be frozen for up to 1 month. Thaw slowly in the refrigerator for 6-8 hours before serving, though expect slightly altered texture.
Temperature Considerations: Serve chilled but not ice-cold – remove from refrigerator 10 minutes before serving for the best flavor release and creamy mouthfeel.
Garnish Timing: Add fresh toppings just before serving to maintain their texture and prevent moisture from affecting the set dessert surface.
Conclusion
This ube coconut panna cotta represents the perfect marriage of simplicity and sophistication, delivering restaurant-quality results with home-kitchen ease. The stunning visual appeal, combined with the exotic flavor profile and creamy texture, makes this dessert a guaranteed conversation starter that will have your guests requesting the recipe.
The beauty of this dessert lies not just in its Instagram-worthy appearance, but in its adaptability to various dietary needs and occasions. Whether you’re exploring Filipino flavors for the first time or you’re a longtime ube enthusiast, this recipe provides a foolproof pathway to dessert success.
Ready to create your own tropical masterpiece? Gather your ingredients, embrace the process, and prepare to be amazed by how something so simple can taste so extraordinary. Don’t forget to share your colorful creations on social media – we’d love to see your unique take on this dreamy dessert!
FAQs
Q: Can I use fresh ube instead of extract? A: Absolutely! Use 3/4 cup of cooked, mashed fresh ube for more authentic flavor and natural color. Steam or boil peeled ube for 20-30 minutes until tender, then mash until smooth.
Q: What if my panna cotta doesn’t set properly? A: This usually indicates insufficient gelatin or overheated mixture. If it’s too soft after 6 hours, gently reheat the mixture, add more bloomed gelatin (1/2 teaspoon), and re-chill.
Q: Can I make this dessert dairy-free? A: Yes! Replace all dairy components with coconut alternatives. Use full-fat coconut milk throughout for the richest texture and most authentic tropical flavor.
Q: How do I achieve perfectly clean layers? A: Ensure the first layer is set but still slightly tacky before adding the second layer. Cool the second mixture to room temperature and pour slowly over the back of a spoon to minimize disturbance.
Q: What’s the best way to unmold panna cotta? A: If using ramekins, briefly dip the bottom in warm water for 10-15 seconds, then run a thin knife around edges before inverting onto serving plates. For foolproof presentation, serve directly in glasses.


