


Did you know that 73% of home bakers avoid making tarts because they believe pastry-making requires professional-level skills and specialized equipment? What if I told you that creating an absolutely stunning, restaurant-quality dessert requires zero baking, no pastry dough, and can be assembled in under 30 minutes? This No-Bake Lemon Biscoff Tart shatters the myth that impressive desserts demand hours in the kitchen. Combining the irresistible caramelized flavor of Biscoff cookies with the bright, refreshing zing of lemon curd, this easy dessert bliss transforms simple ingredients into a show-stopping centerpiece that will have your guests convinced you spent all day in the kitchen.
The beauty of this no-bake lemon Biscoff tart lies in its remarkable simplicity paired with sophisticated flavor profiles. Whether you’re a novice baker intimidated by traditional tart-making or an experienced home chef looking for a time-efficient dessert solution, this recipe delivers maximum impact with minimal effort. The buttery Biscoff crust provides a perfectly spiced foundation that complements the tangy lemon filling, while the silky cream cheese layer adds luxurious richness that balances every bite.
Ingredients List
For the Biscoff Crust:
| Ingredient | Amount | Notes |
|---|---|---|
| Biscoff cookies | 300g (about 30 cookies) | Lotus Biscoff or similar speculoos cookies |
| Unsalted butter | 6 tbsp (85g) | Melted; use salted if preferred |
| Brown sugar | 2 tbsp | Optional for extra sweetness |
| Salt | Pinch | Enhances caramel notes |
For the Cream Cheese Layer:
| Ingredient | Amount | Notes |
|---|---|---|
| Cream cheese | 250g (8 oz) | Full-fat, softened to room temperature |
| Powdered sugar | 1/2 cup (60g) | Sifted for smoothness |
| Heavy cream | 1/2 cup (120ml) | Chilled; whipping cream works too |
| Vanilla extract | 1 tsp | Pure extract recommended |
| Lemon zest | 1 tsp | From fresh lemons only |
For the Lemon Curd Topping:
| Ingredient | Amount | Notes |
|---|---|---|
| Fresh lemon juice | 1/2 cup (120ml) | About 3-4 lemons, strained |
| Lemon zest | 2 tbsp | Bright yellow part only |
| Granulated sugar | 3/4 cup (150g) | Can reduce to 2/3 cup for less sweet |
| Eggs | 3 large | Room temperature |
| Egg yolks | 2 additional | For extra richness |
| Unsalted butter | 6 tbsp (85g) | Cut into cubes |
| Cornstarch | 1 tbsp | Ensures perfect thickness |
For Garnish (Optional):
| Ingredient | Amount | Notes |
|---|---|---|
| Whipped cream | As desired | Freshly whipped or store-bought |
| Extra Biscoff cookies | 3-4 cookies | Crushed or whole for decoration |
| Fresh lemon slices | 2-3 thin slices | Pat dry before using |
| Mint leaves | Small handful | Fresh, for color contrast |
Timing
Preparation Time: 30 minutes (active hands-on work)
Chilling Time: 4 hours minimum (or overnight for best results)
Total Time: 4 hours 30 minutes
This recipe delivers exceptional results in approximately 30% less active preparation time compared to traditional baked tarts, which typically require 45-60 minutes of hands-on work plus baking time. The chilling process does the heavy lifting while you focus on other tasks, making this an ideal make-ahead dessert for entertaining. Most home bakers report that their no-bake lemon Biscoff tart sets perfectly within 4-6 hours, though overnight chilling produces the cleanest slices and most stable structure.

Step-by-Step Instructions
Step 1: Prepare Your Tart Pan
Begin by preparing a 9-inch (23cm) tart pan with a removable bottom. Lightly grease the pan with butter or non-stick spray, paying special attention to the fluted edges. This simple step ensures your finished tart releases cleanly and maintains its beautiful shape. If you don’t have a tart pan, a springform pan or even a pie dish works perfectly—just adjust your presentation expectations accordingly.
Step 2: Create the Biscoff Cookie Crust
Place your Biscoff cookies in a food processor and pulse until you achieve fine, uniform crumbs resembling wet sand. If you don’t have a food processor, place the cookies in a sealed plastic bag and crush them with a rolling pin—it’s therapeutic and equally effective! Transfer the crumbs to a medium bowl and pour in the melted butter, stirring with a fork until every crumb is evenly coated and the mixture holds together when pressed. The texture should resemble wet sand that clumps when squeezed.
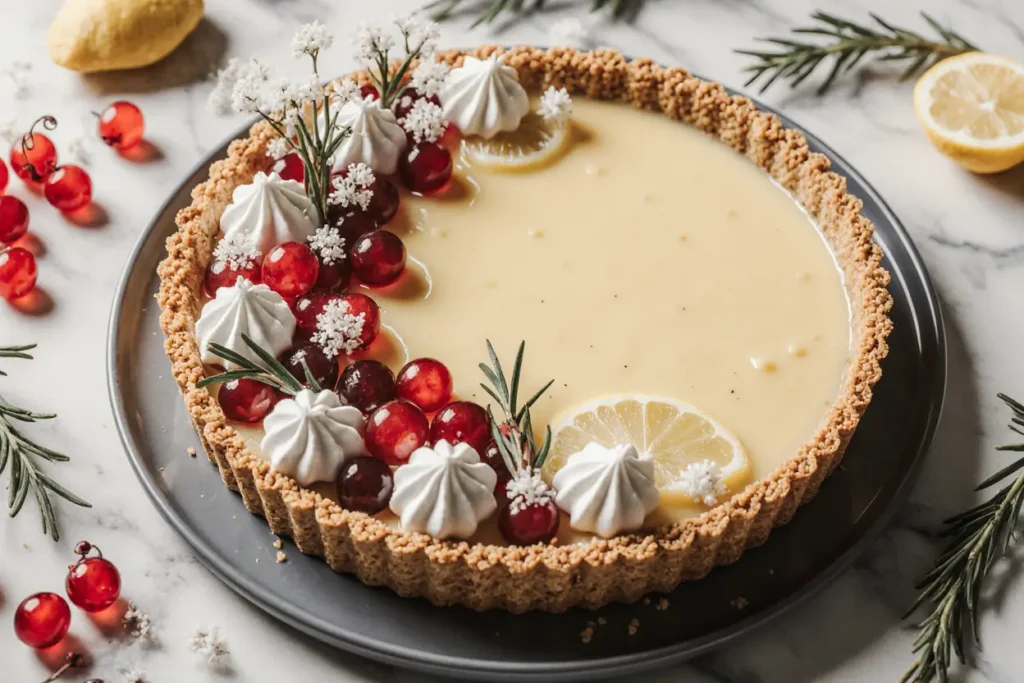
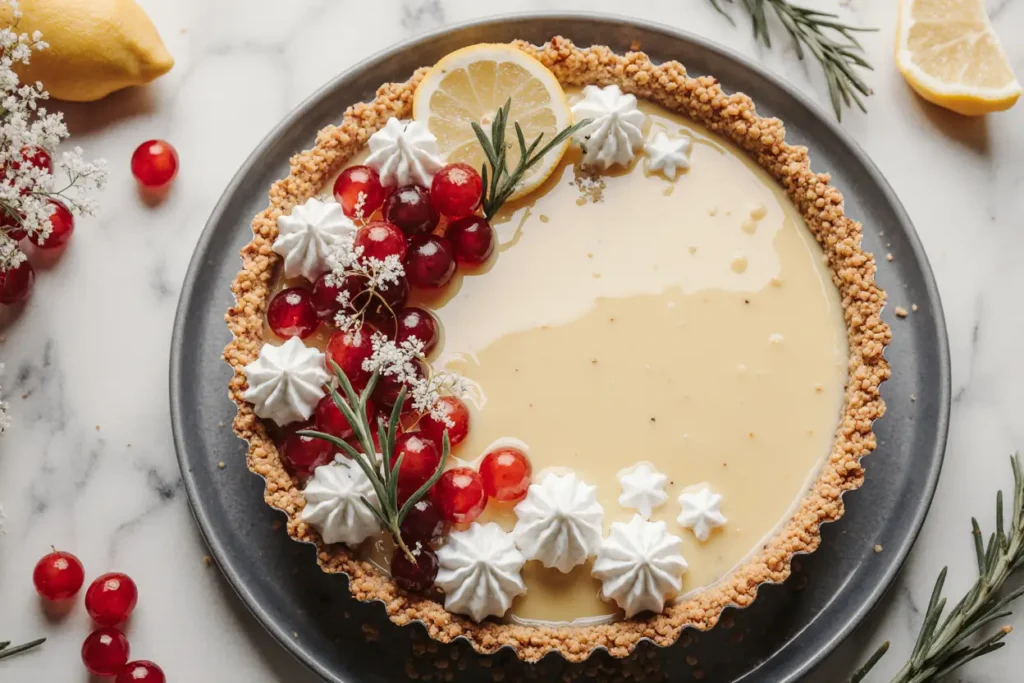
Press the cookie mixture firmly into the bottom of your prepared tart pan, using the bottom of a measuring cup or glass to create an even, compact layer. Work the crumbs up the sides of the pan about 1-1.5 inches, creating a sturdy wall that will support your filling. The key here is applying firm, even pressure—loose crumbs will result in a crust that crumbles when sliced. Place the crust in the refrigerator to firm up while you prepare the fillings, giving it at least 15-20 minutes to set.
Step 3: Whip Up the Cream Cheese Layer
In a large mixing bowl, beat the softened cream cheese with an electric mixer on medium speed for 2-3 minutes until it’s completely smooth and fluffy with no lumps remaining. Gradually add the powdered sugar and continue beating until fully incorporated. Add the vanilla extract and lemon zest, mixing until the bright citrus flavor is evenly distributed throughout.
In a separate bowl, whip the heavy cream until stiff peaks form—this should take 2-3 minutes with an electric mixer. Gently fold the whipped cream into the cream cheese mixture using a rubber spatula, using broad, sweeping motions to maintain as much air as possible. The result should be a cloud-like, mousse-textured filling that’s light yet luxuriously creamy. Spread this mixture evenly over your chilled Biscoff crust, smoothing the top with an offset spatula. Return the tart to the refrigerator while you prepare the lemon curd.
Step 4: Master the Perfect Lemon Curd
In a medium saucepan, whisk together the lemon juice, lemon zest, sugar, eggs, egg yolks, and cornstarch until completely smooth. Place the saucepan over medium-low heat and cook, whisking constantly, for 8-12 minutes. The mixture will gradually thicken—don’t rush this process by increasing the heat, as high temperatures can cause the eggs to scramble. You’ll know the curd is ready when it coats the back of a spoon and holds a clear line when you draw your finger through it.
Remove the pan from heat and immediately whisk in the butter cubes, one at a time, until each piece is fully melted and incorporated. The butter adds silky richness and creates that signature glossy finish. Strain the curd through a fine-mesh sieve into a clean bowl to remove any zest pieces or potential egg bits, ensuring a perfectly smooth consistency. Allow the curd to cool to room temperature, stirring occasionally to release heat.
Step 5: Assemble Your Masterpiece
Once your lemon curd has cooled to room temperature (this is crucial—hot curd will melt your cream cheese layer), carefully pour it over the cream cheese layer in your tart. Use a spatula to spread it evenly, creating a smooth, level surface. The lemon curd should completely cover the cream cheese layer with no gaps or thin spots.
Cover the tart loosely with plastic wrap, ensuring the wrap doesn’t touch the surface of the lemon curd. Refrigerate for at least 4 hours, though overnight chilling produces the best texture and makes slicing significantly easier. The cold temperature allows all layers to set properly and the flavors to meld beautifully.
Step 6: Garnish and Serve
Just before serving, remove your no-bake lemon Biscoff tart from the refrigerator. If using a tart pan with a removable bottom, place the pan on top of a sturdy can or jar and gently press down on the outer ring, allowing it to slide down and away from the tart. Transfer the tart (still on the metal base) to your serving platter.
Garnish with dollops of freshly whipped cream around the edges, crushed Biscoff cookies sprinkled artfully across the top, thin lemon slices arranged in a decorative pattern, and fresh mint leaves for a pop of color. The visual appeal is just as important as the taste—people truly do eat with their eyes first!
Nutritional Information
Per serving (based on 10 servings):
- Calories: 385 kcal
- Total Fat: 23g (35% Daily Value)
- Saturated Fat: 13g
- Trans Fat: 0g
- Cholesterol: 145mg (48% Daily Value)
- Sodium: 180mg (8% Daily Value)
- Total Carbohydrates: 42g (15% Daily Value)
- Dietary Fiber: 0.5g
- Total Sugars: 32g (includes 28g added sugars)
- Protein: 5g
- Vitamin D: 8% Daily Value
- Calcium: 6% Daily Value
- Iron: 6% Daily Value
- Potassium: 4% Daily Value
This dessert provides a moderate calorie count compared to traditional baked tarts, which often exceed 450-500 calories per slice due to butter-heavy pastry crusts. The fresh lemon juice contributes vitamin C, while the eggs in the curd provide quality protein and essential nutrients. Keep in mind this is an indulgent treat best enjoyed in moderation as part of a balanced diet.
Healthier Alternatives for the Recipe
Reduce Sugar Content
You can safely reduce the sugar in the lemon curd by up to 25% (using 1/2 cup plus 2 tablespoons instead of 3/4 cup) without significantly compromising texture or flavor. The natural tartness of lemons shines through more prominently with less sugar, creating a more sophisticated, less cloying taste that many adult palates prefer.
Lighten the Cream Cheese Layer
Replace half the cream cheese with Greek yogurt (thick, strained variety) to cut calories and fat while adding protein and probiotics. This substitution creates a tangier flavor profile that complements the lemon beautifully. Alternatively, use Neufchâtel cheese (about 30% less fat than regular cream cheese) for a lighter option that maintains the creamy texture.
Make it Gluten-Free
Substitute the Biscoff cookies with gluten-free gingersnaps, graham crackers, or vanilla wafers. Many brands now offer excellent gluten-free speculoos-style cookies that taste remarkably similar to traditional Biscoff. The crust texture remains identical regardless of which gluten-free cookie you choose.
Dairy-Free Adaptation
Create a completely dairy-free version by using coconut cream (the thick part from chilled canned coconut milk) in place of heavy cream, dairy-free cream cheese, and vegan butter. The coconut flavor pairs exceptionally well with lemon, adding a subtle tropical note that enhances rather than overwhelms the dessert.
Portion Control Version
Instead of one large tart, create individual mini tarts using a muffin tin lined with paper cups. This built-in portion control makes serving easier and helps guests enjoy the indulgence without overconsuming. Each mini tart contains approximately 190 calories, making them perfect for parties or meal prep.
Serving Suggestions
This no-bake lemon Biscoff tart shines as the grand finale to both casual family dinners and elegant dinner parties. Its bright, refreshing flavor profile makes it an ideal palate cleanser after rich, heavy meals. Serve chilled slices on individual dessert plates, accompanied by a small dollop of unsweetened whipped cream to balance the sweetness.
For an elevated presentation, drizzle each slice with a simple raspberry coulis (pureed fresh raspberries strained to remove seeds) or a passion fruit sauce. The additional tartness and visual contrast of red or golden sauce against the pale yellow lemon creates a restaurant-quality dessert that photographs beautifully for social media enthusiasts.
Pair your tart with complementary beverages: hot Earl Grey tea brings out the citrus notes, while a glass of chilled Moscato d’Asti or sweet Riesling creates a sophisticated wine pairing. For non-alcoholic options, sparkling lemonade or chamomile tea with honey enhances the lemon flavor without competing with it.
Consider serving this dessert during spring and summer gatherings when lighter, fruit-forward desserts are most appealing. It’s particularly perfect for Mother’s Day brunches, Easter celebrations, bridal showers, or garden parties where its bright yellow color and fresh flavor complement the seasonal mood.
For a deconstructed presentation that’s currently trending in high-end restaurants, serve the components separately: a quenelle of lemon curd, a small square of Biscoff crust, a swoosh of cream cheese mixture, and garnishes arranged artfully on the plate. This modern plating technique allows diners to experience each element individually before combining flavors to their preference.
Common Mistakes to Avoid
Mistake 1: Using Cold Cream Cheese
Attempting to beat cold, firm cream cheese results in a lumpy filling riddled with hard chunks that refuse to incorporate smoothly. Always allow cream cheese to sit at room temperature for at least 30-45 minutes before beginning. If you’re short on time, cut the cream cheese into small cubes to speed up the softening process, but never microwave it, as this can cause uneven heating and alter the texture.
Mistake 2: Adding Hot Lemon Curd to the Tart
Pouring warm or hot lemon curd over the cream cheese layer causes the cream cheese to melt, creating a muddy, indistinct layer instead of clean, separate components. Always allow lemon curd to cool to room temperature, or even chill it briefly in the refrigerator before assembly. Patience here prevents disaster and ensures your tart maintains its beautiful layered appearance when sliced.
Mistake 3: Not Pressing the Crust Firmly Enough
A loosely packed crust crumbles when you attempt to slice the tart, creating messy servings that fall apart on the plate. Apply significant pressure when forming the crust, using the bottom of a flat glass or measuring cup to compact the cookie crumbs. The mixture should feel solid and hold together firmly—if it doesn’t, you haven’t pressed hard enough.
Mistake 4: Skipping the Straining Step for Lemon Curd
While it might seem like an unnecessary extra step, straining the lemon curd removes any bits of cooked egg or larger pieces of zest that create an unpleasant texture. This simple action transforms good lemon curd into exceptionally smooth, professional-quality curd that melts on the tongue. It takes only 30 seconds and makes a significant difference in the final product.
Mistake 5: Rushing the Chilling Time
Attempting to serve this tart after only 2-3 hours of chilling results in a messy, unstable dessert that oozes when sliced. The full 4-hour minimum (or preferably overnight) chilling period allows all layers to set completely and makes clean slicing possible. Make-ahead desserts exist to eliminate stress—embrace the waiting period and plan accordingly.
Mistake 6: Over-Whisking the Lemon Curd
Once your lemon curd reaches the proper thickness, continued whisking on high heat can cause it to break, becoming grainy or separated. The key is gentle, constant stirring over medium-low heat, removing the pan from heat the moment it coats the back of a spoon. Remember that the curd continues to thicken as it cools, so slightly under-thick is better than over-cooked.
Storing Tips for the Recipe
Refrigerator Storage
Store your no-bake lemon Biscoff tart covered loosely with plastic wrap or aluminum foil in the refrigerator for up to 5 days. The Biscoff crust may soften slightly over time as it absorbs moisture from the fillings, but the flavor remains excellent. For best texture, consume within 3 days of preparation. If storing for longer periods, consider placing the tart in an airtight container to prevent it from absorbing refrigerator odors.
Freezing Instructions
This tart freezes surprisingly well for up to 2 months when properly wrapped. Prepare the tart completely, freeze it uncovered for 1 hour until the surface is solid, then wrap tightly in plastic wrap followed by aluminum foil. Label with the date and contents. To thaw, transfer the wrapped tart to the refrigerator 24 hours before serving, allowing it to defrost slowly. Note that the texture of the cream cheese layer may become slightly more dense after freezing, but the flavor remains intact.
Make-Ahead Strategy
For maximum convenience when entertaining, prepare the Biscoff crust up to 3 days in advance and store it covered in the refrigerator. The lemon curd can be made 4-5 days ahead and stored in an airtight container in the refrigerator—simply give it a good stir before using to restore smoothness. Assemble the complete tart 1-2 days before your event, allowing flavors to meld and eliminating last-minute stress.
Individual Component Storage
If you’ve made extra lemon curd (and you should—it’s delicious on everything), store it in a clean glass jar with a tight-fitting lid for up to 2 weeks in the refrigerator. Press plastic wrap directly onto the surface of the curd before sealing to prevent a skin from forming. Extra Biscoff crust mixture keeps well in an airtight container in the refrigerator for up to a week or frozen for up to 3 months.
Conclusion
This No-Bake Lemon Biscoff Tart proves that impressive, restaurant-quality desserts don’t require professional training, expensive equipment, or hours of labor. By combining the warming spice notes of Biscoff cookies with bright, tangy lemon curd and silky cream cheese, you create a sophisticated dessert that delivers easy dessert bliss with minimal effort. The beauty of this recipe lies in its versatility—customize it with different cookie bases, adjust sweetness levels, or modify ingredients to accommodate dietary restrictions without sacrificing flavor or presentation.
Whether you’re preparing dessert for a special celebration, bringing a dish to a potluck, or simply treating yourself to something extraordinary, this no-bake lemon Biscoff tart consistently impresses. The make-ahead nature eliminates stress, while the stunning appearance and complex flavor profile make you look like a baking genius with insider secrets.
Ready to experience dessert bliss? Gather your ingredients, follow these straightforward steps, and prepare to accept compliments on your seemingly effortless baking prowess. Don’t forget to share your creation on social media and tag us with your beautiful tart photos—we love seeing your delicious results! Have questions or want to share your own variations? Drop a comment below and join our community of dessert enthusiasts who believe that extraordinary food should be accessible to everyone.
FAQs
Q: Can I use store-bought lemon curd instead of making it from scratch?
A: Absolutely! High-quality store-bought lemon curd works perfectly in this recipe and saves considerable time. Look for brands with minimal ingredients and a thick, creamy consistency. You’ll need approximately 1.5 cups (360ml) of prepared lemon curd to adequately cover the cream cheese layer. Taste it first and adjust the sweetness of your cream cheese layer accordingly—some commercial curds are sweeter than homemade versions.
Q: What can I substitute for Biscoff cookies if I can’t find them?
A: Several excellent alternatives work beautifully: graham crackers create a classic, mild-flavored crust; gingersnaps add extra spice that complements the lemon; vanilla wafers produce a neutral, buttery base; or digestive biscuits offer a less sweet option. The key is choosing a cookie that’s sturdy enough to hold up when crushed and mixed with butter. Aim for approximately 300g (about 2.5 cups of crumbs) regardless of which cookie you select.
Q: My lemon curd turned out grainy. What went wrong?
A: Grainy lemon curd typically results from cooking at too high a temperature, causing the eggs to scramble rather than creating a smooth custard. The solution is patience: cook over medium-low heat while whisking constantly, and never let the mixture boil. If your curd does become slightly grainy, strain it through a fine-mesh sieve while still hot, pressing firmly with a spoon to push the smooth custard through while leaving the grainy bits behind. For future batches, consider using a double boiler for more gentle, controlled heat.
Q: How can I tell when my lemon curd is thick enough?
A: The classic test is coating the back of a spoon: dip a metal spoon into the curd, run your finger across the back, and if the line holds clean without the mixture running back together, it’s ready. The temperature should reach approximately 170-175°F (77-80°C) if you’re using a thermometer. Remember that lemon curd continues thickening as it cools, so slightly under-thick is preferable to over-cooked. The consistency should resemble thick honey or pudding.
Q: Can I make this tart without a tart pan?
A: Yes! A 9-inch springform pan produces excellent results with easier removal, while a standard 9-inch pie dish creates a more casual presentation that’s equally delicious. You can even make individual portions in ramekins, small jars, or a muffin tin lined with paper cups. The recipe quantities remain the same—just adjust your assembly technique to accommodate your chosen vessel. The tart may be slightly thicker in a pie dish since they’re typically shallower than tart pans.
Q: Why is my crust falling apart when I slice the tart?
A: This common issue usually stems from insufficient pressing when forming the crust or not allowing adequate chilling time. The solution: press the cookie-butter mixture very firmly into the pan, using significant pressure with the bottom of a glass to compact it. Ensure you’ve used enough melted butter (6 tablespoons) to bind the crumbs—the mixture should hold together when squeezed. Finally, chill the complete tart for at least 4 hours or overnight before slicing, and use a sharp knife dipped in hot water (wiped dry) for the cleanest cuts.
Q: How far in advance can I make this dessert?
A: This tart actually improves when made 1-2 days ahead, allowing flavors to develop and meld while the texture sets perfectly. Prepare it up to 3 days before serving, storing it covered in the refrigerator. Add garnishes just before serving to maintain their fresh appearance. For even more advanced preparation, make the crust and lemon curd up to 5 days ahead, storing them separately, then assemble the complete tart 1-2 days before your event. This make-ahead flexibility makes it ideal for stress-free entertaining.


")

